3.FoxBit Development Board User Manual
1. Introduction
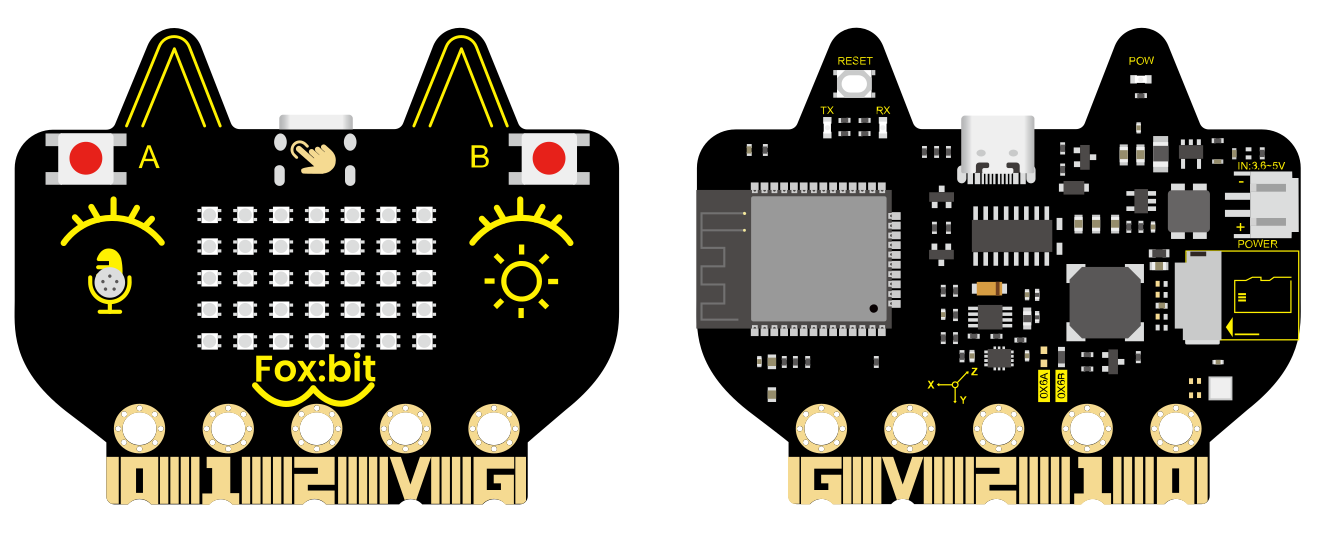
FoxBit is a multi-functional development board centered on ESP32, targeting IoT, STEAM education, intelligent control, and various DIY maker projects. It is equipped with a variety of sensors and peripherals on the board so can achieve wireless communication via Wi-Fi/BLE. It features high performance but low power consumption and is suitable for a wide range of needs from beginners to professional developers.
2. Core Properties
ESP32 dual-core 240 MHz, 520 KB SRAM + 4 MB Flash, supports FreeRTOS
2.4GHz Wi-Fi (802.11 b/g/n, up to 150 Mbps) + Bluetooth v4.2 (BR/EDR & BLE)
On-board sensors:
AHT20 Temperature and humidity sensor
QMI8658C six-axis IMU sensor
Photoresistor
MEMS microphone
On-board peripherals:
Buzzer
5 × 7 WS2812 RGB dot matrix
SD card slot
Two buttons + 7 touch channels
Rich expansions: 19 digital I/O channels, 13 PWM channels, 2 DAC channels, SPI/I2C/UART all open
Low-power design, battery-powered, with a current detection interface for easy power consumption analysis
3. Technical Parameters
3.1 Power Mode
Mode |
Connector |
Description |
|---|---|---|
USB power supply |
USB-C |
5 V / 1 A adapter recommended |
DC port |
PH2.0 |
5 V lithium battery pack |
Gold finger pins |
3V3 / GND |
Peak current ≈ 1 A |
Operating voltage: 3.3V | Peak current: ≈ 1000mA (All leds on)
3.2 Microcontroller
• Model: ESP32-D0WDQ6
• Dual-core Xtensa LX6
• Up to 240 MHz
3.3 Wireless Communication
Protocol |
Frequency band |
Remarks |
|---|---|---|
Wi-Fi 802.11 b/g/n |
2.412 – 2.484 GHz |
20/40 MHz channel |
Bluetooth BR/EDR & BLE |
2.402 – 2.480 GHz |
Supports CVSD/SBC audio |
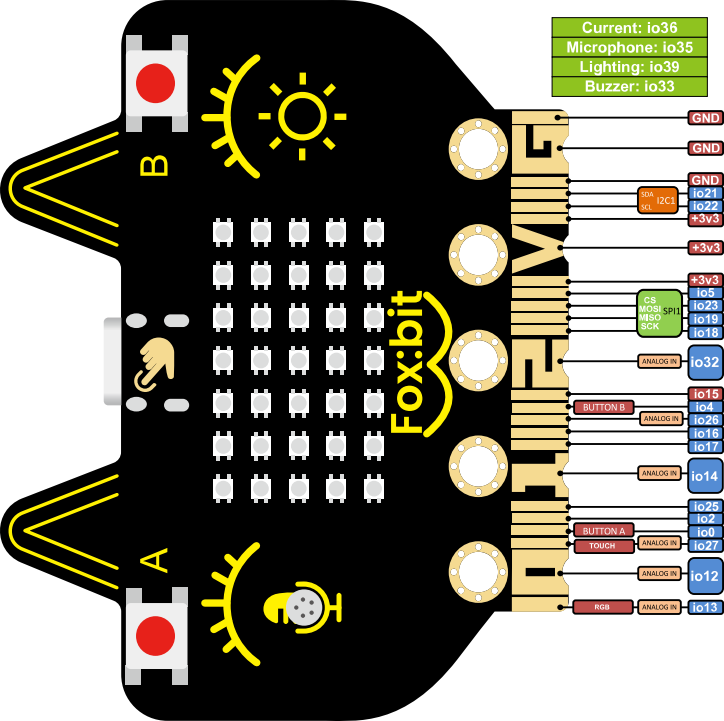
3.4 On-board Resource Distribution
Module |
Interface type |
Default GPIO |
Description |
|---|---|---|---|
Button A / B |
Digital input |
0 / 4 |
Developer Button |
Logo touch |
Touch input |
27 |
Capacitive touch |
Temperature and humidity AHT20 |
I2C |
SDA 21 / SCL 22 |
Environmental monitoring |
Six-axis IMU |
I2C |
ditto |
Posture perception |
Photoresistor |
ADC |
39 |
Ambient light |
Microphone |
ADC |
35 |
Sound |
buzzer |
PWM |
33 |
Prompt sound / music |
RGB dot matrix 5 × 7 |
Single line |
13 |
35 WS2812 |
SD card slot |
SPI |
CS 5 / MOSI 23 / MISO 19 / SCK 18 |
Storage expansion |
Current detection |
ADC |
36 |
Power supply monitoring |
4. Driver & Development Environment
4.1 USB-to-serial Driver (CH340)
FoxBit is equipped with CH340 chip. Before connecting to the computer for the first time, the corresponding driver must be installed; otherwise, the IDE will not recognize the serial port.
Please download a driver according to your system:
https://docs.keyestudio.com/en/latest/docs/Download_Center/Download_Center.html#driver-download
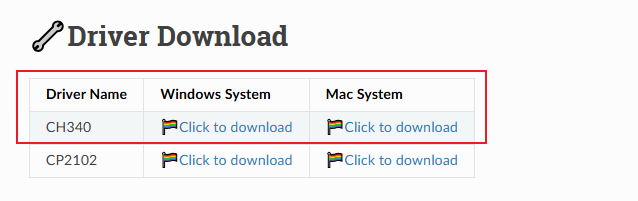
Windows
Download
CH341SER.EXE, and double-click to run and then【install】.
macOS
For macOS 11+, it usually plug and play. If it cannot be recognized, download the
CH34xVCPDriver.pkgwith the identificationmacOS.After installation, go to “System Settings ▸ privacy & security” to allow the driver to load and restart.
Terminal execute
ls /dev/cu.*and you will see/dev/cu.wchusbserialXXXX.
Linux
Most released versions come with built-in
ch341modules, sodmesg | grep ttyUSBwill showttyUSB0.If it does not load automatically, run
sudo modprobe ch341and check/dev/ttyUSB*again.After installation, please select the corresponding serial number (COMx / ttyUSBx / cu.wchusbserial) in MicroBlocks.
4.2 MicroBlocks IDE
Enter https://microblocks.fun/download to download an installation package suitable for the system.
After installation, start the IDE. A gray indicator at the lower right corner indicates that it is not connected.
The FoxBit development board is connected to the computer via a Type-C cable.
Select update firmware on board in the drop-down box from the “Gear” at the top of Microblocks.
Select FoxBit and update the firmware. You need to wait for a few seconds.
After the firmware is updated, click 「Connect」 → select the corresponding serial port → OK. The appearance of a small green dot in the status bar indicates that it is connected. The model of the board is FoxBit, and its extension library is automatically displayed on the left side.
5. Typical Application Scenarios
Internet of Things (IoT) : Wi-Fi/BLE direct connection to the cloud, enabling smart home, environmental monitoring, and remote control.
STEAM Education : Integrating multiple sensors and combining with graphical programming, to help students quickly get started with hardware development.
Intelligent Control : Rich I/O and PWM, suitable for robots and automated equipment.
DIY Creation : RGB dot matrix + buzzer + IMU, capable of creating interactive lights, mini-games, etc.
6. FAQ
Questions |
Solutions |
|---|---|
IDE cannot find the board model |
check the USB cable and CH340 driver, |
Report “I²C busy” when downloading script |
The previous script occupied the bus; |
No responce on the LED matrix |
Ensure that the power supply is sufficient |
Cannot connect to Wi-Fi |
It only supports 2.4GHz; |