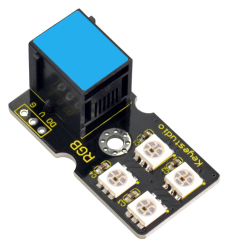
KS0370 EASY plug 2812 2x2 Full Color RGB Module (Black and Eco-friendly)
1. Introduction
EASY plug 2812 2x2 full color RGB module is a smart external control LED light source that integrates control circuit and lighting circuit.
Each LED has the same appearance as a 5050 LED bead, and each component is a pixel point.
The pixel point includes an intelligent digital interface data latch signal shaping and amplifying driving circuit, as well as a high-precision internal oscillator and a 12V high-voltage programmable constant current control part, which effectively ensures that the color of the pixel point light is highly uniform.
The data protocol adopts the single-line return-to-zero code communication mode. After power-on and reset the pixel point, the S pin receives the data transmitted from the controller. And the 24-bit data are extracted by the first pixel and then sent to the data latch inside the pixel point.
LED has advantages of low voltage drive, environmental protection and energy saving, high brightness, wide scattering angle, good consistency, ultra low power, long life and so on.
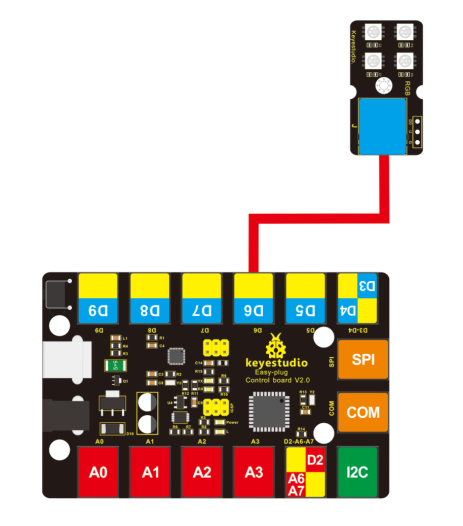
You can easily connect it to EASY Plug control board for communication using a RJ11 cable.
Special Note:
The sensor/module is equipped with the RJ11 6P6C interface, compatible with our keyestudio EASY plug Control Board with RJ11 6P6C interface.
If you have the control board of other brands, it is also equipped with the RJ11 6P6C interface but has different internal line sequence, can’t be used compatibly with our sensor/module.
2. Parameters
Operating Voltage: DC5V
Power: 0.1W
Light Source: SMD 5050 RGB
IC model: 4 / WS2812
Gray level: 256 levels
Illumination angle: 180°
Luminous color: can be adjusted by the controller, white, red, yellow, blue, green, etc.
3. Technical Details
Dimensions: 38mm * 20mm * 18mm
Weight: 4.5g
4. Connect It Up
5. Upload the Code
Download Resources : Resources
Note: before uploading the code, you need to import the library files; otherwise, the code upload will fail.
#include <Adafruit_NeoPixel.h>
#ifdef __AVR__
#include <avr/power.h>
#endif
#define PIN 6

// Parameter 1 = number of pixels in strip
// Parameter 2 = Arduino pin number (most are valid)
// Parameter 3 = pixel type flags, add together as needed:
//   NEO_KHZ800  800 KHz bitstream (most NeoPixel products w/WS2812 LEDs)
//   NEO_KHZ400  400 KHz (classic 'v1' (not v2) FLORA pixels, WS2811 drivers)
//   NEO_GRB     Pixels are wired for GRB bitstream (most NeoPixel products)
//   NEO_RGB     Pixels are wired for RGB bitstream (v1 FLORA pixels, not v2)
Adafruit_NeoPixel strip = Adafruit_NeoPixel(4, PIN, NEO_GRB + NEO_KHZ800);

// IMPORTANT: To reduce NeoPixel burnout risk, add 1000 uF capacitor across
// pixel power leads, add 300 - 500 Ohm resistor on first pixel's data input
// and minimize distance between Arduino and first pixel.  Avoid connecting
// on a live circuit...if you must, connect GND first.

void setup()
{
  // This is for Trinket 5V 16MHz, you can remove these three lines if you are not using a Trinket
  #if defined (__AVR_ATtiny85__)
    if (F_CPU == 16000000) clock_prescale_set(clock_div_1);
  #endif
  // End of trinket special code
  strip.begin();
  strip.show(); // Initialize all pixels to 'off'
}

void loop()
{
  // Some example procedures showing how to display to the pixels:
  colorWipe(strip.Color(255, 0, 0), 50); // Red
  colorWipe(strip.Color(0, 255, 0), 50); // Green
  colorWipe(strip.Color(0, 0, 255), 50); // Blue
  // Send a theater pixel chase in...
  theaterChase(strip.Color(127, 127, 127), 50); // White
  theaterChase(strip.Color(127, 0, 0), 50); // Red
  theaterChase(strip.Color(0, 0, 127), 50); // Blue
  rainbow(20);
  rainbowCycle(20);
  theaterChaseRainbow(50);
}

// Fill the dots one after the other with a color
void colorWipe(uint32_t c, uint8_t wait)
{
  for(uint16_t i=0; i<strip.numPixels(); i++)
  {
    strip.setPixelColor(i, c);
    strip.show();
    delay(wait);
  }
}

void rainbow(uint8_t wait)
{
  uint16_t i, j;
  for(j=0; j<256; j++)
  {
    for(i=0; i<strip.numPixels(); i++)
    {
      strip.setPixelColor(i, Wheel((i+j) & 255));
    }
    strip.show();
    delay(wait);
  }
}

// Slightly different, this makes the rainbow equally distributed throughout
void rainbowCycle(uint8_t wait)
{
  uint16_t i, j;
  for(j=0; j<256*5; j++) // 5 cycles of all colors on wheel
  {
    for(i=0; i< strip.numPixels(); i++)
    {
      strip.setPixelColor(i, Wheel(((i * 256 / strip.numPixels()) + j) & 255));
    }
    strip.show();
    delay(wait);
  }
}

//Theatre-style crawling lights.
void theaterChase(uint32_t c, uint8_t wait)
{
  for (int j=0; j<10; j++) //do 10 cycles of chasing
  {
    for (int q=0; q < 3; q++)
    {
      for (int i=0; i < strip.numPixels(); i=i+3)
      {
        strip.setPixelColor(i+q, c);    //turn every third pixel on
      }
      strip.show();
      delay(wait);
      for (int i=0; i < strip.numPixels(); i=i+3)
      {
         strip.setPixelColor(i+q, 0);        //turn every third pixel off
      }
    }
  }
}

//Theatre-style crawling lights with rainbow effect
void theaterChaseRainbow(uint8_t wait)
{
  for (int j=0; j < 256; j++) // cycle all 256 colors in the wheel
  {
    for (int q=0; q < 3; q++)
    {
      for (int i=0; i < strip.numPixels(); i=i+3)
      {
        strip.setPixelColor(i+q, Wheel( (i+j) % 255));    //turn every third pixel on
      }
      strip.show();
      delay(wait);
      for (int i=0; i < strip.numPixels(); i=i+3)
      {
        strip.setPixelColor(i+q, 0);        //turn every third pixel off
      }
    }
  }
}

// Input a value 0 to 255 to get a color value.
// The colours are a transition r - g - b - back to r.
uint32_t Wheel(byte WheelPos)
{
  WheelPos = 255 - WheelPos;
  if(WheelPos < 85)
  {
    return strip.Color(255 - WheelPos * 3, 0, WheelPos * 3);
  }
  if(WheelPos < 170)
  {
    WheelPos -= 85;
    return strip.Color(0, WheelPos * 3, 255 - WheelPos * 3);
  }
  WheelPos -= 170;
  return strip.Color(WheelPos * 3, 255 - WheelPos * 3, 0);
}
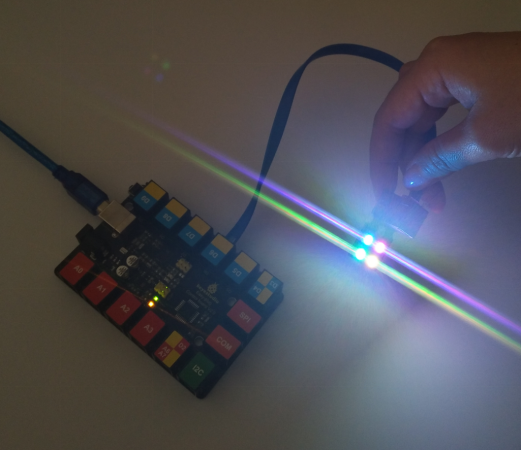
6. Result
After uploading the code, you should see the 4 RGB LEDs flash in different colors.