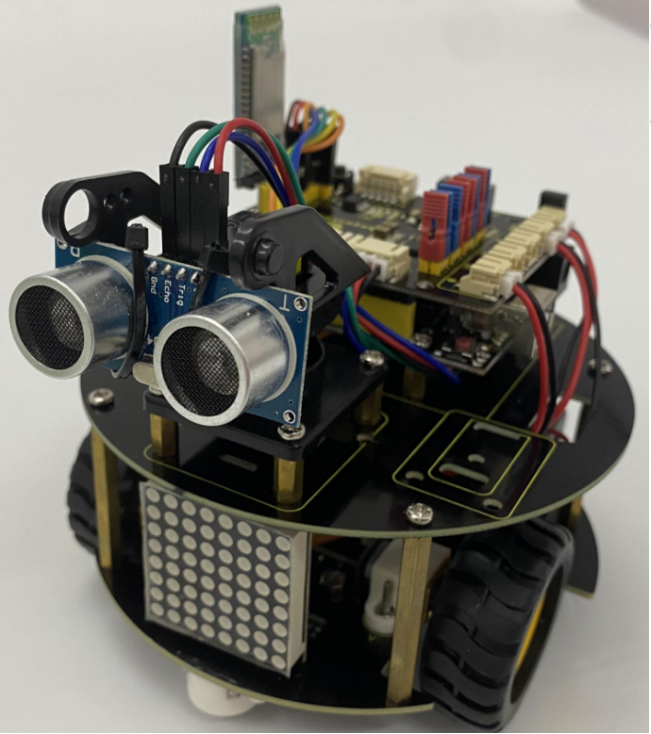
3. Smart Little Turtle Robot Installation
The whole assembling generally can be divided into two parts: assembling parts and wirings.
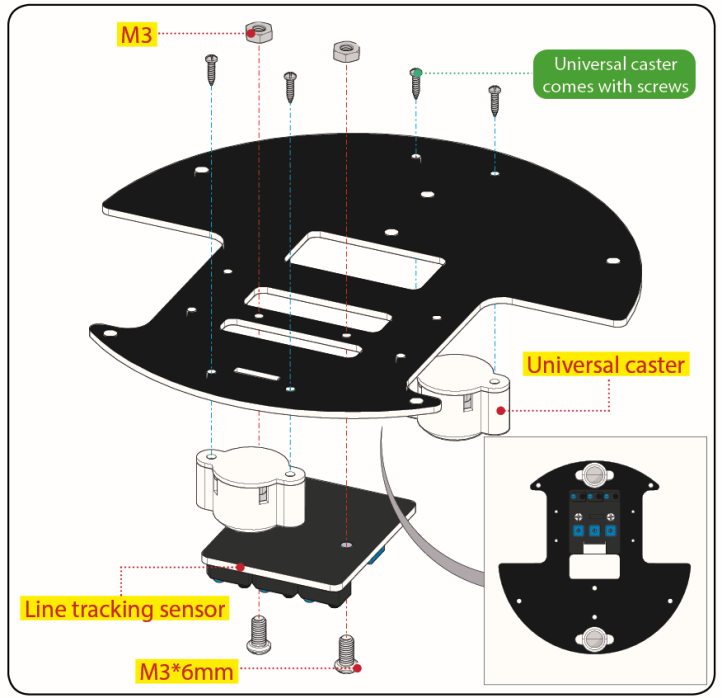
Step 1 : Bottom motor wheel
1.1
Required components
M3*6MM round-head screw *2
Nut M3 nickle plating *2
Bottom PCB*1
Tracking sensor *1
Universal caster *2
1.2
Step 2 : Assemble Parts
2.1
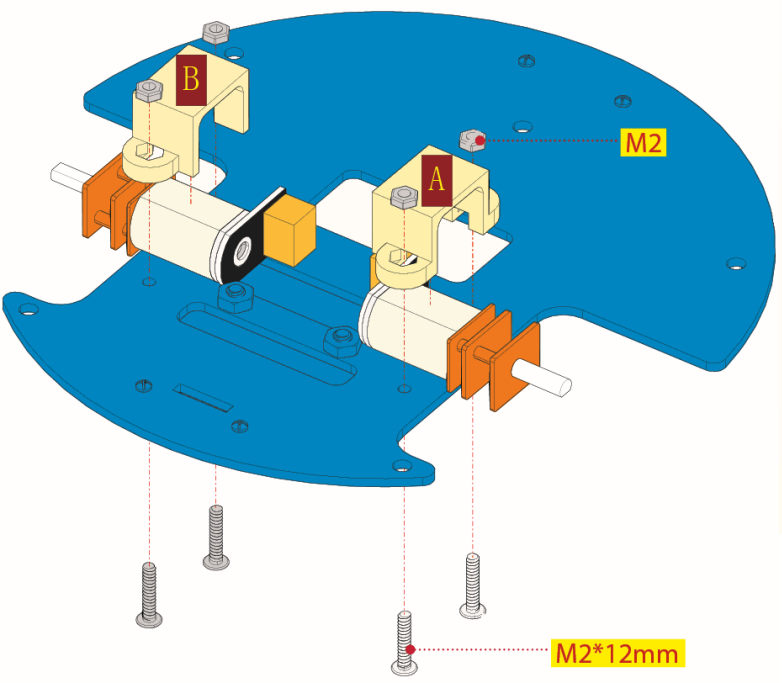
Required components
M2 Nut *4
12FN20 motor *2
U-type holder* 2
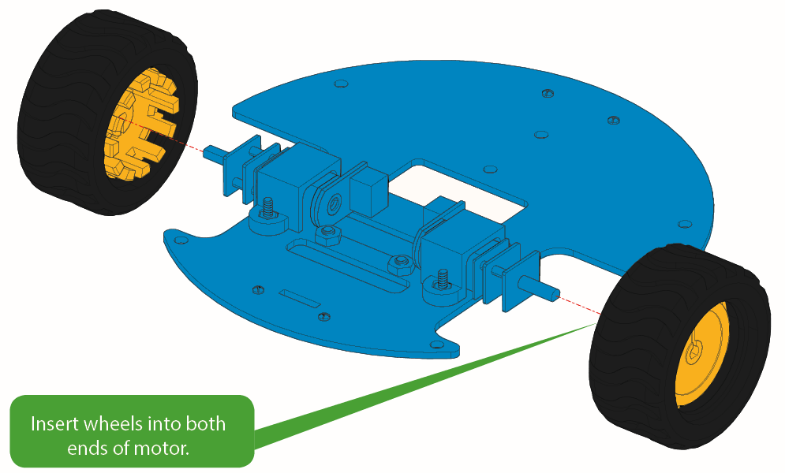
N20 motor wheel *2
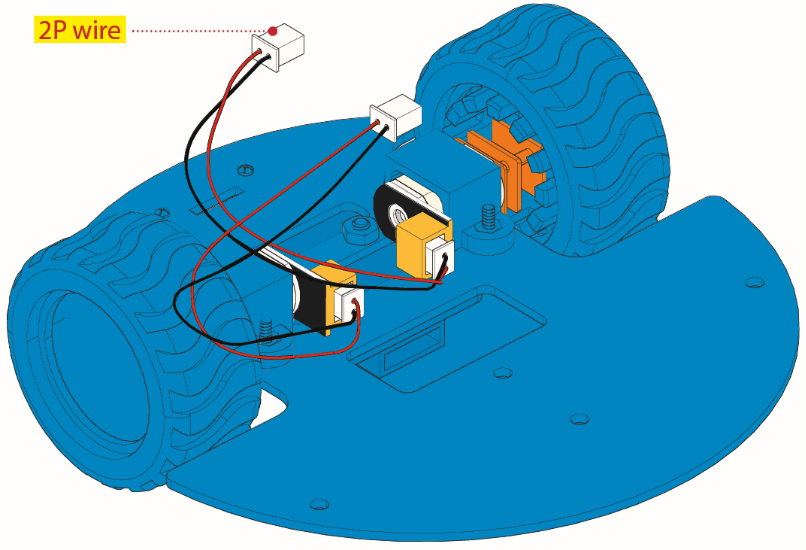
2P wire *2
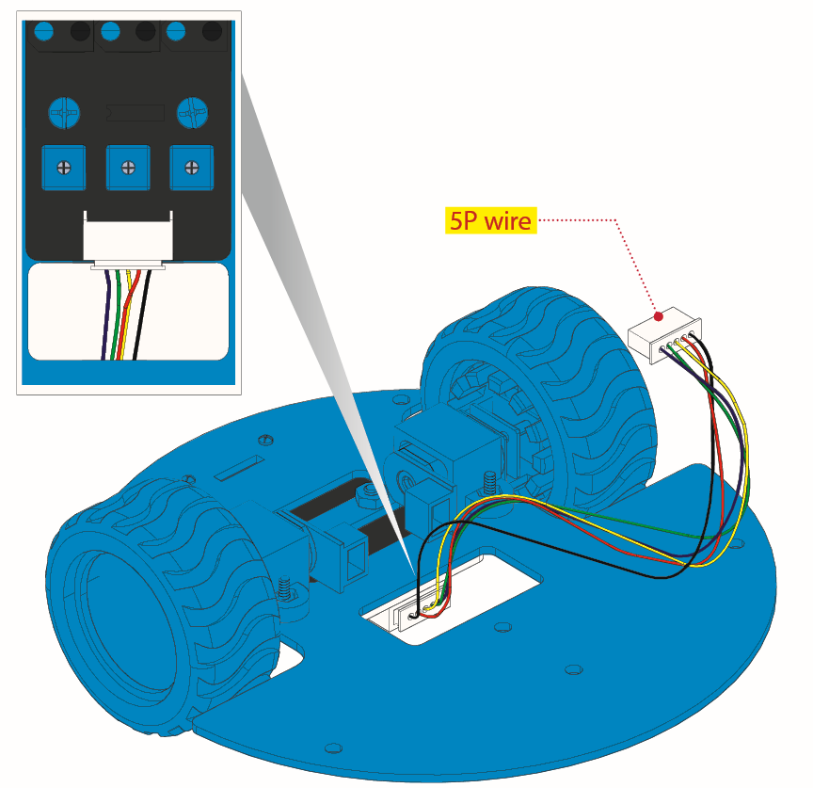
5P wire *1
M2*12MM round-head screw *4
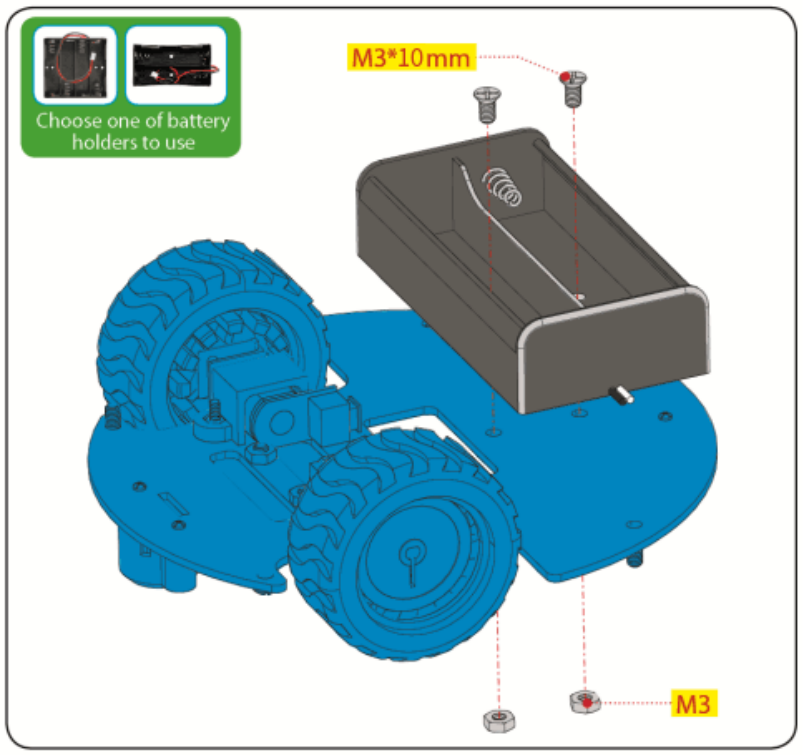
18650 battery holder *1
M3*10MM flat head screw *2
M3 nut *2
2.2
2.3
2.4
2.5
2.6
2.7
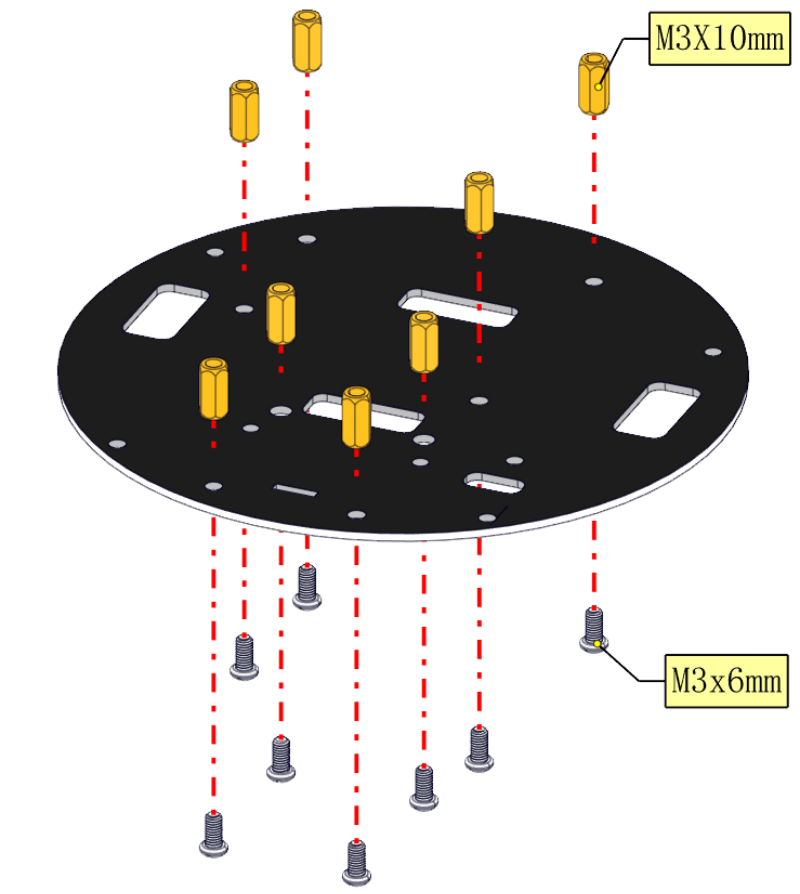
Step 3 : Install Top PCB
3.1
Required components
Top PCB *1
M3*6MM round-head screw *8
M3*10MM dual-pass copper pillar *8
3.2
Step 4 : Mount Control Board
4.1
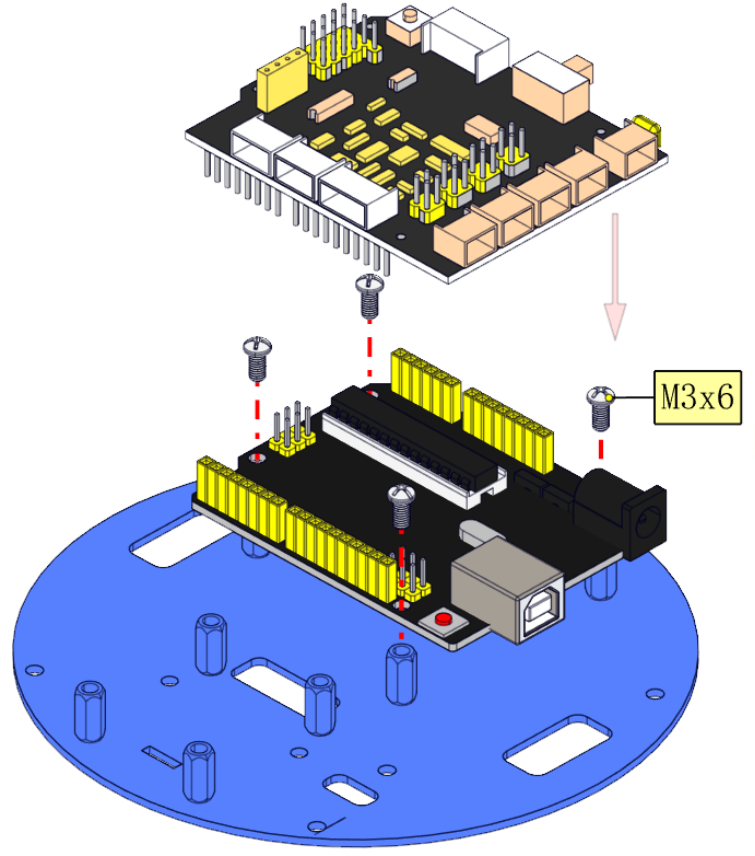
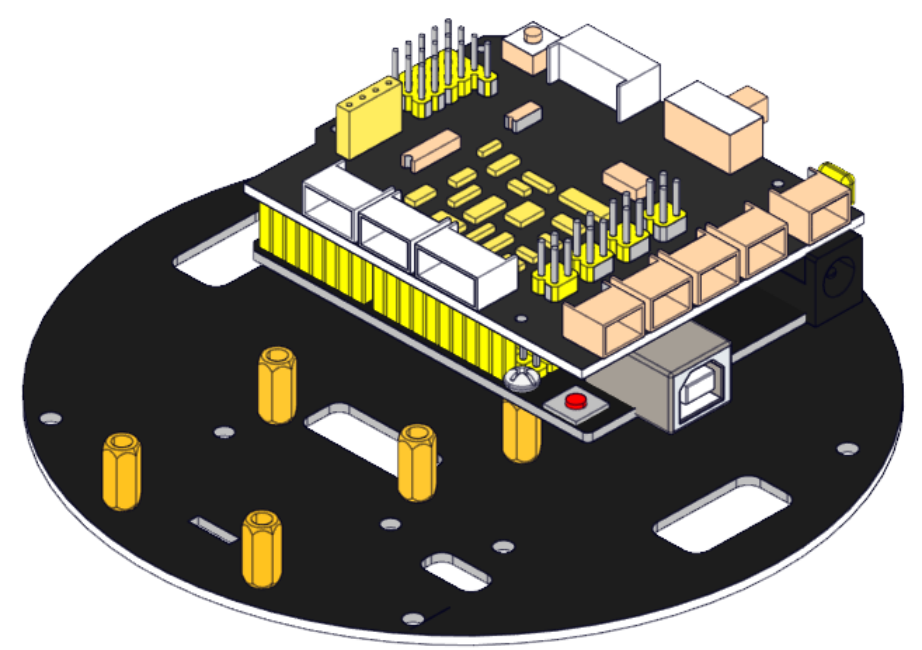
Required components
V4.0 board*1
8833 Motor drive shield*1
M3*6MM round-head screw *4
4.2
4.3
Step 5 : Servo plastic platform
5.1
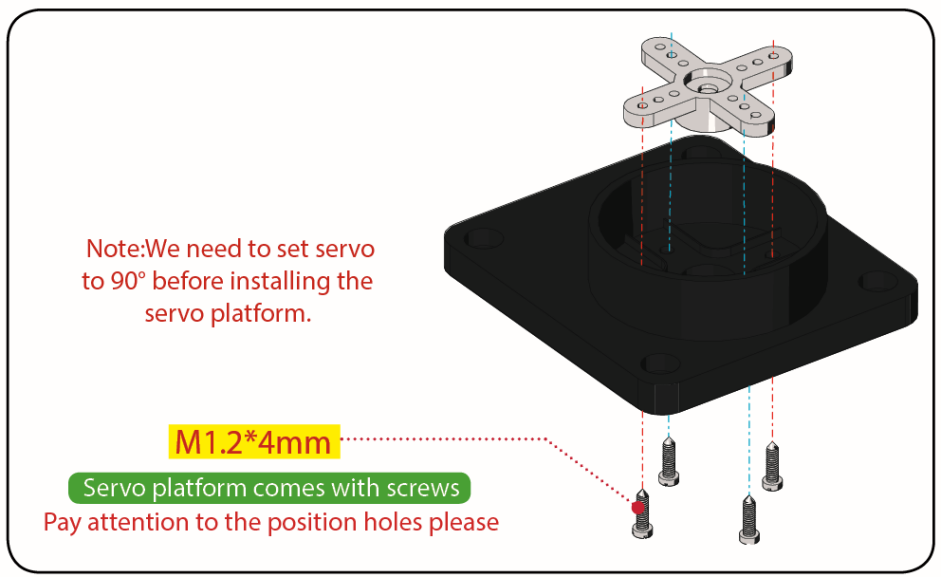
Required components
Servo *1
M2*4 screw (Inside the steering gear package)*1
Black cable tie*2
Ultrasonic sensor*1
Black plastic platform *1
M1.2*4 tapping screw *4
M2*8 tapping screw *2
5.2
5.3
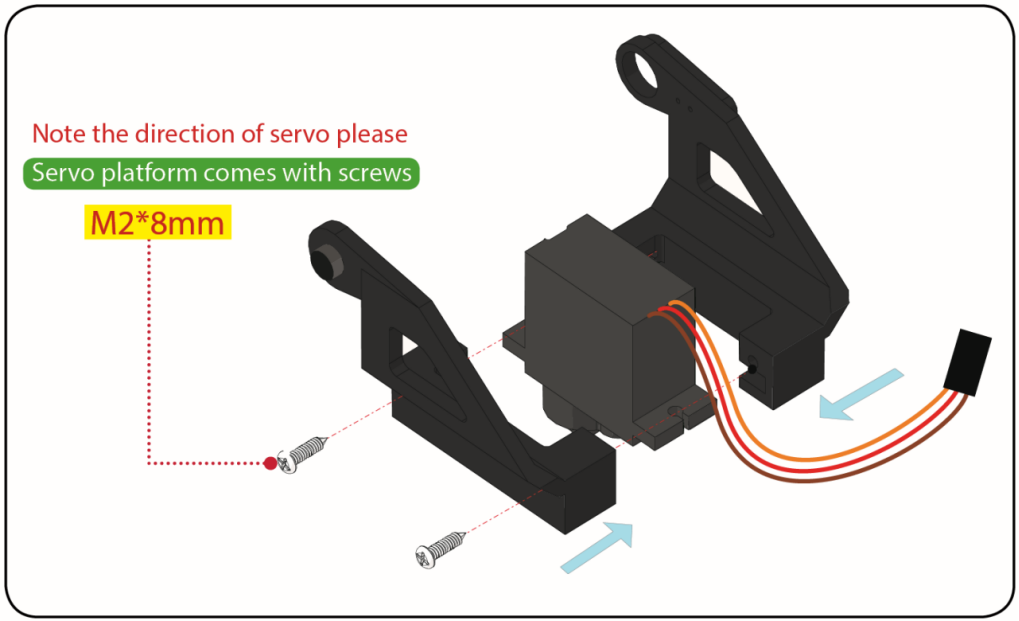
5.4
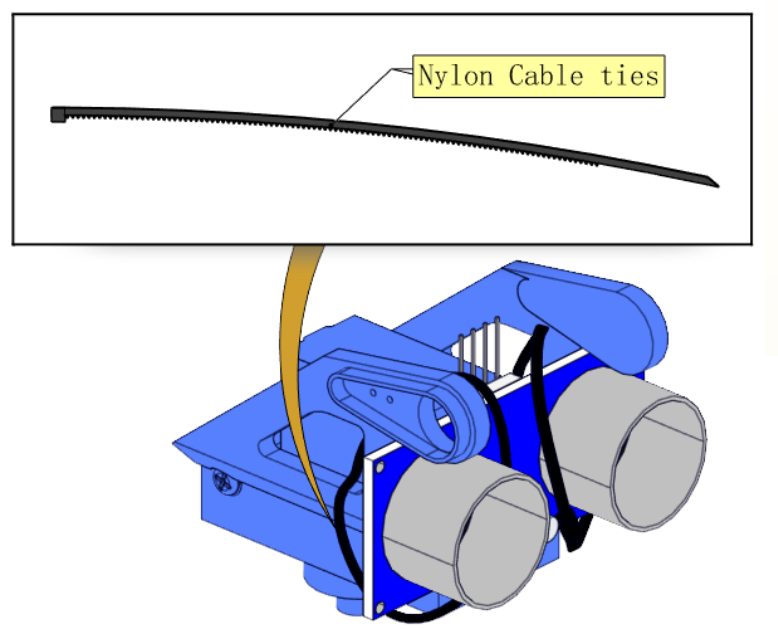
5.5
⚠️ Note:Initialize the steering gear, set the initial Angle of the steering gear to 90°, and the initialization code is as follows:
Steering gear Angle initialized
⚠️ Please first download the code for adjusting the Angle of the servo on the Car, and save it to the path that is convenient for you to use.
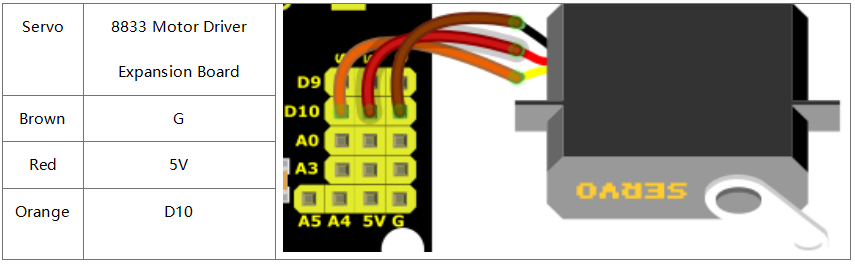
Connect the data cable of the servo to the pins of the 8833 Motor Drive Shield, and connect an external power supply.
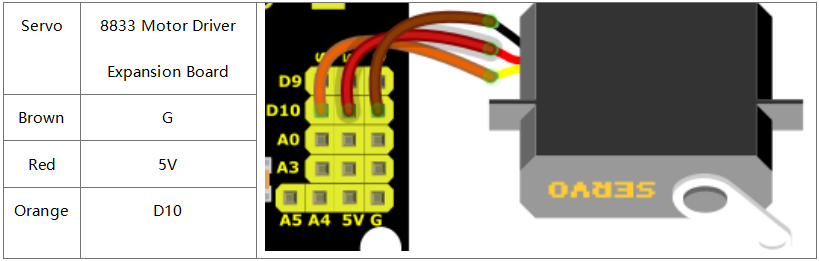
⚠️ Special reminder: Choose freely from the following two methods according to your own situation.
Method 1: Arduino code
⚠️ Special note: Before writing and uploading the code, you must install the Arduino IDE. Please go to the link: Arduino IDE Development Environment Configuration
/*
Set the 90-degree code,Copy the code and upload it to the development board. The steering gear connected to port D10 will rotate to 90 °
*/
const int servopin = 10;//set the pin of servo to D10
int myangle; //the angle variable of servo
int pulsewidth; // pulse width variable of servo
void setup() {
  servopulse(servopin,180); //set the angle of servo to 0°
  delay(1000);
  servopulse(servopin,0); // tell servo to go to position in variable 90°
  delay(1000);
  servopulse(servopin,90); // tell servo to go to position in variable 90°
  delay(1000);
}
void loop() {

}

// function to control servo
void servopulse(int servopin,int myangle)//the running angle of servo
{
  for(int i=0; i<20; i++)
  {
    pulsewidth = (myangle*11)+500;
    digitalWrite(servopin,HIGH);
    delayMicroseconds(pulsewidth);
    digitalWrite(servopin,LOW);
    delay(20-pulsewidth/1000);
  }
}
After uploading the above test code to the motherboard, if no rotation of the servo is found, you can press the reset button on the motherboard.
Method Two: KidsBlock(Scratch) Code
⚠️ Special note: Before writing and uploading the code, KidsBlock IDE must be installed. Please go to the link: KidsBlock IDE Development Environment Configuration
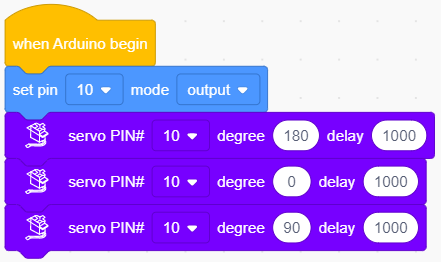
After uploading the above test code to the motherboard, if no rotation of the servo is found, you can press the reset button on the motherboard.
5.6
After initializing the initial angle of the servo, disconnect the data cable of the servo. For ease of assembly later on.
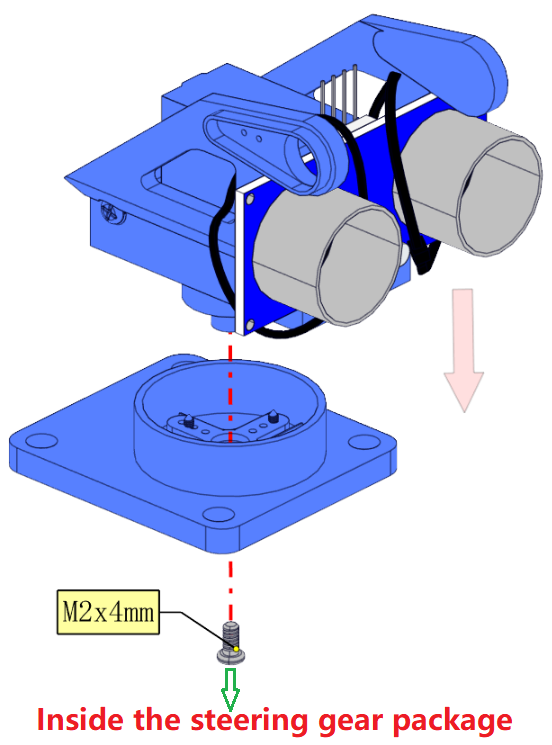
5.7
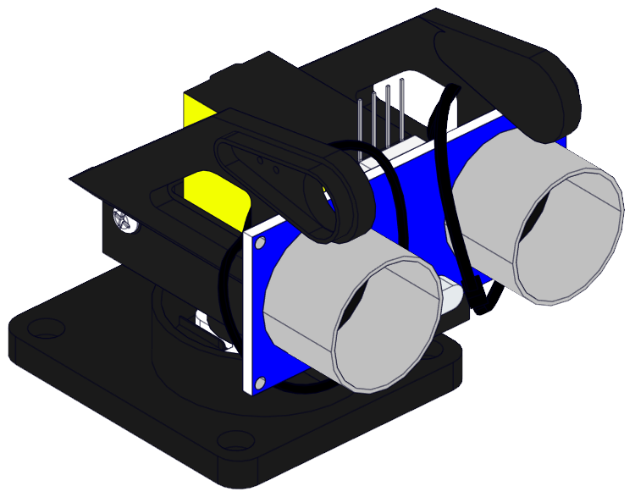
Step 6 : Final Assembly
6.1
Required components
F-F 20CM/Dupont Cable *4
M3*6MM round-head screw *12
M3*40MM copper pillar *4
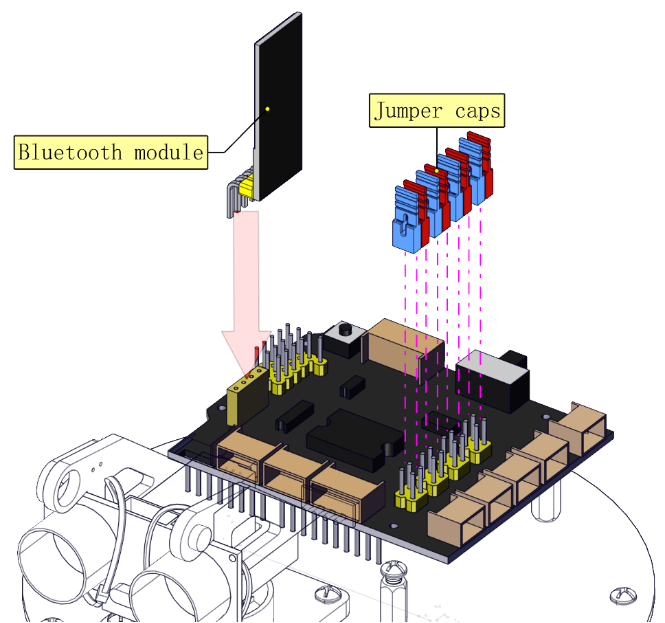
Bluetooth module *1
8x8 Dot Matrix *1
Jumper Cap *8
6.2
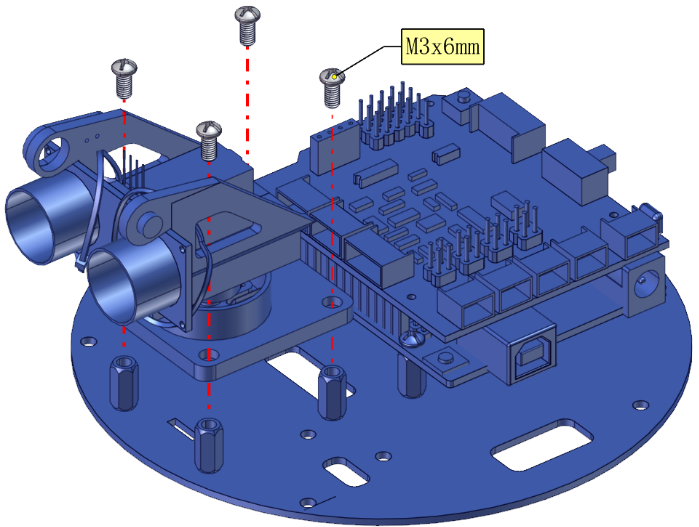
6.3
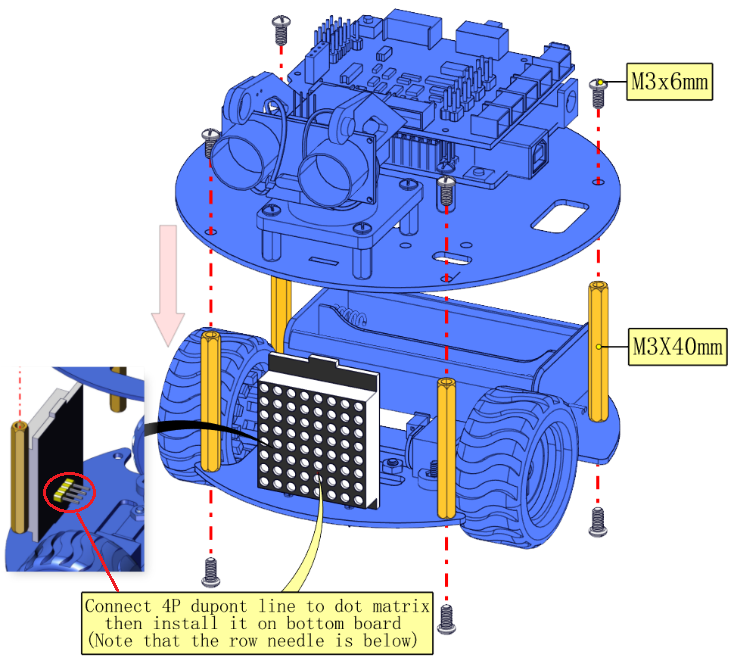
6.4
6.5
Step 7 : Hook-up Guide
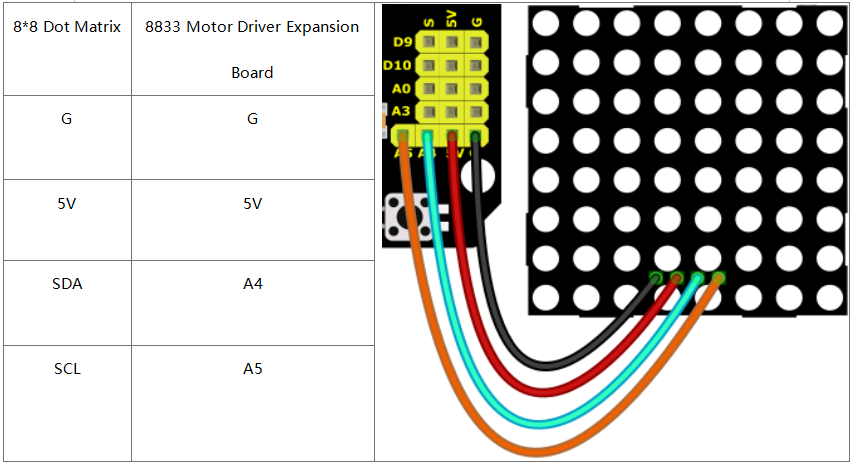
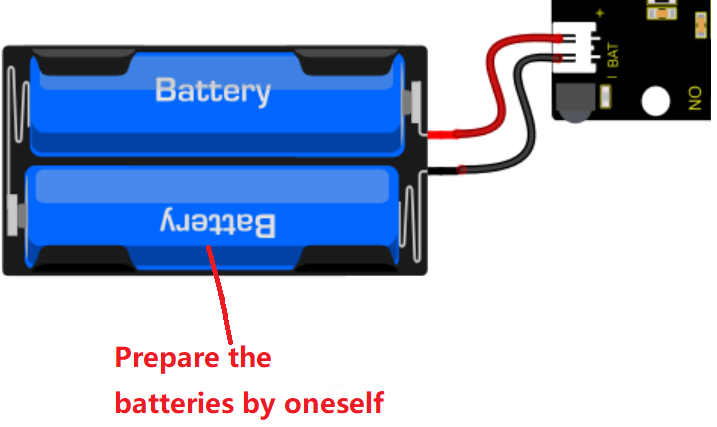
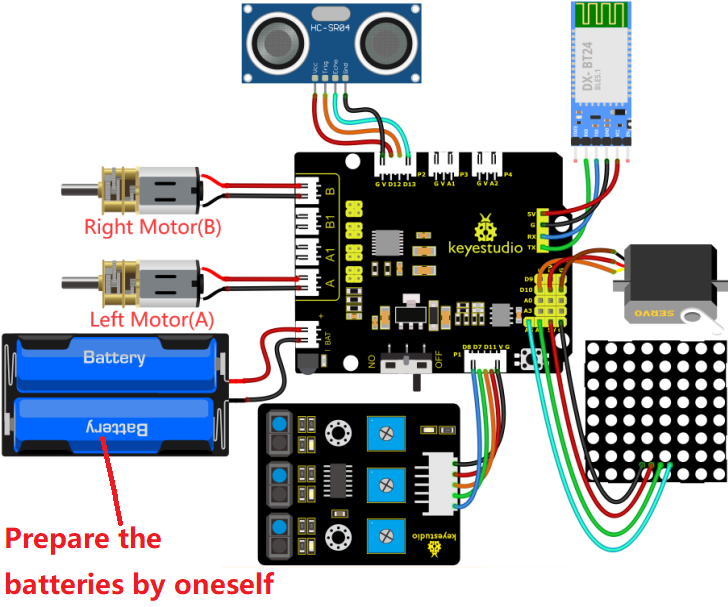
Wire up accordingly. Pay attention to the wire colors and directions.
7.1
7.2
7.3
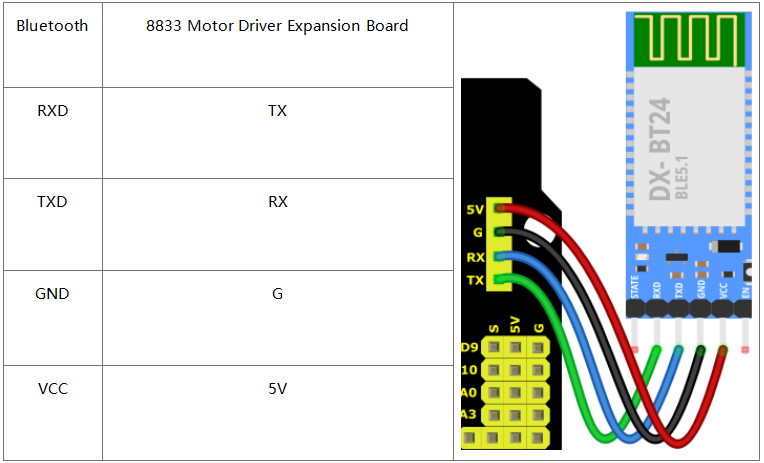
7.4
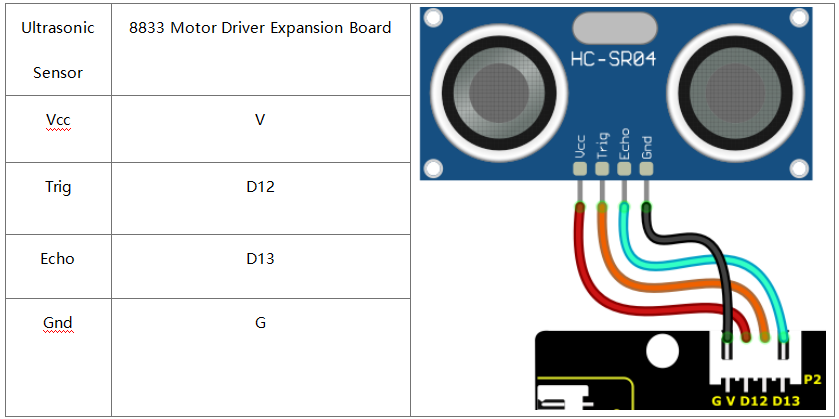
7.5
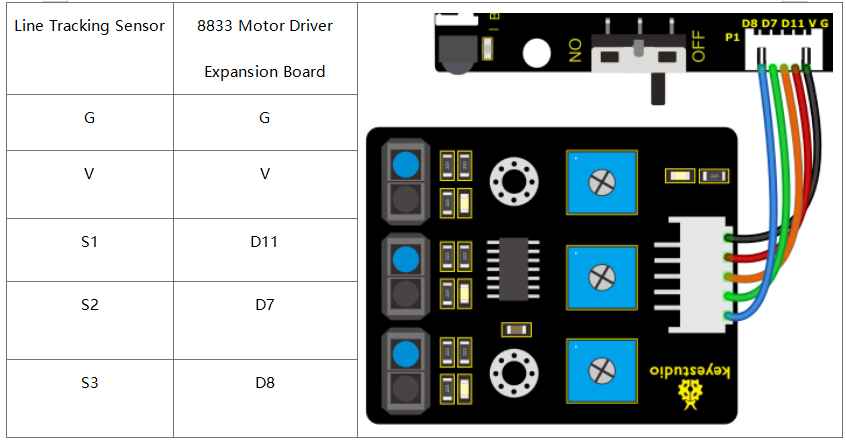
7.6
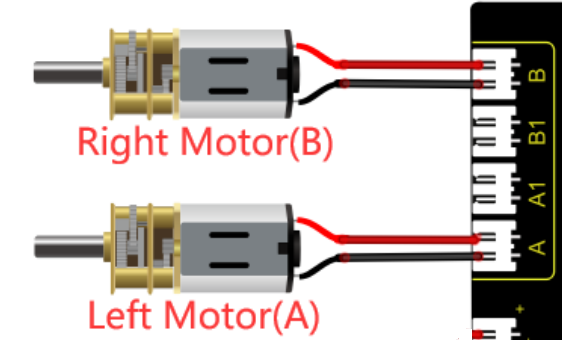
7.7
Overall wirings:
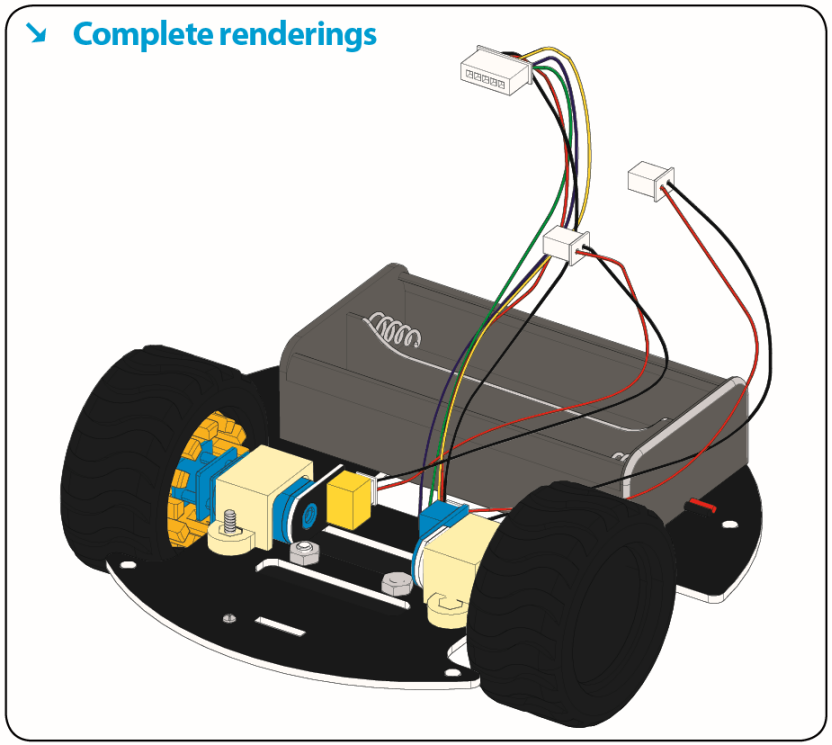
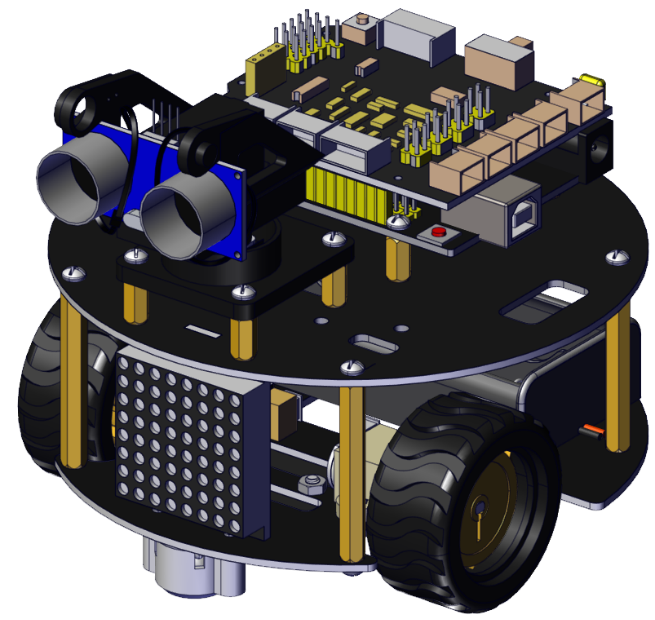
Step 8 : the complete little turtle car