Preparation for Python
1. Install Thonny
Thonny is a free and open source software platform with small size, simple interface, simple operation and rich functions. It is a Python IDE suitable for beginners. In this tutorial, we use this IDE to develop a Raspberry Pi Pico. Thonny supports multiple operating systems including Windows, Mac OS and Linux.
1.1. Download Thonny
1). Enter the website: https://thonny.org to download the latest version of Thonny.
2). Thonny open-source code library: https://github.com/thonny/thonny
Please follow the instructions on the official website or click the link below to download and install. (Please select the appropriate option based on your operating system.)
| System | Download link |
| MAC OS: | https://github.com/thonny/thonny/releases/download/v3.2.7/thonny-3.2.7.pkg |
| Windows: | https://github.com/thonny/thonny/releases/download/v3.2.7/thonny-3.2.7.exe |
| Linux: |
Binary bundle for PC (Thonny+Python): bash <(wget -O - https://thonny.org/installer-for-linux) With pip: pip3 install thonny Distro packages (may not be the latest version): Debian, Rasbian, Ubuntu, Mint and others: sudo apt install thonny Fedora: sudo dnf install thonny |

1.2. Install Thonny on Windows
1). The downloaded Thonny icon is as follows.
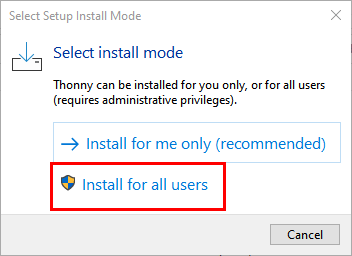
2). Double-click “Thonny-3.3.13.exe”. The following dialog box is displayed. I choose“ ”to operate. You can also select“
 ” to operate.
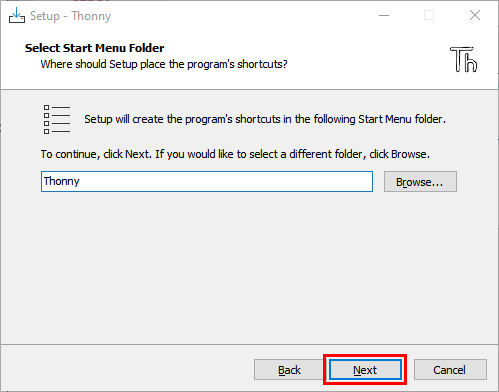
3). If you are not familiar with computer software installation, click “Next” until the installation is complete.


4). If you want to change the route of installing Thonny,just click“Browse…”to select a new route and click “OK”.
If you don’t want to change the route of installing Thonny, just click “Next”and then click“Next”again.

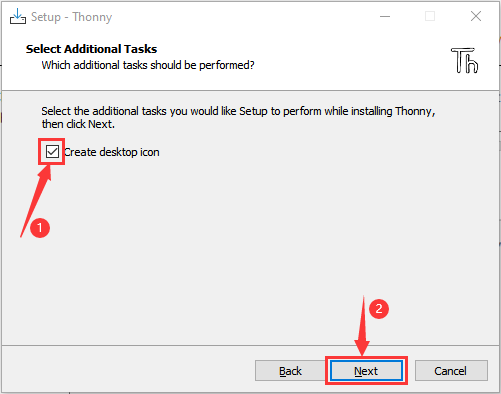
5). Select “Create Desktop Icon”. Thonny software will generate a shortcut on your desktop for you to open Thonny software later.
6). Click “Install”.

7). Wait for a while but don’t click Cancel.

8). Once we see the following screen, Thonny software has been successfully installed. Click “Finish”.

9). If we select “Create Desktop Icon” during the installation, the following icon will be displayed on the desktop.

1.3. Basic configuration of Thonny software
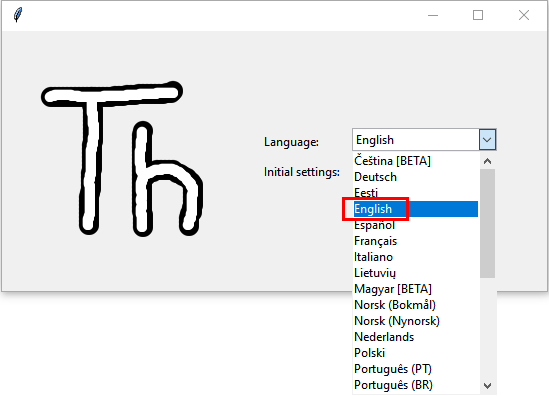
1). Double-click the desktop icon of Thonny software, we can see the following interface, and we can also choose the language and initial settings. Once set, click “Let’s Go!”


2). Select“View”→“File” and “Shell”


1.4. Update Micropython firmware
To run MicroPython programs on Raspberry Pi Pico, we first need to burn a firmware into Raspberry Pi Pico.
Why do we need to update the firmware?
The Raspberry Pi Pico can be programmed in both C and MicroPython, and which is shipped without MicroPython firmware, which we need to download before we can program with MicroPython.
Note: MicroPython Firmware only needs to be downloaded once and does not need to be downloaded again when programming with MicroPython. If we have downloaded the .uf2 firmware written in C, it will be overwritten, so the next time we use MicroPython, we need to update our Raspberry Pi Pico firmware by following the steps.
Download the Micropython Firmware
Method1: Raspberry Pi Pico official website:https://www.raspberrypi.com/documentation/microcontrollers/
1). Click the link above, we can see the following interface:

2). Scroll the mouse and we can see the following again:

3). Click MicroPython(Getting Started MicroPython) to go to the firmware download page.

Method 2: By clicking on the download link:
https://micropython.org/download/rp2-pico/rp2-pico-latest.uf2, we can download directly.
The procedures for burning MicroPython firmware
① Connect one end of the microUSB cable to the USB port of our computer.
② Long press the white button on the “Raspberry Pi Pico”(BOOTSEL). The Raspberry Pi Pico is then connected to the computer via the microUSB wire.

③ Release the button, when the connection is successful, open Device Manager on our computer, the computer will automatically recognize the removable disk (RPI-RP2), as shown below:

④ Copy the file (RP2-Pico-20210902-v1.17.uf2) to a removable disk(RPI-rp2) and wait for it to complete, just like copying the file to a USBflash drive.

⑤ Raspberry Pi Pico automatically restarts after the firmware is burned. After that, we can run Micropython.
1.5. Thonny connects to Raspberry Pi Pico
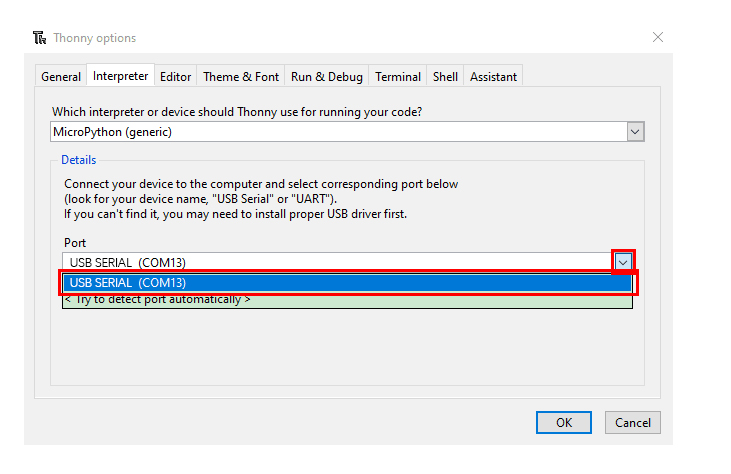
1). Open Thonny, click“Run”and select“Select interpreter…”

2). Select“Micropython (generic)”or“Micropython (Raspberry Pi Pico)”How to select“Micropython(generic)”? As follows:

3). Select USB-Serial (COMx). The COMx number may be different on different PCS. Just make sure we select “USB-Serial (COMx)”.
How to determine which port does the Raspberry Pi Pico communicate with our computer?
Step 1: When our Raspberry Pi Pico is not connected to the computer, open Thonny software, click “Run”, select “Select Interpreter”, the dialog will pop up, click “Port”, we can view the currently connected port, as shown in the picture below:

Step 2: Close the dialog box. Connect Raspberry Pi Pico to our computer, click  “Run” again and select “Select Interpreter”. Click “Port” in the window that is displayed to view the current port. Now add another port, so this port is used to communicate with the computer.
Select“Micropython(generic)”and port,and click“OK”.

When the following message is displayed on Thonny, then the Thonny successfully connects to the Raspberry Pi Pico.

So far, all the preparations have been made.
2. Test Code
2.1. Test Shell commands
In“Shell”window , type“print (Hello World!)”,press“Enter”.

2.2. Run Code Online:
To run Raspberry Pi Pico online, we need to connect the Raspberry Pi Pico to our computer, which allows us to compile or debug programs using Thonny software.
Advantages: You can compile or debug programs using Thonny software. Through the “Shell” window, we can view the error information and output results generated during the operation of the program, and query related function information online to help improve the program.
Disadvantages: To run Raspberry Pi Pico online, you must connect Raspberry Pi Pico to a computer and run it with Thonny software.
If the Raspberry Pi Pico is disconnected from the computer, when they reconnect, the program won’t run again.
basic operation:
Open Thonny and click “Open…”.

Click“This computer”in the new pop-up window.

In the new dialog box, go to the folder …\Python_Codes\Project 01:Hello World . Select“Project_01_HelloWorld.py”, click“Open”. The code used in this tutorial is saved in the file …\Python_Codes. We can move the code anywhere. For example, we save the Python_Codes file in the Disk(D), the route is D:\Python_Codes.

Click “Run current script”to execute program“Hello World!”, “Welcome Keyestudio” will print in the“Shell”window.

Exit online
When running online, click “Stop /Restart Backend” on Thonny or press “Ctrl+C” to exit the program.

2.3. Offline running code:
When running offline, the Raspberry Pi Pico doesn’t need to connect to a computer and Thonny. Once powered up, it can run the main.pyprogram stored in the Raspberry Pi Pico.
Pros: We don’t need to connect a computer to Thonny’s software to run the program.
Cons: The program stops automatically when an error occurs or the Raspberry Pi Pico runs out of power, and the code is hard to change.
Basic Operation:
Once powered up, the Raspberry Pi Pico will check for the presence of main.py on the device automatically. If so, run the program in main.py and go to the shell command system. (If we want the code to run offline, we can save it as main.py); If the main.py does not exist, go directly to the shell command system.
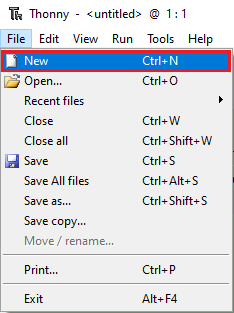
Click “File”→“New”, create and write code.

Enter the code in the newly opened file. Here we use the Project_02_Onboard_LED_Flashing.Py code as an example.

Click“Save”on the menu bar, we can save the code in This computer or MicroPython device.

Select“MicroPython device”,enter“main.py”in the new pop-up window and click“OK”.


We can see the code has been uploaded to the Raspberry Pi Pico.

Disconnect the microUSB cable to the Raspberry Pi Pico and reconnect, and the LEDs on the Raspberry Pi Pico will flash repeatedly.

Exit from Offline operation
Connect Raspberry Pi Pico to the computer,click “Stop/Restart backend”on Thonny to end the offline operation.

If it does’t work, click  “Stop/Restart backend”on Thonny several times or reconnect to the Raspberry Pi Pico.

We provide a main.py file to run offline. The code added to main.py is the bootstrap that executes the user code file. We just need to upload the offline project’s code file (.py) to the “MicroPython Device”.
① Move the file of Python_Codes to Disk(D). Open the Thonny software.

② Expand Project 00 : main in Disk(D) directory D:\Python_Codes. Double-click main.py to make the code in ” MicroPython Device “run offline.

Here, we use project 00 and Project 02 cases as examples. The results are displayed using an LED(GP25 pin) on a Raspberry Pi Pico. If we have modified the Project_02_Onboard_LED_Flashing. Py file, then we need to modify it accordingly. Right-click the Project_02_Onboard_LED_Flashing. Py file and select ‘Upload to/’ to upload the code to Raspberry Pi Pico, as shown below.

Upload the main.py in the same way.

Disconnect and reconnect the microUSB cable to the Raspberry Pi Pico, and the LEDs will flash repeatedly.
Note:
The code here runs offline. If we want to stop running offline and go to “Shell”, simply click “Stop/Restart Backend” on Thonny software.
3. Thonny common operations
3.1. Upload the code to Raspberry Pi Pico
In the Project 01:Hello World file, right-click and select Project_01_HelloWorld.py,select“Upload to /”and upload the code to the root directory of the Raspberry Pi Pico.

3.2. Download the code to the computer
In the“MicroPython device”, right-click and select Project_01_HelloWorld.py,select“Download to …”to download the code to our computer.

3.3. Delete the files in the Raspberry Pi Pico root directory
In the“MicroPython device”,right-click and select Project_01_HelloWorld.py,select“Delete”,delete the Project_01_HelloWorld.py from the Raspberry Pi Pico root directory.

3.4. Delete files from the computer’s directory
In the Project_01 : Hello World file, right-click and select Project_01_HelloWorld.py,select“Move to Recycle Bin”,then it can be deleted from the Project_01_HelloWorld file.

3.5. Create and Save Code
①Click“File”→“New”to create and compile code.
②Enter code in the newly opened file, here we use Project_02_Onboard_LED_Flashing.py code as an example.

③Click“Save”,and we can save the code to our computer or the Raspberry Pi Pico.

④ Select“MicroPython device”,enter“main.py”in the new pop-up window and click“OK”.

⑤ We can see the code has been uploaded to the Raspberry Pi Pico.

⑥Click“Run current script”, the LED on the Raspberry Pi Pico will flash periodically.
