KS5034 Keystudio ESP32 S3 Pro Development Board
1. Introduction
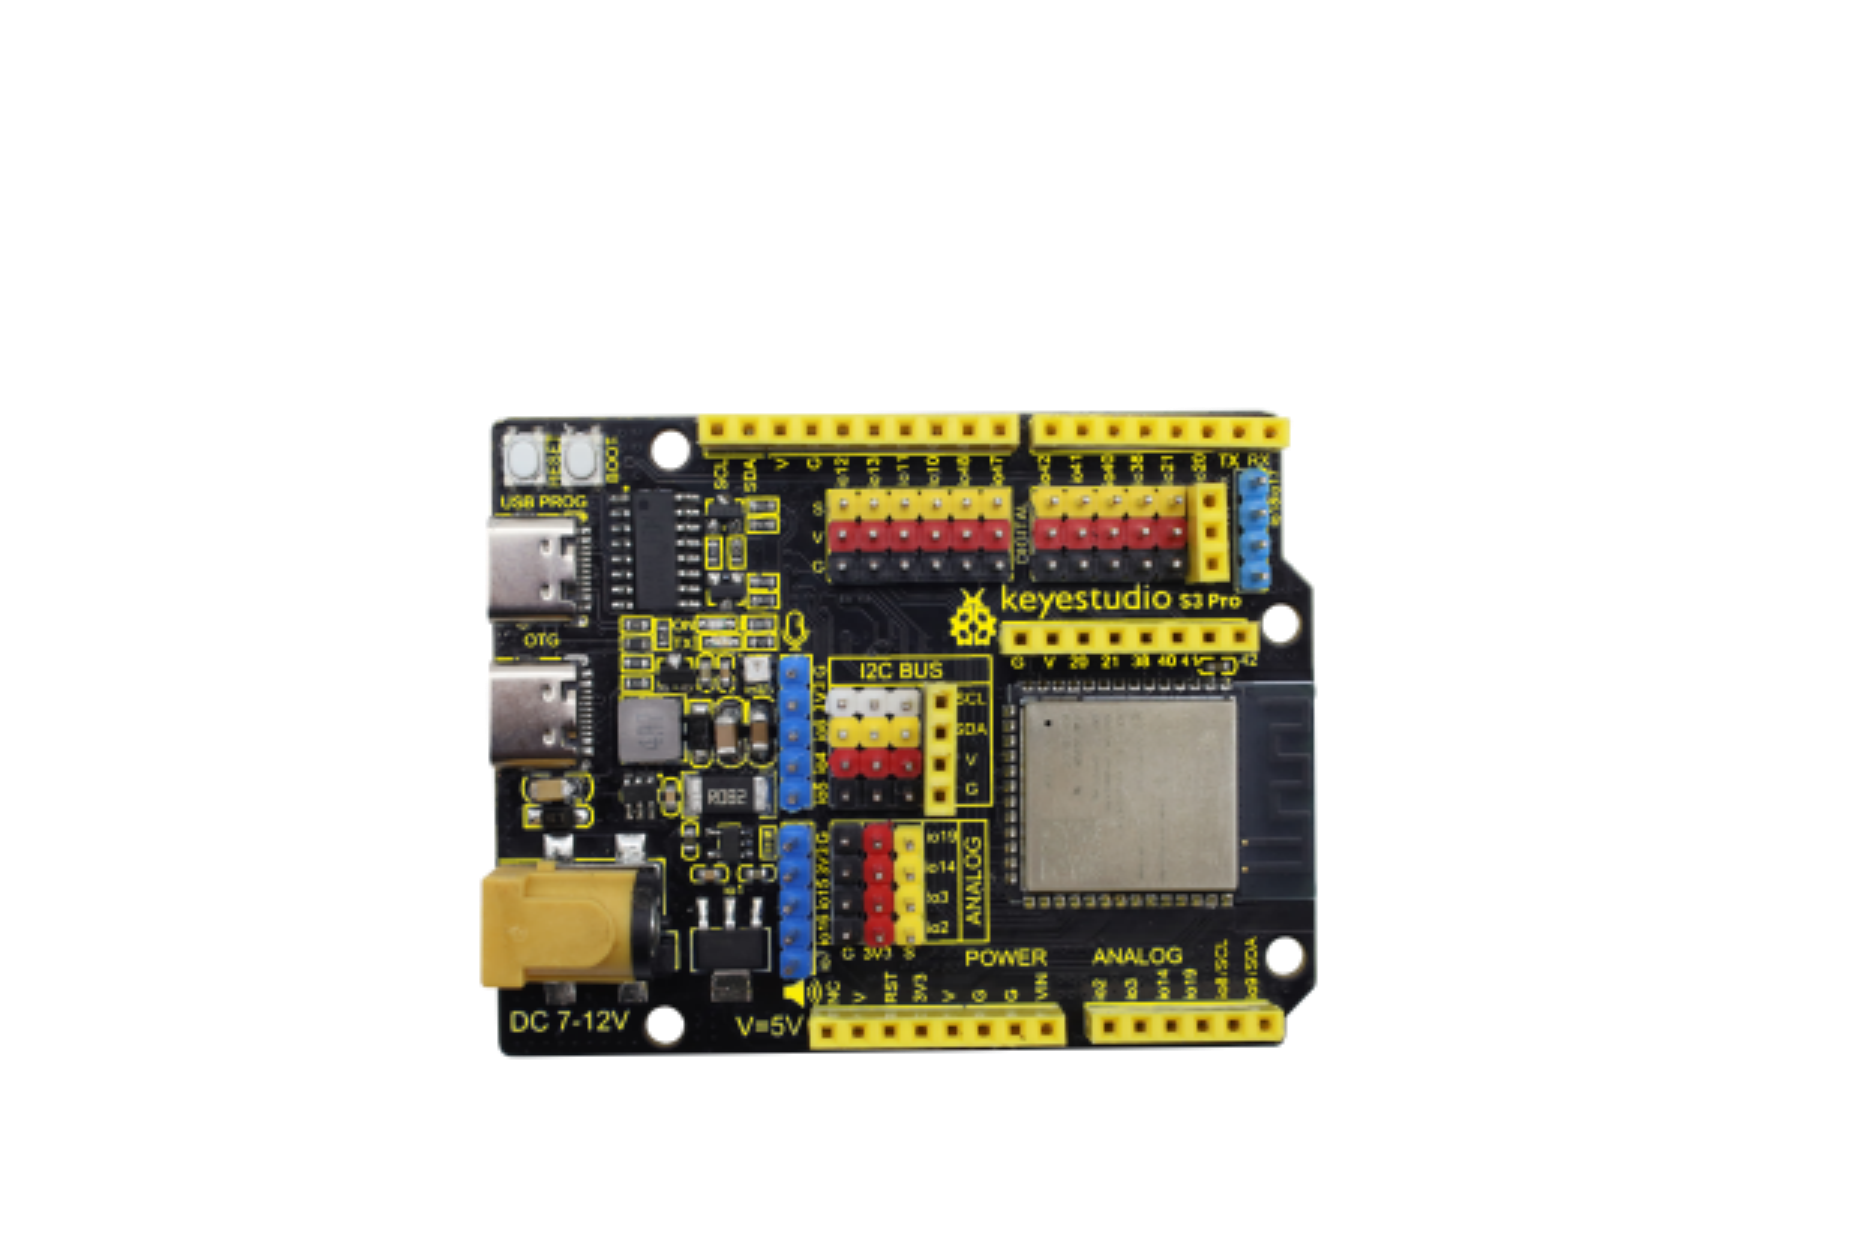
The ESP32S3 PRO development board is based on the ESP32-S3-N16R8 module. Compared to standard boards, it features current sensing and SD card support, with most pins routed through pin headers. Its on-board DC-DC and LDO chips provide sufficient power for most common modules, enabling developers to extend functionality.
2. Parameters
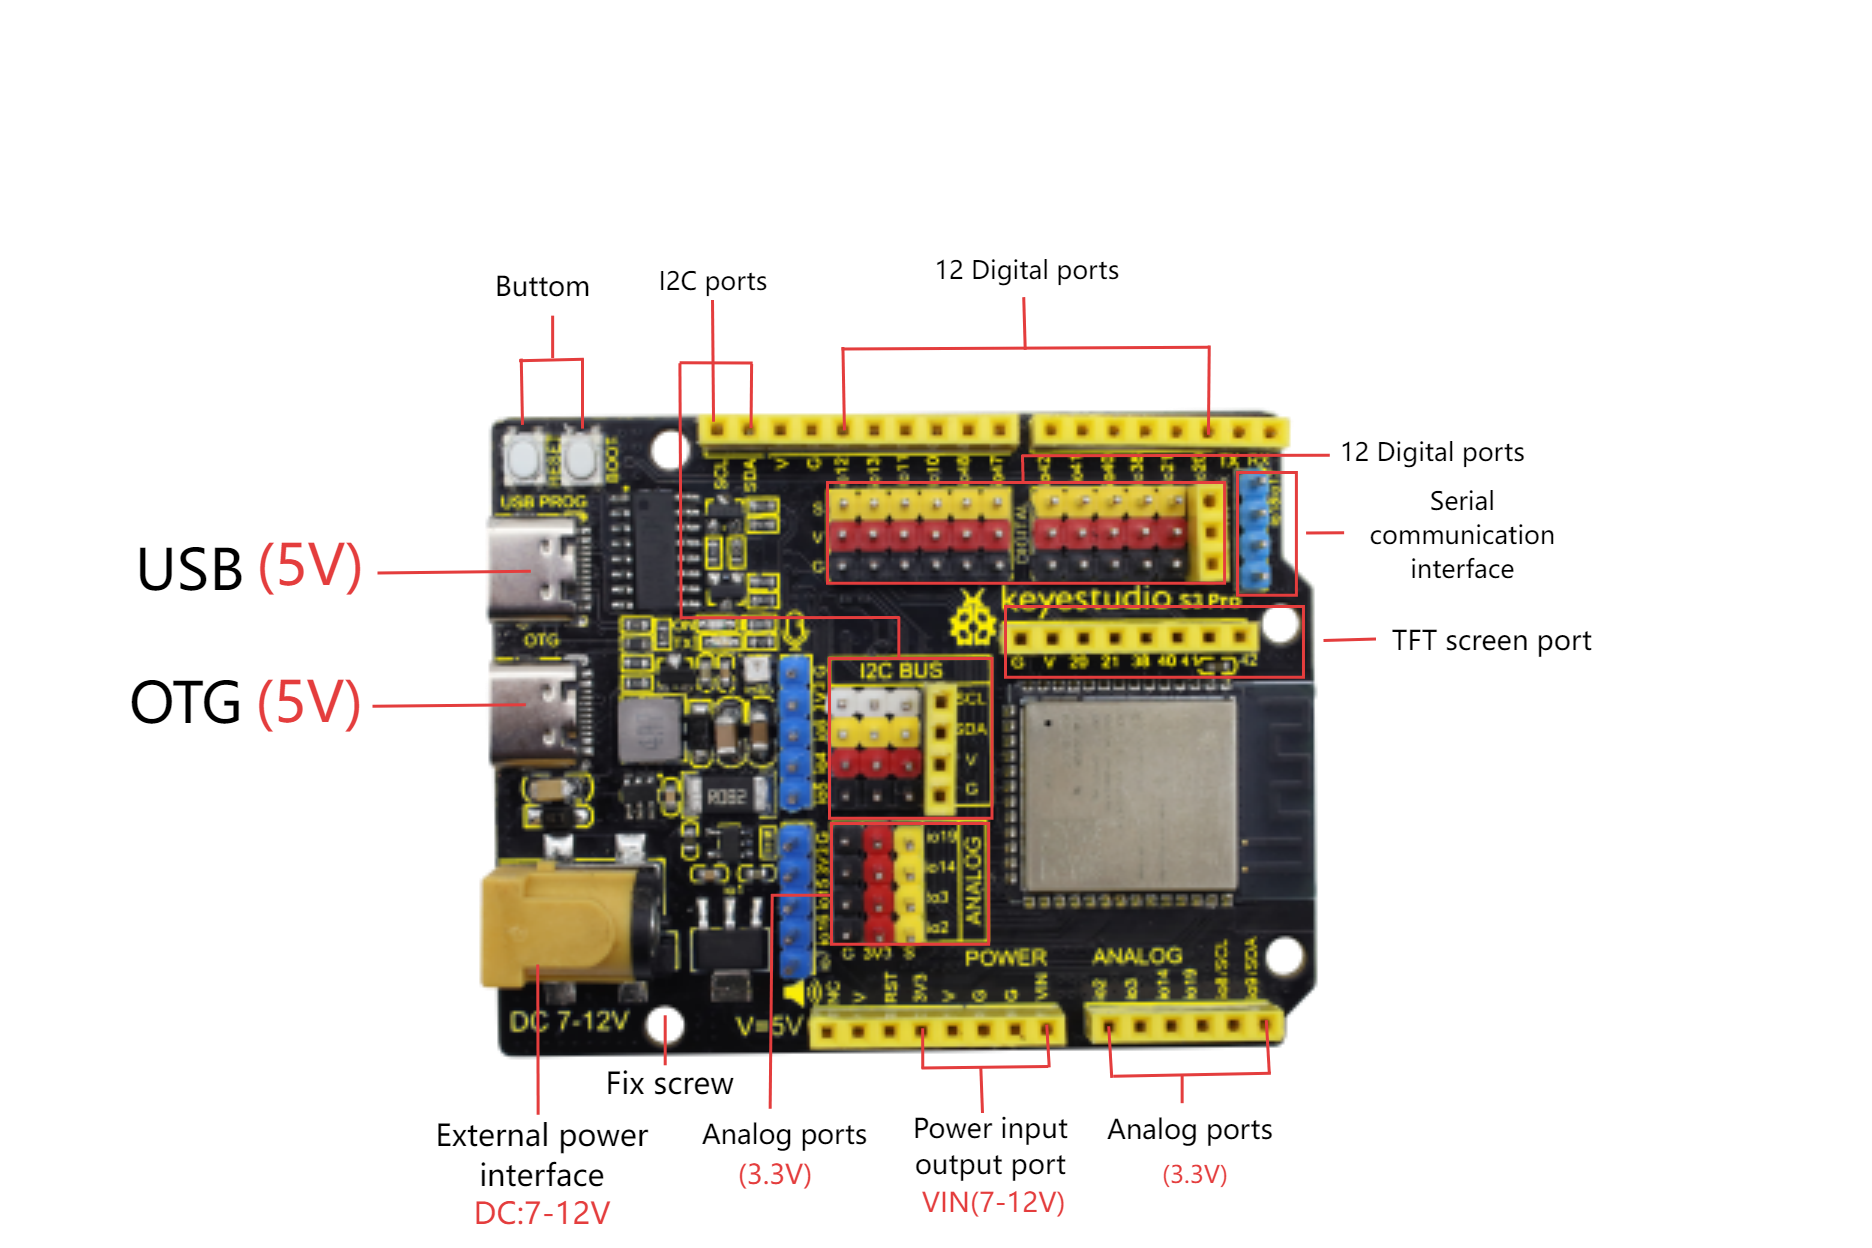
Operating Voltage: DC3.3V, DC5V
Input Voltage: 7-12V DC (via USB port), 5V DC (via USB port)
No-Load Current: 80mA
Maximum Output Current: 1.5A
Module: ESP32-S3-WROOM-1
FLASH: 16MB
Clock Frequency: 240MHz
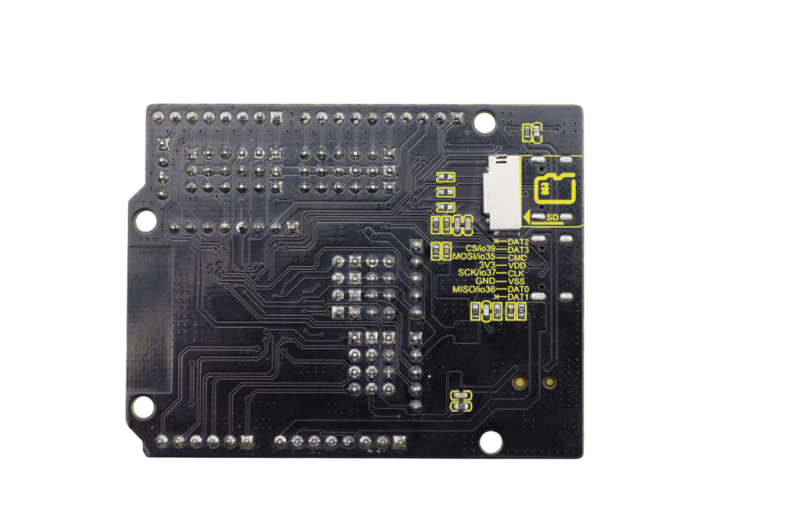
SD Card: Supports MicroSD/TF formats
Dimensions: 69mm x 54mm
3. Pin-out
 For detailed pin functions, please see ESP32-S3 Series Datasheet, 2.2 Pin Overview.
The board peripherals are connected to the pins as follows:
Peripherals |
Name |
IO |
|---|---|---|
RGB |
DIN |
io45 |
INA180 |
OUT |
io1 |
SD card |
DAT3 |
io39/CS |
SD card |
CMD |
io35/MOSI |
SD card |
SCK |
io37/SCK |
SD card |
DAT0 |
io36/MISO |
USB OTG |
D+ |
io20 |
USB OTG |
D- |
io19 |
4. Arduino
For installing Arduino IDE, please refer to: Arduino IDE
For installing ESP32 chip package, refer to: ESP32
Please read the above reference links carefully.
Download
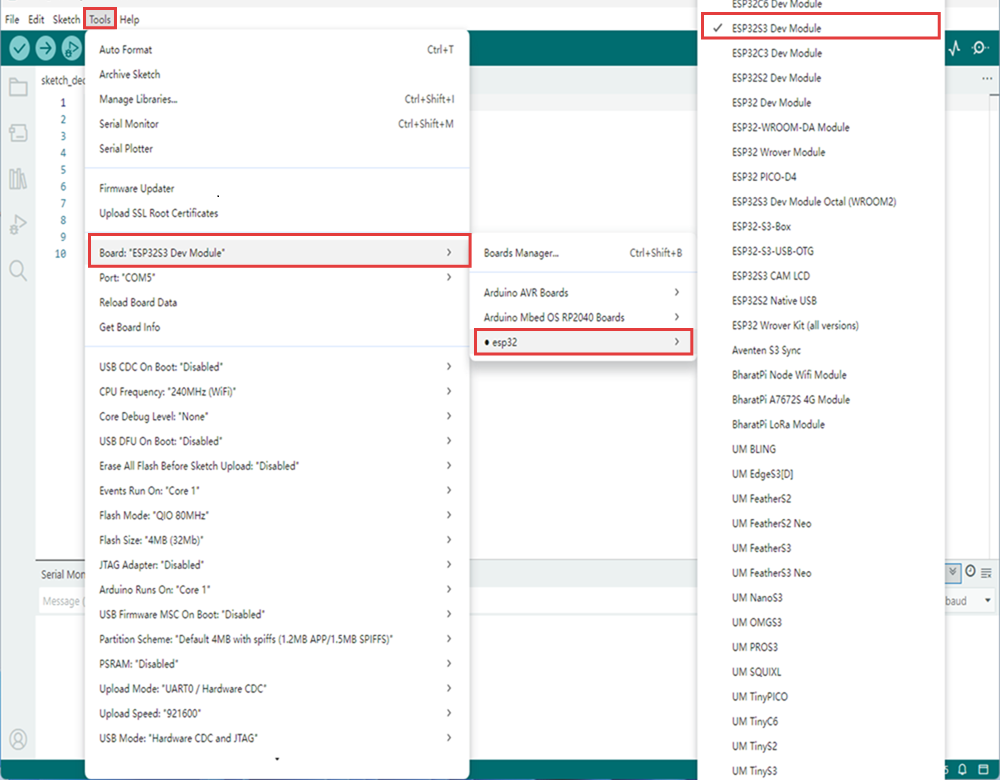
The Arduino IDE installation tutorial above includes detailed steps for installing the ESP32 chip package (for the latest version). O
pen the IDE, and enter TOOLS → Board → esp32 → ESP32S3 Dev Module. Select the serial port number added after connecting the USB cable. If no new port appears, check if the CH340 driver is installed or try with another USB cable.
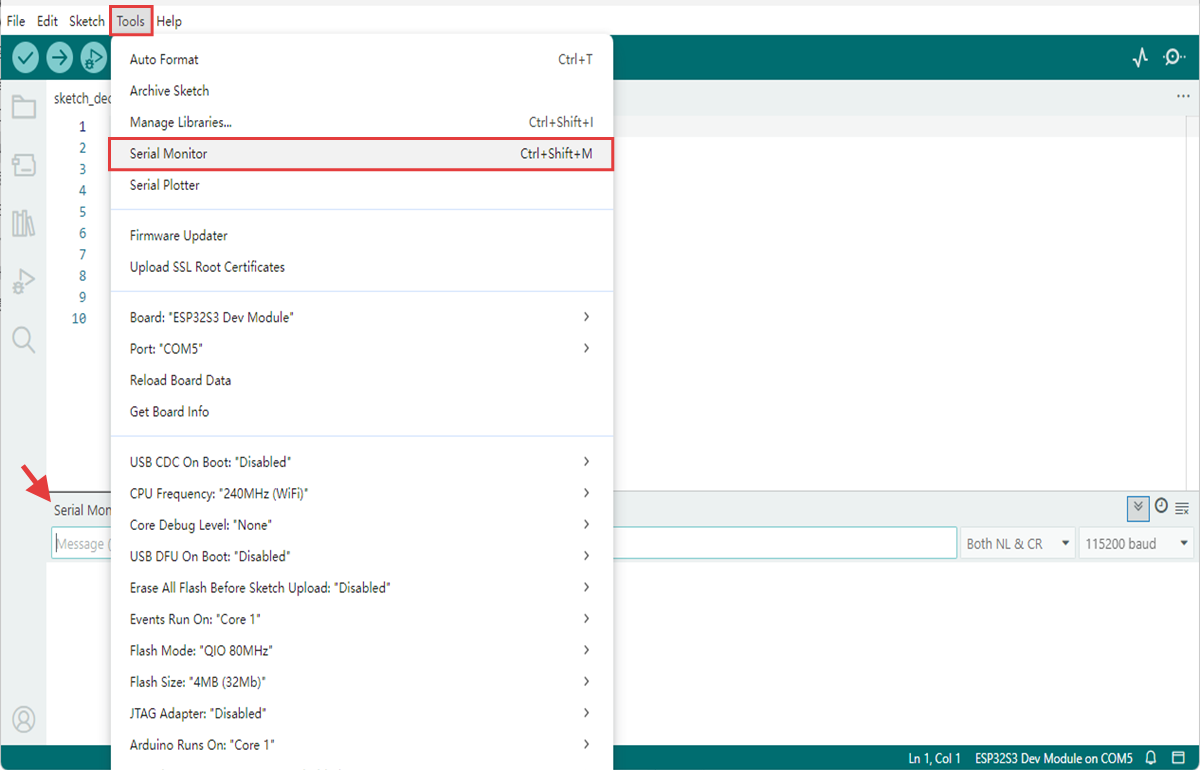
How to open the serial monitor?
Open the IDE, click Tools → Serial Monitor or press Ctrl+Shift+M to display the serial monitor at the bottom of the IDE.
RGB Test
Copy the code below and click Upload 
void setup() {
  // No need to initialize the RGB LED
}

// the loop function runs over and over again forever
void loop() {
#ifdef RGB_BUILTIN

  rgbLedWrite(45, RGB_BRIGHTNESS, 0, 0);  // Red
  delay(1000);
  rgbLedWrite(45, 0, RGB_BRIGHTNESS, 0);  // Green
  delay(1000);
  rgbLedWrite(45, 0, 0, RGB_BRIGHTNESS);  // Blue
  delay(1000);
  rgbLedWrite(45, 0, 0, 0);  // Off / black
  delay(1000);
#endif
}
After uploading the code, the onboard RGB will repeatedly emit red, green, and blue lights in sequence at 1-second intervals and then turn off
INA180 Current Test
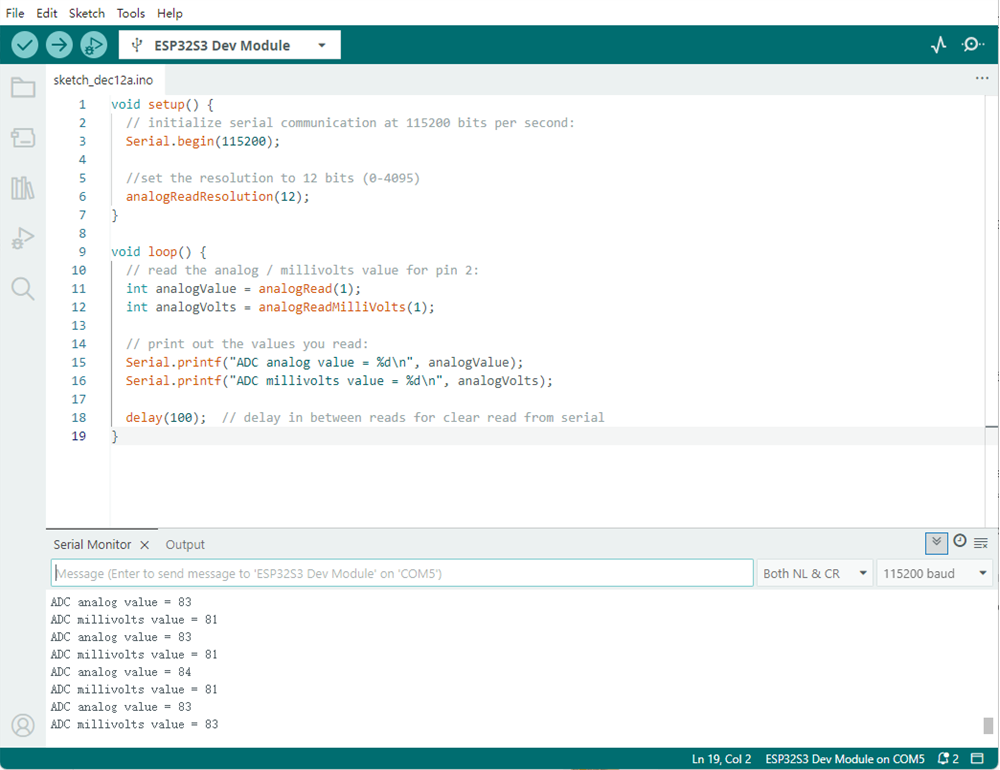
Copy the code below and click Upload
void setup() {
  // initialize serial communication at 115200 bits per second:
  Serial.begin(115200);

  //set the resolution to 12 bits (0-4095)
  analogReadResolution(12);
}

void loop() {
  // read the analog / millivolts value for pin 1:
  int analogValue = analogRead(1);
  int analogVolts = analogReadMilliVolts(1);

  // print out the values you read:
  Serial.printf("ADC analog value = %d\n", analogValue);
  Serial.printf("ADC millivolts value = %d\n", analogVolts);

  delay(100);  // delay in between reads for clear read from serial
}
After uploading the code, open the serial port monitor to observe the IO1 pin readings of the ESP32S3PRO board under no-load.
SD Card Mount Test
Copy the code below and click Upload
#include "driver/sdmmc_host.h"
#include "driver/sdmmc_defs.h"
#include "esp_vfs_fat.h"
#include "sdmmc_cmd.h"
#include <stdio.h>
#include <string.h>
#include <unistd.h>

// SDIO pin definition - SDIO pins of ESP32-S3
#define SD_CLK_PIN GPIO_NUM_37  // SD card clock
#define SD_CMD_PIN GPIO_NUM_35  // SD card command
#define SD_D0_PIN  GPIO_NUM_36  // SD card data cable 0

// Global variable
bool sdCardAvailable = false;
sdmmc_card_t* sdCard = nullptr;

// Function declaration
bool initSDCard();
bool testSDCard();
void printSDCardInfo();
void printTestResult(bool result);
void unmountSDCard();
void runTestCycle();

void setup() {
  // Initialize the serial port
  Serial.begin(115200);

  // Wait for the serial port to be ready
  while (!Serial) {
    usleep(100000); // Wait for 0.1 seconds
  }

  Serial.println("=== SD card offline testing system ===");
  Serial.println("System started, ready for testing...\n");

  // Run the initial test
  runTestCycle();

  // Prompt the user to retest
  Serial.println("\nTest completed - plug the SD card again and press the RST button on the development board to retest");
}

void loop() {
  // The main loop remains idle and does not perform any operations
  delay(1000);
}

// Complete testing process
void runTestCycle() {
  // Initialize the SD card
  Serial.println("1. Start initializing SD card...");
  sdCardAvailable = initSDCard();

  if (sdCardAvailable) {
    // Print the basic information of the SD card
    Serial.println("\n2. Basic information of SD card:");
    printSDCardInfo();

    // Perform the SD card test
    Serial.println("\n3. Start SD card function test...");
    bool testResult = testSDCard();

    // Print the test results
    printTestResult(testResult);

    // Uninstall the SD card (release resources)
    Serial.println("\n4. Uninstall the SD card");
    unmountSDCard();
  } else {
    Serial.println("\nInitialization failed, testing cannot be conducted");
  }
}

// Initialize the SD card - SDMMC mode
bool initSDCard() {
  Serial.printf("Enabled pins: CLK=%d, CMD=%d, DATA0=%d\n",
                SD_CLK_PIN, SD_CMD_PIN, SD_D0_PIN);

  // Configure the SDMMC host
  sdmmc_host_t host = SDMMC_HOST_DEFAULT();
  host.max_freq_khz = SDMMC_FREQ_HIGHSPEED;

  // Configure the SDMMC slot
  sdmmc_slot_config_t slot_config = SDMMC_SLOT_CONFIG_DEFAULT();
  slot_config.clk = (gpio_num_t)SD_CLK_PIN;
  slot_config.cmd = (gpio_num_t)SD_CMD_PIN;
  slot_config.d0 = (gpio_num_t)SD_D0_PIN;
  slot_config.width = 1;  // 1-bit mode

  // Mounting failed
  esp_vfs_fat_sdmmc_mount_config_t mount_config = {
    .format_if_mount_failed = false,
    .max_files = 5,
    .allocation_unit_size = 16 * 1024
  };

  esp_err_t ret = esp_vfs_fat_sdmmc_mount("/sdcard", &host, &slot_config, &mount_config, &sdCard);

  if (ret != ESP_OK) {
    Serial.printf("SDMMC mounting failed: 0x%x - %s\n", ret, esp_err_to_name(ret));

    // Try formatting
    Serial.println("Try formatting SD card...");
    mount_config.format_if_mount_failed = true;
    ret = esp_vfs_fat_sdmmc_mount("/sdcard", &host, &slot_config, &mount_config, &sdCard);

    if (ret != ESP_OK) {
      Serial.printf("Formatting failed.: 0x%x - %s\n", ret, esp_err_to_name(ret));
      return false;
    }
  }

  Serial.println("SD card initialized");
  return true;
}

  // SD card test function
bool testSDCard() {
  if (!sdCardAvailable) return false;

  String testPath = "/sdcard/test.txt";
  bool testPassed = true;

  // 1. Delete any possible old test files
  Serial.println("\nTest step 1/4: Delete old test file");
  if (remove(testPath.c_str()) != 0) {
    if (errno != ENOENT) {  // ENOENT indicates that the file does not exist, which is a normal situation
      Serial.printf("Deletion failed: %s\n", strerror(errno));
      testPassed = false;
    } else {
      Serial.println("No old files to be deleted");
    }
  } else {
    Serial.println("Old file deleted");
  }

  // 2. Write the test file
  Serial.println("\nTest step 2/4: Write test file");
  FILE* file = fopen(testPath.c_str(), "w");
  if (!file) {
    Serial.println("Write failed: Unable to create file");
    return false;
  }

  const char* testContent = "SD card test content: 123456";
  fprintf(file, "%s", testContent);
  fclose(file);
  Serial.printf("Written content: %s\n", testContent);

  // 3. Read the test file
  Serial.println("\nTest step 3/4: Read test file");
  file = fopen(testPath.c_str(), "r");
  if (!file) {
    Serial.println("Read failed: Unable to open file");
    return false;
  }

  char content[100] = {0};
  fread(content, 1, sizeof(content)-1, file);
  fclose(file);

  // Remove possible line breaks
  String contentStr = String(content);
  contentStr.trim();
  Serial.printf("Read the content: %s\n", contentStr.c_str());

  // 4. Verify content
  Serial.println("\nTest step 4/4: Verify content consistency");
  if (contentStr != testContent) {
    Serial.println("Content verification failed: Expectations do not match reality");
    testPassed = false;
  } else {
    Serial.println("Content verified");
  }

  // Clean up the test file
  Serial.println("\nClean up test file");
  if (remove(testPath.c_str()) != 0) {
    Serial.printf("Test file deletion failed: %s\n", strerror(errno));
    // Deletion failure is not regarded as a test failure
  } else {
    Serial.println("Test file deleted");
  }

  return testPassed;
}

// Print the SD card information
void printSDCardInfo() {
  if (!sdCardAvailable) return;

  // Card name
  Serial.printf("Card name: %s\n", sdCard->cid.name);

  // Card type
  Serial.print("Card type: ");
  if (sdCard->ocr & 0x40000000) {
    Serial.println("High capacity(SDHC)/Expanded capacity(SDXC)");
  } else {
    Serial.println("Standard capacity(SDSC)");
  }

  // Capacity information
  uint64_t cardSize = (uint64_t)sdCard->csd.capacity * sdCard->csd.sector_size;
  Serial.printf("Total capacity: %.2f GB (%.2f MB)\n",
                (float)cardSize / (1024 * 1024 * 1024),
                (float)cardSize / (1024 * 1024));

  // Working frequency
  Serial.printf("Working frequency: %d kHz\n", sdCard->max_freq_khz);

  // File system
  Serial.println("File system: FAT32");
  Serial.println("Mount point: /sdcard");
}

// Print the test results
void printTestResult(bool result) {
  Serial.println("\n======================");
  if (result) {
    Serial.println("===== TEST PASS! =====");
  } else {
    Serial.println("===== TEST FAILED! =====");
  }
  Serial.println("======================");
}

// Uninstall the SD card
void unmountSDCard() {
  if (sdCardAvailable) {
    esp_vfs_fat_sdmmc_unmount();
    sdCardAvailable = false;
    Serial.println("SD card uninstalled");
  }
}
After uploading the code, open the serial port monitor and press the RESET button on the development board to display the following messages.

5. Attentions
Do not connect high-power motors directly to the IO port.
Do not short the power supply to the ground.
The current detection error is large when no-load.