MB0183 ESP32-S3 development board

1. Introduction
The ESP32-S3 development board is based on the Espressif ESP32-S3-WROOM-1-N16R8 module. It integrates a dual-core Xtensa LX7 MCU with a main frequency of up to 240MHz, storage(16MB Flash and 8MB PSRAM) and 2.4GHz Wi-Fi and BLE(Bluetooth® LE). As for its interfaces, it comes with Type-C to serial port, Type-C to OTG, RGB LED, and GPIO pin headers. These two rows of pins are with a spacing of 25.4mm, which is convenient to quickly develop and experiment. What’s more, it can be widely applied to smart home, industrial automation, healthcare, consumer electronics, smart farm, etc.
2. Parameters
Operating voltage: DC3.3V
Input voltage: DC3.3~DC5V
Operating current: 80mA(average)
ESP32 module: ESP32-S3-WROOM-1
16MB Flash + 8MB PSRAM
Clock frequency: 240MHz
USB-to-serial port: Type-C interface; CH340C USB-to-serial port chip (programs can be downloaded through this interface.)
USB-to-OTG: Type-C interface; used for debugging or mounting external storage devices
Product size: 69.5mm x 29.5mm
Wi-Fi
Supports the IEEE 802.11b/g/n protocols
Supports 20MHz and 40MHz bandwidths in the 2.4GHz frequency band
Supports 1T1R (1 Transmitter, 1 Receiver) mode with a maximum data rate of 150Mbps
Wireless Multimedia (WMM)
Frame Aggregation (TX/RX A-MPDU, TX/RX A-MSDU)
Immediate Block ACK
Fragmentation/Defragmentation
Beacon Automatic Monitoring (Hardware TSF)
4 virtual Wi-Fi interfaces
Simultaneously supports Infrastructure BSS (Basic Service Set) Station mode, SoftAP mode, and Station + SoftAP mixed mode
Antenna Diversity
802.11mc FTM (Fine Timing Measurement)
Bluetooth
Bluetooth Low Energy (Bluetooth LE): Bluetooth 5, Bluetooth Mesh
High-power mode with a maximum transmit power of 20dBm
Supports data rates of 125Kbps, 500Kbps, 1Mbps, and 2Mbps
LE Advertising Extensions
Multiple Advertising Sets
LE Channel Selection Algorithm
Wi-Fi and Bluetooth coexistence, sharing the same antenna
Power Management
Enables precise power control by selecting clock frequency, duty cycle, Wi-Fi operating mode, and independently controlling the power supply of internal components
Four power consumption modes designed for typical scenarios: Active, Modem-sleep, Light-sleep, Deep-sleep
Power consumption as low as 7µA in Deep-sleep mode
RTC (Real-Time Clock) memory remains operational in Deep-sleep mode
Security Mechanisms
Secure Boot - Permission control for internal and external memory
Flash Encryption - Encrypts and decrypts memory
Cryptographic Hardware Accelerators: AES-128/256 (compliant with FIPS PUB 197), SHA (compliant with FIPS PUB 180-4), RSA, Random Number Generator (RNG), HMAC, Digital Signatures
3. Interface Description
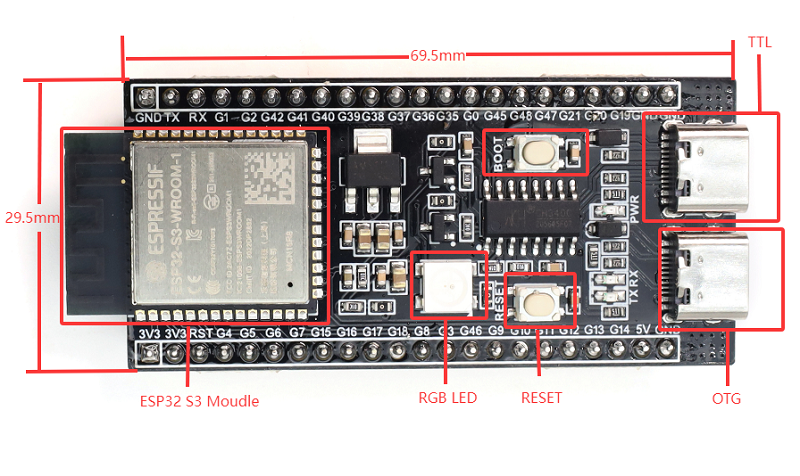 For more information about this board, check the official documentation here.
4. Arduino
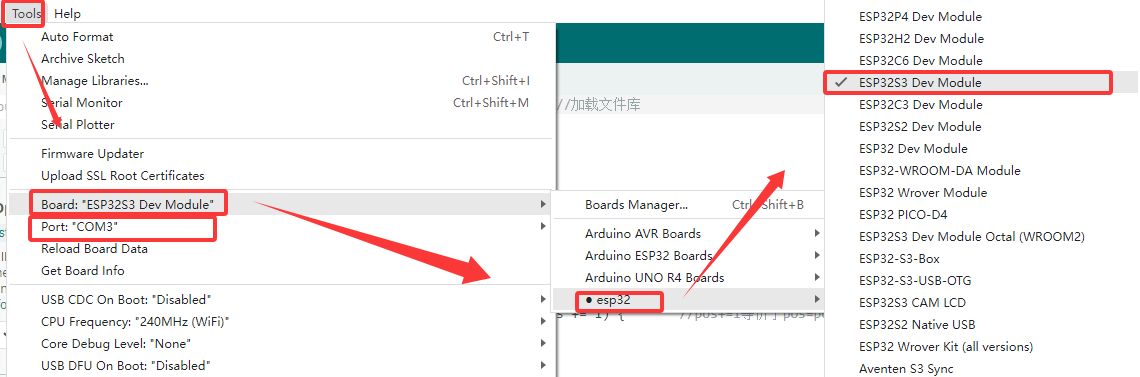
First, open the Arduino IDE software, click Tools -> Development Board -> esp32 -> ESP32S3 DEV Moudle; choose the new port after connecting to the development board via the USB cable (If there is no new serial port, please check whether CH340 driver is installed or replace the USB cable).
Then copy the following program to burn it onto the development board.
void setup() {
  // No need to initialize the RGB LED
}

// the loop function runs over and over again forever
void loop() {
#ifdef RGB_BUILTIN
  digitalWrite(RGB_BUILTIN, HIGH);  // Turn the RGB LED white
  delay(1000);
  digitalWrite(RGB_BUILTIN, LOW);  // Turn the RGB LED off
  delay(1000);

  rgbLedWrite(RGB_BUILTIN, RGB_BRIGHTNESS, 0, 0);  // Red
  delay(1000);
  rgbLedWrite(RGB_BUILTIN, 0, RGB_BRIGHTNESS, 0);  // Green
  delay(1000);
  rgbLedWrite(RGB_BUILTIN, 0, 0, RGB_BRIGHTNESS);  // Blue
  delay(1000);
  rgbLedWrite(RGB_BUILTIN, 0, 0, 0);  // Off / black
  delay(1000);
#endif
}
After burning the code, the RGB on the development board will flash in the sequence of “white - red - green - blue - off”.

5. Precautions
Cannot burn the program to the development board?
A: Please replace the data cable or reinstall the CH340 driver.
https://docs.keyestudio.com/en/latest/docs/Download_Center/Download_Center.html#driver-download
Please do not directly connect high-power motors through the IO port.