MB0184 ESP32-S3 CAM Development Board
1. Introduction
The ESP32-S3 CAM Development Board is designed based on Espressif’s ESP32-S3-WROOM-1-N16R8 module. It is equipped with a dual-core Xtensa® 32-bit LX7 Microcontroller Unit (MCU), with a maximum operating frequency of up to 240 MHz. This development board integrates large-capacity storage (**16MB Flash and 8MB **Pseudo-Static Random Access Memory (PSRAM)), and supports 2.4GHz Wireless Fidelity (Wi-Fi) and Bluetooth Low Energy (Bluetooth LE).
The development board provides a rich set of interfaces, including a Type-C port for Universal Asynchronous Receiver/Transmitter (UART), a Type-C port for Universal Serial Bus On-The-Go (USB OTG), an RGB Light-Emitting Diode (LED), an OV3660 camera, an** SD card interface**, and General-Purpose Input/Output (GPIO) pin headers. The two rows of pin headers have a spacing of 25.4mm, which is compatible with breadboards, facilitating rapid prototyping and experimental development. This development board is widely used in fields such as smart homes, industrial automation, healthcare, consumer electronics, and smart agriculture.
2. Parameters
Operating Voltage: DC 3.3V
Input Voltage: DC 3.3V ~ 5V
Operating Current: ~120mA (Average)
ESP32 Module: ESP32-S3-WROOM-1-N16R8
Memory: 16MB Flash and 8MB PSRAM
Clock Frequency: Up to 240MHz
Camera Sensor: OV3660
SD Card Interface: SD_MMC 1-bit mode
USB to Serial Port: Type-C interface (CH340C chip), used for programming and log output
USB OTG: Type-C interface, used for USB debugging or mounting external storage devices
Dimensions: 67mm x 29mm
Wi-Fi
Supports the IEEE 802.11b/g/n protocols
Supports 20MHz and 40MHz bandwidths in the 2.4GHz frequency band
Supports 1T1R (1 Transmitter, 1 Receiver) mode with a maximum data rate of 150Mbps
Wireless Multimedia (WMM)
Frame Aggregation (TX/RX A-MPDU, TX/RX A-MSDU)
Immediate Block ACK
Fragmentation/Defragmentation
Beacon Automatic Monitoring (Hardware TSF)
4 virtual Wi-Fi interfaces
Simultaneously supports Infrastructure BSS (Basic Service Set) Station mode, SoftAP mode, and Station + SoftAP mixed mode
Antenna Diversity
802.11mc FTM (Fine Timing Measurement)
Bluetooth
Bluetooth Low Energy (Bluetooth LE): Bluetooth 5, Bluetooth Mesh
High-power mode with a maximum transmit power of 20dBm
Supports data rates of 125Kbps, 500Kbps, 1Mbps, and 2Mbps
LE Advertising Extensions
Multiple Advertising Sets
LE Channel Selection Algorithm
Wi-Fi and Bluetooth coexistence, sharing the same antenna
Power Management
Enables precise power control by selecting clock frequency, duty cycle, Wi-Fi operating mode, and independently controlling the power supply of internal components
Four power consumption modes designed for typical scenarios: Active, Modem-sleep, Light-sleep, Deep-sleep
Power consumption as low as 7µA in Deep-sleep mode
RTC (Real-Time Clock) memory remains operational in Deep-sleep mode
Security Mechanisms
Secure Boot - Permission control for internal and external memory
Flash Encryption - Encrypts and decrypts memory
Cryptographic Hardware Accelerators: AES-128/256 (compliant with FIPS PUB 197), SHA (compliant with FIPS PUB 180-4), RSA, Random Number Generator (RNG), HMAC, Digital Signatures
3. Pin-out
For specific pin functions, please refer to the User Manual. Schematic table for connecting board pins to peripheral devices
Development board |
Camera |
SD card |
|---|---|---|
IO4 |
SIOD |
|
IO5 |
SIOC |
|
IO6 |
VYSNC |
|
IO7 |
HREF |
|
IO15 |
XCLK |
|
IO16 |
Y9 |
|
IO17 |
Y8 |
|
IO18 |
Y7 |
|
IO12 |
Y6 |
|
IO10 |
Y5 |
|
IO8 |
Y4 |
|
IO9 |
Y3 |
|
IO11 |
Y2 |
|
IO13 |
PCLK |
|
IO38 |
CMD |
|
IO39 |
CLK |
|
IO40 |
DATA |
4. Arduino
For how to install ESP32 chip package, there are instructions in the above reference, too.
Open Arduino IDE and click Tool->Board->esp32->ESP32S3 DEV Moudle; Select the new port after connecting the board by USB cable. If there are no any new port, please check whether you install CH340 driver or try another USB cable.
OV3660 Example
Click “File->Example->ESP32->Camera->CameraWebServer”
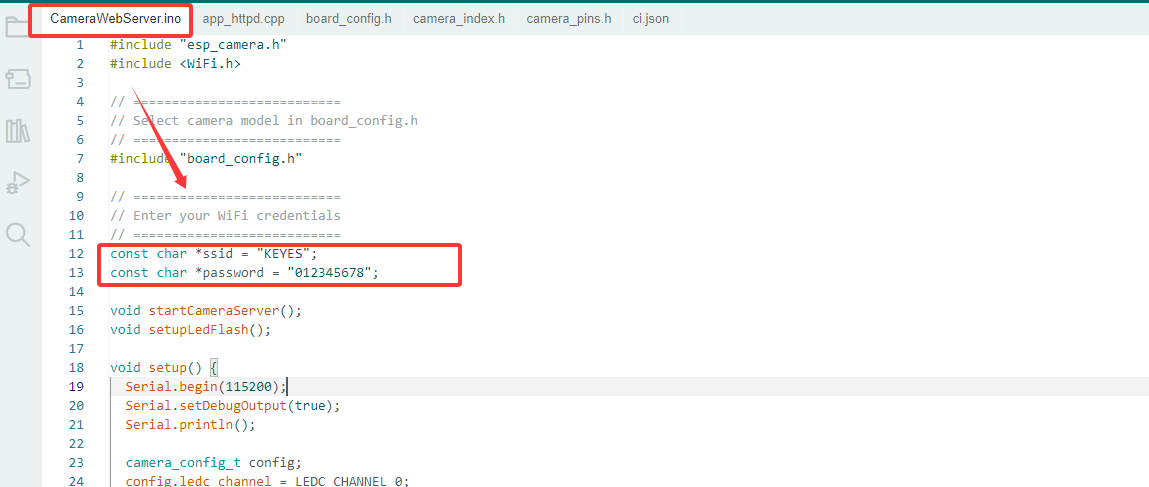
 In CameraWebServer.ino, Modify the WiFi password and account name that the development board needs to connect to. “*ssid” is name and “*password” is WiFi passwords.
Note: When observing the experiment result on the camera later, the computer also needs to be connected to this WiFi.(The development board and the computer need to be on the same local area network)
In CameraWebServer.ino, Modify the WiFi password and account name that the development board needs to connect to. “*ssid” is name and “*password” is WiFi passwords.
Note: When observing the experiment result on the camera later, the computer also needs to be connected to this WiFi.(The development board and the computer need to be on the same local area network)
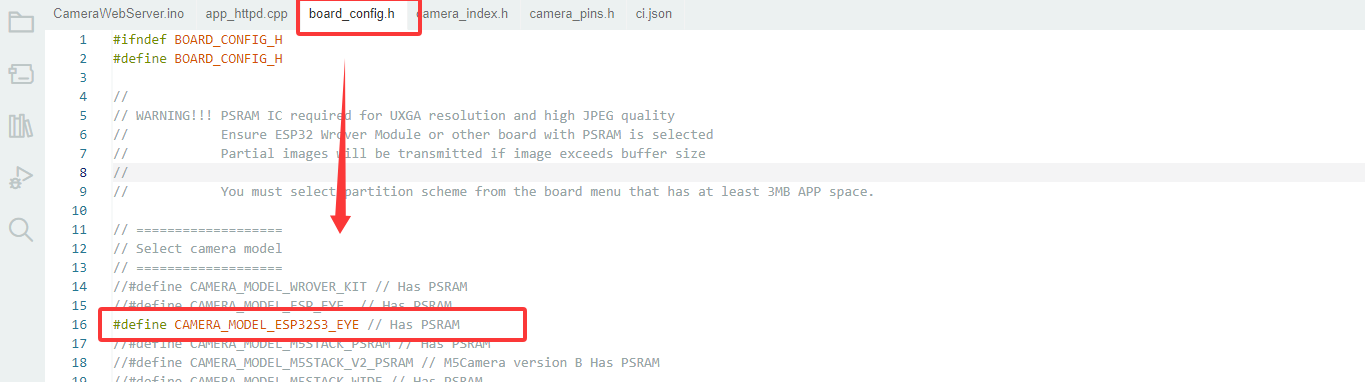
 In board.config.h, modify board model to “CAMERA_MODEL_ESP32S3_EYE”.
 Click
Click  to download the program. And then the serial monitor shows:
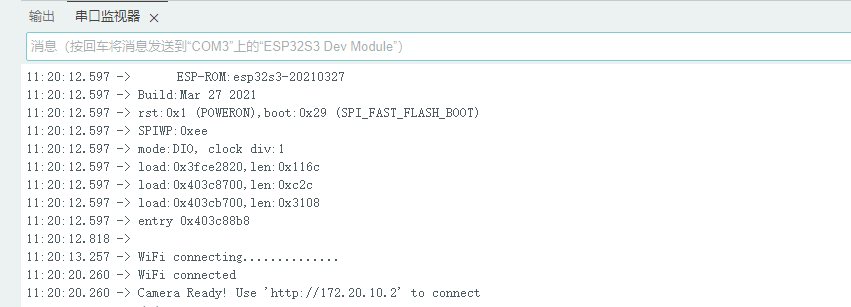 Enter the printed link “http://172.20.10.2” in the browser (please refer to the printed version for the specific link).
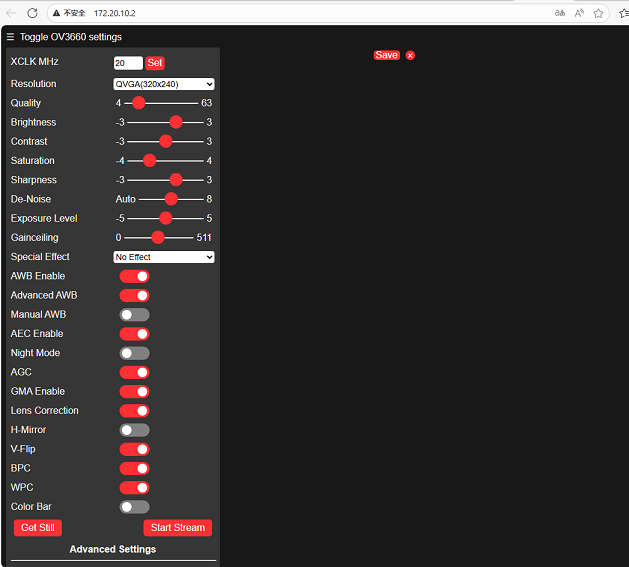
After entering, there will be no screen at first. We need to click “Start Stream” to enable the screen:

SD Card Sample
First of all, connect the development board to the computer properly and select the corresponding development board and port.
Then copy the following code and burn it directly onto the development board.
#include "driver/sdmmc_host.h"
#include "driver/sdmmc_defs.h"
#include "esp_vfs_fat.h"
#include "sdmmc_cmd.h"
#include <stdio.h>
#include <string.h>
#include <unistd.h>

// SDIO pin definition - SDIO pins of ESP32-S3
#define SD_CLK_PIN GPIO_NUM_39  // SD card clock
#define SD_CMD_PIN GPIO_NUM_38  // SD card command
#define SD_D0_PIN  GPIO_NUM_40  // SD card data cable 0

// Global variable
bool sdCardAvailable = false;
sdmmc_card_t* sdCard = nullptr;

// Function declaration
bool initSDCard();
bool testSDCard();
void printSDCardInfo();
void printTestResult(bool result);
void unmountSDCard();
void runTestCycle();

void setup() {
  // Initialize the serial port
  Serial.begin(115200);

  // Wait for the serial port to be ready
  while (!Serial) {
    usleep(100000); // Wait for 0.1 seconds
  }

  Serial.println("=== SD card offline testing system ===");
  Serial.println("System started, ready for testing...\n");

  // Run the initial test
  runTestCycle();

  // Prompt the user to retest
  Serial.println("\nTest completed - plug the SD card again and press the RST button on the development board to retest");
}

void loop() {
  // The main loop remains idle and does not perform any operations
  delay(1000);
}

// Complete testing process
void runTestCycle() {
  // Initialize the SD card
  Serial.println("1. Start initializing SD card...");
  sdCardAvailable = initSDCard();

  if (sdCardAvailable) {
    // Print the basic information of the SD card
    Serial.println("\n2. Basic information of SD card:");
    printSDCardInfo();

    // Perform the SD card test
    Serial.println("\n3. Start SD card function test...");
    bool testResult = testSDCard();

    // Print the test results
    printTestResult(testResult);

    // Uninstall the SD card (release resources)
    Serial.println("\n4. Uninstall the SD card");
    unmountSDCard();
  } else {
    Serial.println("\nInitialization failed, testing cannot be conducted");
  }
}

// Initialize the SD card - SDMMC mode
bool initSDCard() {
  Serial.printf("Enabled pins: CLK=%d, CMD=%d, DATA0=%d\n",
                SD_CLK_PIN, SD_CMD_PIN, SD_D0_PIN);

  // Configure the SDMMC host
  sdmmc_host_t host = SDMMC_HOST_DEFAULT();
  host.max_freq_khz = SDMMC_FREQ_HIGHSPEED;

  // Configure the SDMMC slot
  sdmmc_slot_config_t slot_config = SDMMC_SLOT_CONFIG_DEFAULT();
  slot_config.clk = (gpio_num_t)SD_CLK_PIN;
  slot_config.cmd = (gpio_num_t)SD_CMD_PIN;
  slot_config.d0 = (gpio_num_t)SD_D0_PIN;
  slot_config.width = 1;  // 1-bit mode

  // Mounting failed
  esp_vfs_fat_sdmmc_mount_config_t mount_config = {
    .format_if_mount_failed = false,
    .max_files = 5,
    .allocation_unit_size = 16 * 1024
  };

  esp_err_t ret = esp_vfs_fat_sdmmc_mount("/sdcard", &host, &slot_config, &mount_config, &sdCard);

  if (ret != ESP_OK) {
    Serial.printf("SDMMC mounting failed: 0x%x - %s\n", ret, esp_err_to_name(ret));

    // Try formatting
    Serial.println("Try formatting SD card...");
    mount_config.format_if_mount_failed = true;
    ret = esp_vfs_fat_sdmmc_mount("/sdcard", &host, &slot_config, &mount_config, &sdCard);

    if (ret != ESP_OK) {
      Serial.printf("Formatting failed.: 0x%x - %s\n", ret, esp_err_to_name(ret));
      return false;
    }
  }

  Serial.println("SD card initialized");
  return true;
}

  // SD card test function
bool testSDCard() {
  if (!sdCardAvailable) return false;

  String testPath = "/sdcard/test.txt";
  bool testPassed = true;

  // 1. Delete any possible old test files
  Serial.println("\nTest step 1/4: Delete old test file");
  if (remove(testPath.c_str()) != 0) {
    if (errno != ENOENT) {  // ENOENT indicates that the file does not exist, which is a normal situation
      Serial.printf("Deletion failed: %s\n", strerror(errno));
      testPassed = false;
    } else {
      Serial.println("No old files to be deleted");
    }
  } else {
    Serial.println("Old file deleted");
  }

  // 2. Write the test file
  Serial.println("\nTest step 2/4: Write test file");
  FILE* file = fopen(testPath.c_str(), "w");
  if (!file) {
    Serial.println("Write failed: Unable to create file");
    return false;
  }

  const char* testContent = "SD card test content: 123456";
  fprintf(file, "%s", testContent);
  fclose(file);
  Serial.printf("Written content: %s\n", testContent);

  // 3. Read the test file
  Serial.println("\nTest step 3/4: Read test file");
  file = fopen(testPath.c_str(), "r");
  if (!file) {
    Serial.println("Read failed: Unable to open file");
    return false;
  }

  char content[100] = {0};
  fread(content, 1, sizeof(content)-1, file);
  fclose(file);

  // Remove possible line breaks
  String contentStr = String(content);
  contentStr.trim();
  Serial.printf("Read the content: %s\n", contentStr.c_str());

  // 4. Verify content
  Serial.println("\nTest step 4/4: Verify content consistency");
  if (contentStr != testContent) {
    Serial.println("Content verification failed: Expectations do not match reality");
    testPassed = false;
  } else {
    Serial.println("Content verified");
  }

  // Clean up the test file
  Serial.println("\nClean up test file");
  if (remove(testPath.c_str()) != 0) {
    Serial.printf("Test file deletion failed: %s\n", strerror(errno));
    // Deletion failure is not regarded as a test failure
  } else {
    Serial.println("Test file deleted");
  }

  return testPassed;
}

// Print the SD card information
void printSDCardInfo() {
  if (!sdCardAvailable) return;

  // Card name
  Serial.printf("Card name: %s\n", sdCard->cid.name);

  // Card type
  Serial.print("Card type: ");
  if (sdCard->ocr & 0x40000000) {
    Serial.println("High capacity(SDHC)/Expanded capacity(SDXC)");
  } else {
    Serial.println("Standard capacity(SDSC)");
  }

  // Capacity information
  uint64_t cardSize = (uint64_t)sdCard->csd.capacity * sdCard->csd.sector_size;
  Serial.printf("Total capacity: %.2f GB (%.2f MB)\n",
                (float)cardSize / (1024 * 1024 * 1024),
                (float)cardSize / (1024 * 1024));

  // Working frequency
  Serial.printf("Working frequency: %d kHz\n", sdCard->max_freq_khz);

  // File system
  Serial.println("File system: FAT32");
  Serial.println("Mount point: /sdcard");
}

// Print the test results
void printTestResult(bool result) {
  Serial.println("\n======================");
  if (result) {
    Serial.println("===== TEST PASS! =====");
  } else {
    Serial.println("===== TEST FAILED! =====");
  }
  Serial.println("======================");
}

// Uninstall the SD card
void unmountSDCard() {
  if (sdCardAvailable) {
    esp_vfs_fat_sdmmc_unmount();
    sdCardAvailable = false;
    Serial.println("SD card uninstalled");
  }
}
After burning, the serial port will print the following test information.
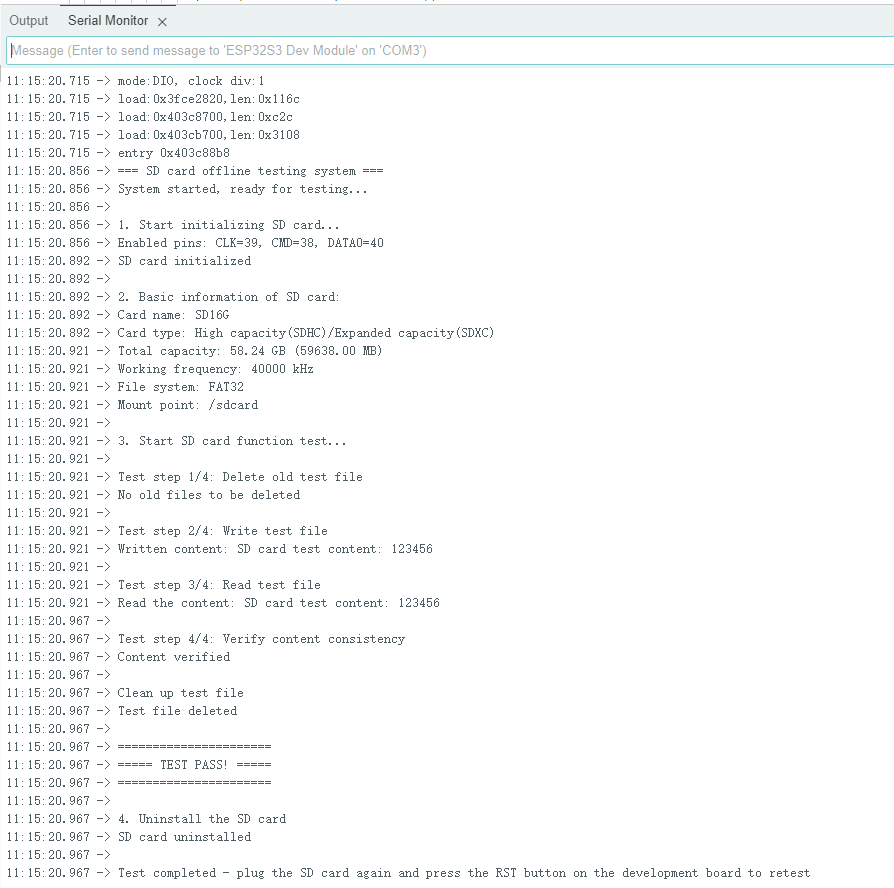 If the above information is not shown, please replace the SD card with a capacity of less than 64GB or format the SD card to FTA32.
5. Precautions
1.Cannot burn the program to the development board?
A: Please replace the data cable or reinstall the CH340 driver.
https://docs.keyestudio.com/en/latest/docs/Download_Center/Download_Center.html#driver-download
2.Do not directly connect high-power motors through the IO port.