6. AI Recognition Tutorial
Note: need to turn off the programme of boot-up, then follow the below instructions
Open the terminal and input sudo nano /etc/rc.local then press Enter.

Add # before enabling the scripts, as shown below;

Press Ctrl + o to save, then press Enter and Ctrl + X to exit editing.
1. Drive the Camera
Use “opencv” to drive the camera. The “API” function provided is very powerful and flexible, now let’s introduce it as follow.
1.1. cv2.VideoCapture() function
cap = cv2.VideoCapture(0)
0 is the parameter of this function, indicating Raspberry Pi “video0”.
(Note:The current camera can be viewed with the command “ ls/dev/ ”.)

1.2. cap.set() function
cap.set(CV_CAP_PROP_FRAME_WIDTH, 500) #set the frame width of the vide to 500.
Camera configuration methods:
CV_CAP_PROP_POS_MSEC =0, //obtain an image at certain time
CV_CAP_PROP_POS_FRAMES =1, //Get a frame of an image
CV_CAP_PROP_POS_AVI_RATIO =2, //Get an image of the * position
CV_CAP_PROP_FRAME_WIDTH =3, //Gets frame width
CV_CAP_PROP_FRAME_HEIGHT =4, //Gets frame height
CV_CAP_PROP_FPS =5, //Gets the frame rate
CV_CAP_PROP_FOURCC =6, // 4-character Encoder
CV_CAP_PROP_FRAME_COUNT =7, //Gets the total number of frames
CV_CAP_PROP_FORMAT =8, //Video formats
CV_CAP_PROP_MODE =9, //Boolean flags indicating whether images should be converted to RGB.
CV_CAP_PROP_BRIGHTNESS =10, //Brightness
CV_CAP_PROP_CONTRAST =11, //Contrast Ratio
CV_CAP_PROP_SATURATION =12, //Saturation
CV_CAP_PROP_HUE =13, //Hue
CV_CAP_PROP_GAIN =14, //Gain
CV_CAP_PROP_EXPOSURE =15, //Exposure
CV_CAP_PROP_CONVERT_RGB =16, //Stereo camera correction mark
CV_CAP_PROP_WHITE_BALANCE_BLUE_U =17, //White balance
1.3. cap.isOpened() function
Used to determine if the camera is turned on successfully. If it is successful, return “ture”, otherwise “false”.
1.4. ret,frame = cap.read() function
“ cap.read() ”reads the video frame by frame.“ret,frame” are the two return values to get the “cap.read()” method.“ret” is a boolean value .
If the frame is right, returns True, and if the file is not read to the end, its return value is False.
The frame is the image of each frame, which is a three-dimensional matrix.
1.5. cv2.waitKey() function
The parameter is 1, which means delay 1ms to switch to the next frame.
The parameter is 0, which indicates that only the current frame image is displayed(equivalent to video pause).
1.6. cap.release() and destroyAllWindows() function
“cap.release()” releases the video and uses “destroyAllWindows()” to close all image windows.
1.7. Example code for driving a camera
import cv2

def useCamera():
    # Obtaining a Camera
    capture = cv2.VideoCapture(0)
    capture.set(3, 480)  # Gets the video frame width
    capture.set(10, 55)  # Screen brightness
    while capture.isOpened():
        # Open the camera and read the image
        flag, image = capture.read()
        cv2.imshow("image", image)
        k = cv2.waitKey(1)
        if k == ord('s'):
            cv2.imwrite("test.jpg", image)
        elif k == ord("q"):
            break
    # release the camera
    capture.release()
    # Close all Windows
    cv2.destroyAllWindows()

if __name__ == '__main__':
    useCamera()
1.8. Run the code and test result
Enter the following two commands in the terminal respectively and press “Enter” key respectively:
cd /home/pi/RaspberryPi-Car/Ai_recognition
sudo python3 Ai1_Camera_driver.py
After running the code, a window will appear on the desktop to display the image captured by the camera.

2. Color recognition
2.1. HSV color space
we often use the RGB color space, mixing red, green and blue, and can synthesize various colors. But in the machine, it is not easy to recognizes the proportion of each color. The HSV color space is composed of H (Hue), S (Saturation), and V (Value).
According to the “H”, a certain color can be basically determined, and some value can be determined as greater than a threshold by the saturation and brightness information. This makes it easier for the machine to recognize colors.

2.2. Color space conversion
Opencv incorporates multiple color space conversion functions. We usually fucntion use BGR >> Gray and BGR >> HSV. Note that Gray can’t convert with HSV. Function is as follows;
cv2.cvtColor(image, flag)
When BGR >> Gray,the parameter flag can be written as cv2.COLOR_BGR2GRAY
When BGR >> HSV,the parameter flag: cv2.COLOR_BGR2HSV
Pay attention to the value range of HSV color space in “opencv”:H[0,179] S[0,255] V[0,255]
Range of common colors:

2.3. Sample code for color recognition
First set to color range white, and the rest to black, then replace the white parts with the original images.
import cv2
import numpy as np
import time
cap = cv2.VideoCapture(0)
cap.set(3, 480)
cap.set(4, 380)
cap.set(5, 120) #Set the frame rate
cap.set(cv2.CAP_PROP_FOURCC, cv2.VideoWriter.fourcc('M', 'J', 'P', 'G'))
cap.set(cv2.CAP_PROP_BRIGHTNESS, 60) #Set the brightness -64 - 64 0.0
cap.set(cv2.CAP_PROP_CONTRAST, 40) #Set contrast -64 - 64 2.0
# image.set(cv2.CAP_PROP_EXPOSURE, 156) #Set exposure 1.0 - 5000 156.0
# The red areas
color_lower = np.array([0, 43, 46])
color_upper = np.array([10, 255, 255])
# #Green range
#color_lower = np.array([35, 43, 46])
#color_upper = np.array([77, 255, 255])
# #Blue range
#color_lower=np.array([100, 43, 46])
#color_upper = np.array([124, 255, 255])
# #Yellow range
# color_lower = np.array([26, 43, 46])
# color_upper = np.array([34, 255, 255])
# #Orange range
# color_lower = np.array([11, 43, 46])
# color_upper = np.array([25, 255, 255])
def Color_Recongnize():
while(1):
ret, frame = cap.read()
cv2.imshow('Capture', frame)
# change to hsv model
hsv = cv2.cvtColor(frame, cv2.COLOR_BGR2HSV)
# get mask
# The inRange() function and the upper and lower bounds of the blue
# range in HSV model are used to obtain the mask. The blue part of the
# original video of the mask will be made white, and the other parts will be black.
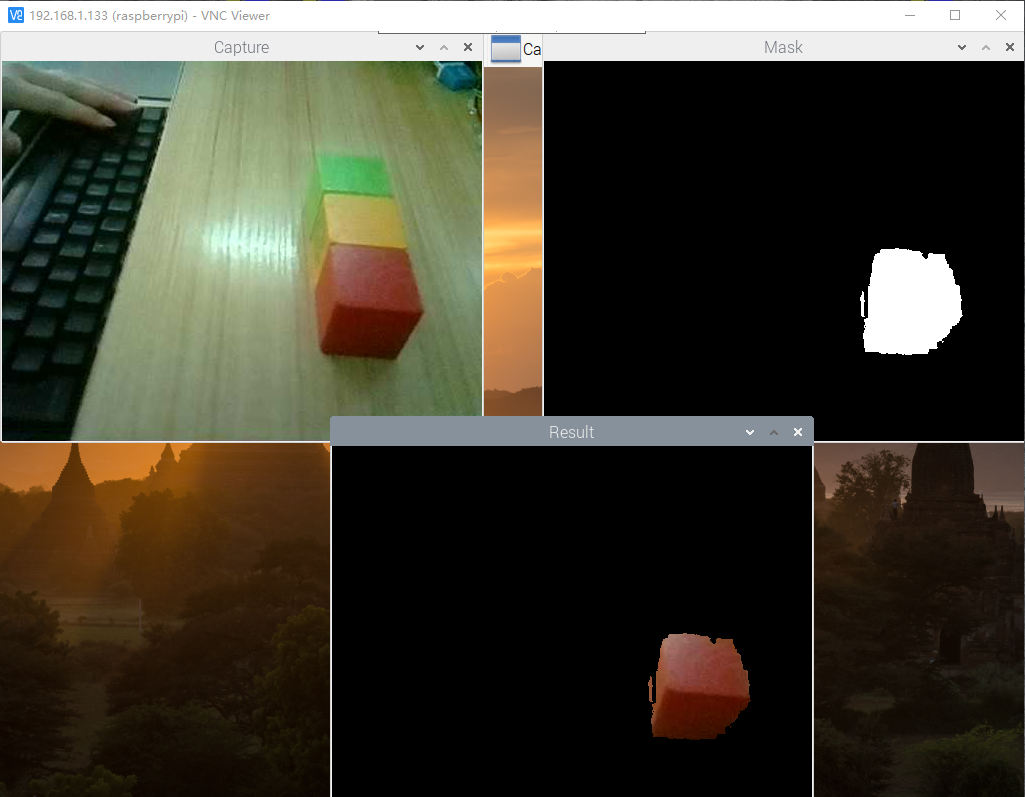
mask = cv2.inRange(hsv, color_lower, color_upper)
cv2.imshow('Mask', mask)
#mask_widget.value = bgr8_to_jpeg(mask)
# detect blue
# When the mask is pressed and operated on the original video frame,
# white in the mask will be replaced with the real image:
res = cv2.bitwise_and(frame, frame, mask=mask)
cv2.imshow('Result', res)
if cv2.waitKey(1) & 0xFF == ord('q'):
break
time.sleep(0.01)
# Exit when closed
cap.release()
cv2.destroyAllWindows()
# main function
Color_Recongnize()
2.4. Run the codes and test result
Enter the following two commands in the terminal respectively and press “Enter” key respectively:
cd /home/pi/RaspberryPi-Car/Ai_recognition
sudo python3 Ai2_Color_identification.py
You can see that only the red square is identified in the screen monitored by the camera. Press keyboard “q” to exit.
3. Color Recognition and Tracking
We’ve learned the color recognition from the previous lesson. In this lesson, we will achieve color recognition and tracking by the 4DOF pan tilt.
3.1. Code to Identify colors and track
import RPi.GPIO as GPIO
import time
import enum
import cv2

import time
# Thread function operation library
import threading
import inspect
import ctypes

import numpy as np
import PID

# servo pin
ServoPin = 7  #S2
ServoPinB = 6  #S3
#Set GPIO BCM
GPIO.setmode(GPIO.BCM)
#servo output mode
def init():
    GPIO.setup(ServoPin, GPIO.OUT)
    GPIO.setup(ServoPinB, GPIO.OUT)

#Defines an impulse function used to generate PWM values in analog mode
#The time-base pulse is 20ms,
#and the high level part of the pulse controls 0-180 degrees in 0.5-2.5ms
def servo_pulse(myangleA, myangleB):
    pulsewidth = myangleA
    GPIO.output(ServoPin, GPIO.HIGH)
    time.sleep(pulsewidth/1000000.0)
    GPIO.output(ServoPin, GPIO.LOW)
    time.sleep(20.0/1000-pulsewidth/1000000.0)

    pulsewidthB = 2500-myangleB
    GPIO.output(ServoPinB, GPIO.HIGH)
    time.sleep(pulsewidthB/1000000.0)
    GPIO.output(ServoPinB, GPIO.LOW)
    time.sleep(20.0/1000-pulsewidthB/1000000.0)

#According to the steering gear pulse control range of 500-2500USEC:
def Servo_control(angle_1, angle_2):
    init()
    if angle_1 < 500:
        angle_1 = 500
    elif angle_1 > 2500:
        angle_1 = 2500

    if angle_2 < 500:
        angle_2 = 500
    elif angle_2 > 2500:
        angle_2 = 2500
    servo_pulse(angle_1, angle_2)

# Thread closing function
def _async_raise(tid, exctype):
    """raises the exception, performs cleanup if needed"""
    tid = ctypes.c_long(tid)
    if not inspect.isclass(exctype):
        exctype = type(exctype)
    res = ctypes.pythonapi.PyThreadState_SetAsyncExc(tid, ctypes.py_object(exctype))
    if res == 0:
        raise ValueError("invalid thread id")
    elif res != 1:
        # """if it returns a number greater than one, you're in trouble,
        # and you should call it again with exc=NULL to revert the effect"""
        ctypes.pythonapi.PyThreadState_SetAsyncExc(tid, None)

def stop_thread(thread):
    _async_raise(thread.ident, SystemExit)

# Enabling the Camera
image = cv2.VideoCapture(0)
image.set(3, 640)
image.set(4, 480)
image.set(5, 120)   #Set the frame rate
# fourcc = cv2.VideoWriter_fourcc(*"MPEG")
image.set(cv2.CAP_PROP_FOURCC, cv2.VideoWriter.fourcc('M', 'J', 'P', 'G'))
image.set(cv2.CAP_PROP_BRIGHTNESS, 55) #Set the brightness-64 - 64  0.0
image.set(cv2.CAP_PROP_CONTRAST, 20)   #Set contrast -64 - 64  2.0

global color_x, color_y, color_radius
color_x = color_y = color_radius = 0
global target_valuex
target_valuex = 1500
global target_valuey
target_valuey = 1500
global g_mode
g_mode = 0


global color_lower
#color_lower = np.array([156, 43, 46])
#color_lower = np.array([0, 43, 46])  # red
color_lower=np.array([100, 43, 46])  # blue
#color_lower = np.array([35, 43, 46]) #green
global color_upperv
#color_upper = np.array([180, 255, 255])
#color_upper = np.array([10, 255, 255]) # red
color_upper = np.array([124, 255, 255]) # blue
#color_upper = np.array([77, 255, 255]) #green

target_valuex = target_valuey = 2048
Servo_control(1500, 1500)
xservo_pid = PID.PositionalPID(0.8, 0.1, 0.3)
yservo_pid = PID.PositionalPID(0.4, 0.1, 0.2)

# Camera head movement
def Color_track():
    global color_lower, color_upper, g_mode
    global target_valuex, target_valuey
    t_start = time.time()
    fps = 0
    times = 0
    print("start")
    while True:
        ret, frame = image.read()  # Read the video by frame
        frame = cv2.resize(frame, (300, 300))  # Image size
        frame_ = cv2.GaussianBlur(frame,(5,5),0) # Gaussian filter
        hsv = cv2.cvtColor(frame,cv2.COLOR_BGR2HSV) # HSV
        mask = cv2.inRange(hsv,color_lower,color_upper)  # Specify color range
        mask = cv2.erode(mask,None,iterations=2)
        mask = cv2.dilate(mask,None,iterations=2)
        mask = cv2.GaussianBlur(mask,(3,3),0)
        cnts = cv2.findContours(mask.copy(),cv2.RETR_EXTERNAL,cv2.CHAIN_APPROX_SIMPLE)[-2]
        #if g_mode == 1: # Button switch
        if len(cnts) > 0:
            cnt = max (cnts, key = cv2.contourArea)
            (color_x,color_y),color_radius = cv2.minEnclosingCircle(cnt)
            if color_radius > 10:
                times =  times +  1
                # Mark detected colors
                cv2.circle(frame,(int(color_x),int(color_y)),int(color_radius),(255,0,255),2)
                # Proportion-Integration-Differentiation
                xservo_pid.SystemOutput = color_x
                xservo_pid.SetStepSignal(150)
                xservo_pid.SetInertiaTime(0.01, 0.1)
                target_valuex = int(1500+xservo_pid.SystemOutput)
                # Input Y direction parameter PID control input
                yservo_pid.SystemOutput = color_y
                yservo_pid.SetStepSignal(150)
                yservo_pid.SetInertiaTime(0.01, 0.1)
                target_valuey = int(1500+yservo_pid.SystemOutput)
                print(target_valuey)
                # Turn the head holder to the PID setting position
                time.sleep(0.008)
                if times == 5 :
                    times = 0
                    Servo_control(target_valuex,target_valuey)
        fps = fps + 1
        mfps = fps / (time.time() - t_start)
        cv2.putText(frame, "FPS " + str(int(mfps)), (40,40), cv2.FONT_HERSHEY_SIMPLEX, 0.8, (0,255,255), 3)
        # Real-time return image data for display
        cv2.imshow("resuilt",frame) # Display renderings

        if cv2.waitKey(10) & 0xFF == ord('q'):
            #End the process, release the camera, and execute as needed
            #stop_thread(thread1)
            image.release()
            break
    #stop_thread(thread1)
    image.release()
    cv2.destroyAllWindows()

Color_track()
# Start the process
#thread1 = threading.Thread(target=Color_track)  # Enter the head control main process
#thread1.setDaemon(True)
#thread1.start()
3.2. Run the code and test result
Enter the following two commands in the terminal respectively and press “Enter” key respectively:
cd /home/pi/RaspberryPi-Car/Ai_recognition
sudo python3 Ai3_color_follow.py
After running the code, take a blue object and move it slowly before the camera monitoring range, then camera head will also slowly move, then maintain it in the center of the monitoring range of the camera . You can modify the code to identify the color you want.

4. QR Code Identification
QR code is also known as two-dimensional barcode. A two-dimensional barcode is a black-and-white graphic that records data symbol information.
4.1. QR Code Generator
Link:https://www.the-qrcode-generator.com/

4.2. Test Code
In China, QR code identification technology is a part of our daily life.
We utilized the pyzbar package. If you don’t use the Raspberry Pi imager system, you need to install pyzbar.
Enter the following two commands in the terminal respectively and press “Enter” key respectively:
sudo apt-get install libzbar0
sudo pip3 install pyzbar
import enum
import cv2
# import the necessary packages
#import simple_barcode_detection
import numpy as np
import pyzbar.pyzbar as pyzbar
from PIL import Image

# Define and parse two-dimensional code
def decodeDisplay(image):
    barcodes = pyzbar.decode(image)
    for barcode in barcodes:
        # Extract the position of the boundary box of the TWO-DIMENSIONAL code
        # Draw the bounding box for the bar code in the image
        (x, y, w, h) = barcode.rect
        cv2.rectangle(image, (x, y), (x + w, y + h), (225, 225, 225), 2)

        # Extract qr code data as byte objects, so if we want to output images on
        # To draw it, you have to convert it to a string
        barcodeData = barcode.data.decode("utf-8")
        barcodeType = barcode.type

        # Plot the barcode data and barcode type on the image
        text = "{} ({})".format(barcodeData, barcodeType)
        cv2.putText(image, text, (x, y - 10), cv2.FONT_HERSHEY_SIMPLEX,0.5, (225, 225, 225), 2)

        # Prints barcode data and barcode type to the terminal
        print("[INFO] Found {} barcode: {}".format(barcodeType, barcodeData))
    return image

def detect():
    camera = cv2.VideoCapture(0)
    camera.set(3, 320)
    camera.set(4, 240)
    camera.set(5, 120)  #Set the frame rate
    # fourcc = cv2.VideoWriter_fourcc(*"MPEG")
    camera.set(cv2.CAP_PROP_FOURCC, cv2.VideoWriter.fourcc('M', 'J', 'P', 'G'))
    camera.set(cv2.CAP_PROP_BRIGHTNESS, 50) #Set the brightness -64 - 64  0.0
    camera.set(cv2.CAP_PROP_CONTRAST, 50) #Set contrast -64 - 64  2.0
    camera.set(cv2.CAP_PROP_EXPOSURE, 156) #Set exposure 1.0 - 5000  156.0
    ret, frame = camera.read()
    while True:
        # Read current frame
        ret, frame = camera.read()
        #Grayscale image
        gray = cv2.cvtColor(frame, cv2.COLOR_BGR2GRAY)
        im = decodeDisplay(gray)
        cv2.waitKey(5)
        cv2.imshow("image",im)
        # If you press Q, the loop will be broken
        if cv2.waitKey(10) & 0xFF == ord('q'):
            break
    camera.release()
    cv2.destroyAllWindows()

while 1:
    detect()
4.3. Run the code and test result
Enter the following two commands in the terminal respectively and press “Enter” key respectively:
cd /home/pi/RaspberryPi-Car/Ai\_recognition
sudo python3 Ai4\_Qr\_code.py
After running the code, put the QR code generated in the surveillance area of the camera, and the terminal can identify the information of the QR code.

5. Face Recognition
Face recognition is now very common in technology products. The basic task of face recognition is face detection. It means that the face can be captured before further comparison and recognition can be performed.
We only provide a method for face detection.
The most common method of face detection is to use the “Haar Cascade Classifier”. Target detection using a cascade classifier based on Haar features is an efficient target detection method proposed by Paul Viola and Michael Jones in the paper “Rapid Object Detection using a Boosted Cascade of Simple Features” in 2001. This is basically a machine learning based approach where a cascade function is trained from a lot of images both positive and negative. Based on the training it is then used to detect the objects in the other images. We will use it for face recognition. Initially, the algorithm requires a large number of positive images (face images) and negative images (images without faces) to train the classifier, and then extract features from them. “OpenCV” has trainers and detectors. If you want to train your own object classifier, such as cars, airplanes, etc., you can use “OpenCV” to create one. We are using a pre-trained classifier. In “OpenCV”, static images and real-time video have similar operations for face detection.
In other words, video face detection just reads each frame of image from the camera, and then uses static image detection methods for detection. Classifiers required for face detection:
Face detector (default): haarcascade_frontalface_default.xml
Face detector (fast Harr): haarcascade_frontalface_alt2.xml
Face detector (side view): haarcascade_profileface.xml
Eye detector (left eye): haarcascade_lefteye_2splits.xml
Eye detector (right eye): haarcascade_righteye_2splits.xml
Mouth detector: haarcascade_mcs_mouth.xml
Nose detector: haarcascade_mcs_nose.xml
Body detector: haarcascade_fullbody.xml
Face detector (fast LBP): lbpcascade_frontalface.xml
Only open eyes can be detected: haarcascade_eye.xml
Only detectable when the subject wears glasses: haarcascade_eye_tree_eyeglasses.xml
Link: https://github.com/opencv/opencv/tree/master/data
Note: coordinate(X),coordinate(Y),width(W),height(H)
haarcascade_profileface.xml is the cascade data of Haar. xml is obtained from the data/haarcascades, We can detect faces with face_cascade.detectMultiScale(). Yet we can’t load each image obtained from the camera to the .detectMultiScale(), on the contrary, we should convert the image into the gray image instead because the face recognition needs this color space.
(Note:input haarcascade_profileface.xml at right place)
Detected API function in the OpenCV:
detectMultiScale (const Mat& image, vector& objects, double scaleFactor=1.1,int minNeighbors, int flag,cvSize)
Image: input the gray image
Objects: Rectangular box vector group obtains the detected object
scaleFactor:scale parameter of each image, the default value is 1.1.
minNeighbors: minNeighbors controls the error detection, default value is 3, which indicates at least three times overlap detection.
minSize: the minimum size of the object
maxSize: the maximum size of the object
5.1. Face Detection Code
import enum
import cv2

# Camera display module
import cv2
import time
import sys

image = cv2.VideoCapture(0)
image.set(3,320)
image.set(4,240)
image.set(cv2.CAP_PROP_BRIGHTNESS, 50) #Set the brightness -64 - 64  0.0
ret, frame = image.read()

# Face recognition
# body_haar = cv2.CascadeClassifier("haarcascade_upperbody.xml")
face_haar = cv2.CascadeClassifier("haarcascade_profileface.xml")
# face_haar = cv2.CascadeClassifier("haarcascade_fullbody.xml")
# eye_haar = cv2.CascadeClassifier("haarcascade_eye.xml")
# eye_haar = cv2.CascadeClassifier("haarcascade_eye_tree_eyeglasses.xml")
def Camera_display():
    while 1:
        ret, frame = image.read()
        # Convert the image to black and white
        gray_img = cv2.cvtColor(frame, cv2.COLOR_BGR2GRAY)
#         # Detect all pedestrians in the image
#         bodies = body_haar.detectMultiScale(gray_img, 1.3, 5)
#         for body_x,body_y,body_w,body_h in bodies:
#             cv2.rectangle(frame, (body_x, body_y), (body_x+body_w, body_y+body_h), (0,255,0), 2)

# detectMultiScale(const Mat& image, vector& objects, double scaleFactor=1.1,int minNeighbors, int flag,cvSize)
# 1. image is the gray scale image of the input
# 2. Objects is a vector group of rectangular boxes to get the detected object
# 3. ScaleFactor is the scale parameter in each image scale, with a default value of 1.1.
#    The scale_factor parameter determines how much of a jump there is between scans of two Windows of different sizes.
#    Setting this parameter to large means that the computation is faster, but if the window misses a face of a certain size, the object may be lost.
# 4. MinNeighbors parameters for each cascade number of adjacent rectangular should be retained (can't understand this parameter, -_ - | | |), the default value is 3.
#    MinNeighbors controls false detection, with a default value of 3 indicating at least three overlapping detections before we think a face actually exists.
# 5. MinSize indicates the minimum size of the target
# 6. MaxSize is the maximum size of the target


        faces = face_haar.detectMultiScale(gray_img, 1.1, 3)
        for face_x,face_y,face_w,face_h in faces:
            cv2.rectangle(frame, (face_x, face_y), (face_x+face_w, face_y+face_h), (0,255,0), 2)
            (face_x, face_y, face_w, face_h) = faces[0]
            print(faces[0:1])
        '''
        eyes = eye_haar.detectMultiScale(gray_img, 1.1, 3)
        for eye_x,eye_y,eye_w,eye_h in eyes:
            cv2.rectangle(frame, (eye_x,eye_y), (eye_x+eye_w, eye_y+eye_h), (255,0,0), 2)

#         eyes = eye_haar.detectMultiScale(gray_img, 1.3, 5)
#         for eye_x,eye_y,eye_w,eye_h in eyes:
#             cv2.rectangle(frame, (eye_x,eye_y), (eye_x+eye_w, eye_y+eye_h), (255,0,0), 2)
        '''
        cv2.imshow("people",frame)
        time.sleep(0.010)
        # If you press q, exit the loop and close the thread
        if cv2.waitKey(10) & 0xFF == ord('q'):
            image.release()
            break

Camera_display()
5.2. Run the code and test result
Enter the following two commands in the terminal respectively and press “Enter” key respectively:
cd /home/pi/RaspberryPi-Car/Ai_recognition/Ai5_face_detection
sudo python3 Ai5\_Face\_detection.py
After running the code, the camera will start detecting faces and add a green box if a face is recognized.

6. TensorFlow Object Recognition

TensorFlow is an open source software library that uses data flow graphs for numerical calculations. It is one of the widely used algorithm libraries that implement machine learning and other extensive mathematical operations. TensorFlow is developed by Google and is one of the most popular machine learning libraries on GitHub. Google uses TensorFlow to implement machine learning in almost all applications. For example, if you use Google Photos or Google Voice Search, then you indirectly use the TensorFlow model. They work on large Google hardware clusters and are powerful in perception tasks.
For more information on TensorFlow: https://www.tensorflow.org/learn
We only use the object identification model(object_detection) of TensorFlow Link: https://github.com/tensorflow/models/tree/master/research/object_detection
Link for example code: https://github.com/tensorflow/models/blob/master/research/object_detection/colab_tutorials/object_detection_tutorial.ipynb
6.1. Test Code
import numpy as np
import cv2
import os,time

import tensorflow as tf
from object_detection.utils import label_map_util
from object_detection.utils import visualization_utils as vis_utils
# Init camera
cap = cv2.VideoCapture(0)
cap.set(3,640) # set Width
cap.set(4,480) # set Height

# Init tf model
MODEL_NAME = 'ssdlite_mobilenet_v2_coco' #fast
PATH_TO_CKPT = MODEL_NAME + '/frozen_inference_graph.pb'
PATH_TO_LABELS = os.path.join('data', 'mscoco_label_map.pbtxt')
NUM_CLASSES = 90
IMAGE_SIZE = (12, 8)
fileAlreadyExists = os.path.isfile(PATH_TO_CKPT)

if not fileAlreadyExists:
    print('Model does not exsist !')
    exit

# LOAD GRAPH
print('Loading...')
detection_graph = tf.Graph()
with detection_graph.as_default():
    od_graph_def = tf.compat.v1.GraphDef()
    with tf.io.gfile.GFile(PATH_TO_CKPT, 'rb') as fid:
        serialized_graph = fid.read()
        od_graph_def.ParseFromString(serialized_graph)
        tf.import_graph_def(od_graph_def, name='')
label_map = label_map_util.load_labelmap(PATH_TO_LABELS)
categories = label_map_util.convert_label_map_to_categories(label_map, max_num_classes=NUM_CLASSES, use_display_name=True)
category_index = label_map_util.create_category_index(categories)
print('Finish Load Graph..')

# Main
t_start = time.time()
fps = 0

with detection_graph.as_default():
    with tf.compat.v1.Session(graph=detection_graph) as sess:
        while True:
            ret, frame = cap.read()
#            frame = cv2.flip(frame, -1) # Flip camera vertically
#             frame = cv2.resize(frame,(320,240))
            ##############
            image_np_expanded = np.expand_dims(frame, axis=0)
            image_tensor = detection_graph.get_tensor_by_name('image_tensor:0')
            detection_boxes = detection_graph.get_tensor_by_name('detection_boxes:0')
            detection_scores = detection_graph.get_tensor_by_name('detection_scores:0')
            detection_classes = detection_graph.get_tensor_by_name('detection_classes:0')
            num_detections = detection_graph.get_tensor_by_name('num_detections:0')

            print('Running detection..')
            (boxes, scores, classes, num) = sess.run(
                [detection_boxes, detection_scores, detection_classes, num_detections],
                feed_dict={image_tensor: image_np_expanded})

            print('Done.  Visualizing..')
            vis_utils.visualize_boxes_and_labels_on_image_array(
                    frame,
                    np.squeeze(boxes),
                    np.squeeze(classes).astype(np.int32),
                    np.squeeze(scores),
                    category_index,
                    use_normalized_coordinates=True,
                    line_thickness=8)

            ##############
            fps = fps + 1
            mfps = fps / (time.time() - t_start)
            cv2.putText(frame, "FPS " + str(int(mfps)), (10,10), cv2.FONT_HERSHEY_SIMPLEX, 0.5, (0,0,255), 2)
            cv2.imshow('frame', frame)

            k = cv2.waitKey(30) & 0xff
            if k == 27: # press 'ESC' to quit
                break

cap.release()
cv2.destroyAllWindows()
6.2. Run the code and test result
Enter the following two commands in the terminal respectively and press “Enter” key respectively:
cd /home/pi/RaspberryPi-Car/Ai_recognition/Ai6_TensorflowObject_recognition
sudo python3 Ai6_Object_recognition.py
After running the code, the identified problems are circled. Raspberry Pi’s performance is still not good ,with a low frame rate.
