5.1 Resource compression package
The resource package contains Code, Libraries, APP and Driver files. You must have this resourse to continue learing.
5.2 Getting started with Arduino
5.2.1 ESP32 PLUS Development board

ESP32PLUS is a universal WiFi plus Bluetooth development board based on ESP32, integrated with ESP32-WOROOM-32 module and compatible with Arduino.
It has a hall sensor, high-speed SDIO/SPI, UART, I2S as well as I2C. Furthermore, equipped with freeRTOS operating system, which is quite suitable for the Internet of things and smart home.

5.2.2 Windows System

1 Installing Arduino IDE
When you get control board, you need to download Arduino IDE and driver firstly.
You could download Arduino IDE from the official website: https://www.arduino.cc/, click the SOFTWARE on the browse bar to enter download page, as shown below:

⚠️ Special reminder: If you cannot find the Arduino IDE in the software on the aforementioned official website, you can click on this link:\ https://www.arduino.cc/en/software to directly access the Arduino IDE download page.
There are various versions of IDE for Arduino. Just download a version compatible with your system. Here we will show you how to download and install the windows version of Arduino IDE.

You can choose between the Installer (.exe) and the Zip packages. We suggest you use the first one that installs directly everything you need to use the Arduino Software (IDE), including the drivers. With the Zip package you need to install the drivers manually. The Zip file is also useful if you want to create a portable installation.

You just need to click JUST DOWNLOAD.
2 Install a driver
⚠️ Special reminder: If you have installed the CH340 driver, just skip it.
Connect the main control board to your computer with a USB cable, and the driver will be installed automatically on MacOS and Windows10 system. If the driver installation process fails, you need to install the driver manually.
(1) Check whether the computer automatically installs the driver:
Right click Computer—– Click Properties—–Click Device Manager, the following picture shows the successful installation:

(2) Manual installation:
Right-click “\ USB2.0-Serial\ ” and click “\ Update drive…\ ”

Click “\ Browse my computer for driver software\ ”

Click“\ Browse…\ ”and select the“\ usb_ch341_3.1.2009.06 folder\ ”.

Check the serial port connection status again, as shown in the following figure, the driver is successfully installed.
3 Add the ESP32 Environment(add version 3.1.0)
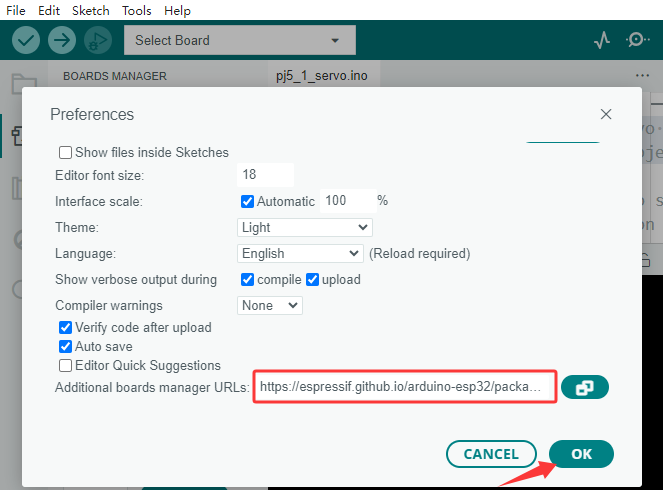
(1)Open the arduino IDE,click File > Preferences,as shown below:

(2)Copy the
link:\ https://espressif.github.io/arduino-esp32/package_esp32_index.json
.
(3)Open the button marked below:

(4) Paste it inside and click OK, as shown below

(5) Click Tools > Board > Boards Manager

(6) Find the ESP32 from the pop up Boards Manager and then click install. (add version 3.1.3)!!!Very important

(7) Click Tools > Board >esp32 to choose the ESP32 Dev Module.

4 Arduino IDE Setting
Click  icon,open Arduino IDE.

To avoid the errors when uploading the program to the board, you need to select the correct Arduino board that matches the board connected to your computer.
Then come back to the Arduino software, you should click Tools→Board, select the board. (as shown below)

Then select the correct COM port (you can see the corresponding COM port after the driver is successfully installed)

Before uploading the program to the board, let’s demonstrate the function of each symbol in the Arduino IDE toolbar.

1- Used to verify whether there is any compiling mistakes or not.
2- Used to upload the sketch to your ESP32 board.
3- Used to send the serial data received from board to the serial plottle.
4- Used to send the serial data received from board to the serial monitor.
5.2.3 Mac System

1 Download Arduino IDE

2 Download the CH340 driver
We provide,please go to 5.1 resourse pack to get
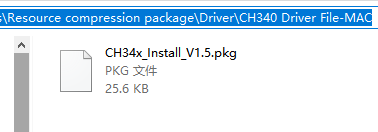
3 How to install the CH340 driver
After the download, seen as below:

Double-click installation package and tap Continue

Click Install

Input your user password and click Install Software

Tap Continue Installation

Wait to install

Click Restart after the installation is finished

4 Arduino IDE Setting:
Except for COM ports, the setting method is the same as in chapter 1.4:

5.3 How to Add Libraries?
5.3.1 What are Libraries ?
Libraries are a collection of code that makes it easy for you to drive a sensor,display, module, etc.
For example, the built-in LiquidCrystal library helps talk to LCD displays. There are hundreds of additional libraries available on the Internet for download.
The built-in libraries and some of these additional libraries are listed in the reference.
https://www.arduino.cc/en/Reference/Libraries
5.3.2 Add ZIP Libraries
When you want to add a zip library, you need to download it as a ZIP file, put in the proper directory. The Libraries needed to run the Smart Home can be found on:

Click Sketch—->Include Library—>Add.ZIP Library,then Then navigate to the library file you downloaded and click “open.”


Import the library. You can find it in the include library list.
