5.1 Face Unlock
5.1.1 Overview
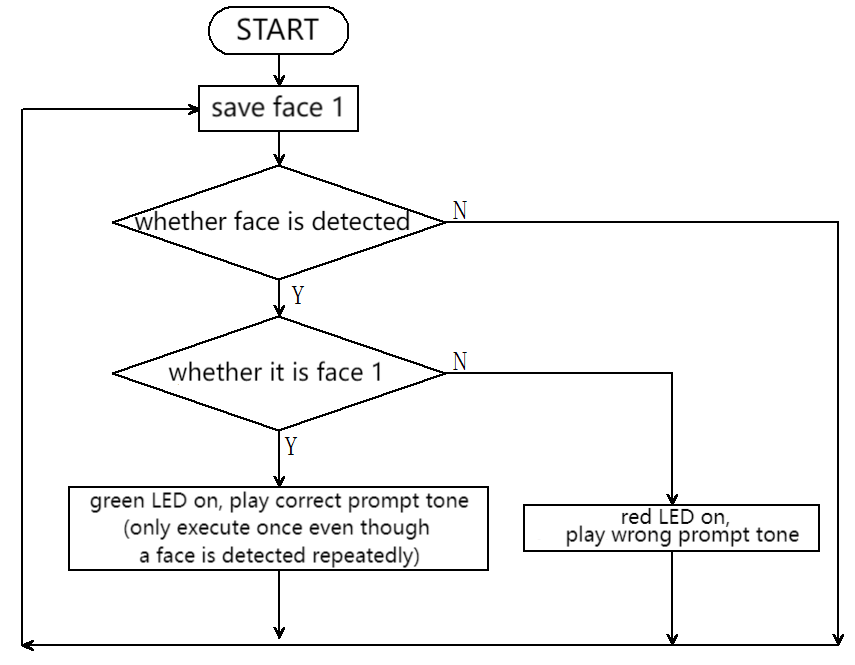
For face unlock, the module determines whether the face is a stored one. If it is, a correct prompt tone will be played with the green LED on; if not, an error prompt tone will be played with a red LED on. We can train and store faces by long-pressing the function button of the module, and then it will recognize the face by code.
5.1.2 Code Flow
5.1.3 Test Code
#include <Arduino.h>  // Arduino core library
#include <Sentry.h>   // Sentry machine vision sensor library
#include <Wire.h>     // I2C communication library
#include <Adafruit_NeoPixel.h>

#define PIN A3
Adafruit_NeoPixel strip = Adafruit_NeoPixel(4, PIN, NEO_GRB + NEO_KHZ800);

// Create an alias Sengo for the Sengo1 type to simplify subsequent usage
typedef Sengo1 Sengo;

// Communication mode (currently enabled I2C).
#define SENGO_I2C
// #define SENGO_UART    // UART serial communication solution (annotated as disabled)

// Include the corresponding library according to the selected communication mode
#ifdef SENGO_I2C
#include <Wire.h>  // Libraries required for I2C communication
#endif

#ifdef SENGO_UART
#include <SoftwareSerial.h>               // Soft serial library
#define TX_PIN 11                         // Customize the TX pin
#define RX_PIN 10                         // Customize the RX pin
SoftwareSerial mySerial(RX_PIN, TX_PIN);  // Create a soft serial port object
#endif

#define speakerPin 3  // Speaker pin

// Global state variable
unsigned long lastDetectionTime = 0;        // Finally, the timestamp of the face was detected
const unsigned long disappearDelay = 5000;  // Face disappearance delay time (5 seconds)
bool currentFaceDetected = false;  // Face 1 detected or not


// Define the visual processing type as face recognition
#define VISION_TYPE Sengo::kVisionFace

// Create a Sengo sensor object
Sengo sengo;

// Correct prompt tone: two crisp short tones
void playSuccessSound() {
  for (int i = 0; i < 2; i++) {
    tone(speakerPin, 1500);  // 1500Hz high frequency
    delay(100);
    noTone(speakerPin);
    delay(50);  // Interval between tones
  }
}

// Wrong prompt tone: single deep long note
void playErrorSound() {
  tone(speakerPin, 300);  // 300Hz low frequency
  delay(500);
  noTone(speakerPin);
}

// Fill the dots one after the other with a color
void colorWipe(uint32_t c, uint8_t wait) {
  for (uint16_t i = 0; i < strip.numPixels(); i++) {
    strip.setPixelColor(i, c);
    strip.show();
    delay(wait);
  }
}

void setup() {
  sentry_err_t err = SENTRY_OK;  // Define the error state variable and initialize it to be error-free

  Serial.begin(9600);            // Initialize the serial port and set baud rate to 9600
  Serial.println("Waiting for sengo initialize...");  // Print the initialization prompt

// Initialize the sensor according to the selected communication mode
#ifdef SENGO_I2C
  Wire.begin();  // Initialize the I2C bus
  // Keep trying to connect until succeed
  // The yield() function allows ESP8266/ESP32 to handle background tasks during the waiting period
  while (SENTRY_OK != sengo.begin(&Wire)) {
    yield();
  }
#endif  // SENGO_I2C

#ifdef SENGO_UART
  mySerial.begin(9600);  // Initialize the soft serial port and set baud rate to 9600
  // Keep trying to connect until succeed
  while (SENTRY_OK != sengo.begin(&mySerial)) {
    yield();
  }
#endif  // SENGO_UART


  Serial.println("Sengo begin Success.");  // Print the successful initialization information of the sensor

  // Activate the machine face recognition function
  err = sengo.VisionBegin(VISION_TYPE);

  // Print the initialization result of face recognition
  Serial.print("sengo.VisionBegin(kVisionFace) ");
  if (err) {
    Serial.print("Error: 0x");  // If an error occurs, print the error prefix
  } else {
    Serial.print("Success: 0x");  // If succeed, print the success prefix
  }
  Serial.println(err, HEX);  // Print the error code in hexadecimal format

  strip.begin();
  strip.show();  // Initialize all pixels to 'off'
}


void loop() {

  // Obtain the number of detected faces
  int face_count = sengo.GetValue(VISION_TYPE, kStatus);
  unsigned long currentMillis = millis();

  // Face 1 is detected or not
  if (face_count > 0) {
    for (int i = 1; i <= face_count; ++i) {
      int current_face_id = sengo.GetValue(VISION_TYPE, kLabel, i);
      Serial.println(current_face_id);

      if (current_face_id == 1 && !currentFaceDetected) {
        lastDetectionTime = currentMillis;  // Update the last detection time
        currentFaceDetected = true;
        colorWipe(strip.Color(0, 255, 0), 50);  // Green LED on
        playSuccessSound();                     // Play corrent prompt tone
        colorWipe(strip.Color(0, 0, 0), 50);    // Lights out
      } else if (current_face_id == 0 || current_face_id == 200) {
        colorWipe(strip.Color(255, 0, 0), 50);  // Red LED on
        playErrorSound();                       // Play wrong prompt tone
        colorWipe(strip.Color(0, 0, 0), 50);    // Lights out
      }
    }
  }

  // 5-second delay code
  if (currentFaceDetected && (currentMillis - lastDetectionTime >= disappearDelay)) {
    currentFaceDetected = false;  // Exit the activation status
  }
  delay(300);
}
5.1.4 Test Result
After uploading the code, the AI vision module will detect the image captured by the camera to determine if there is a face. If there is, it will judge whether it is the one we set. If yes, the car will emit a correct prompt tone with green LED on. If not, the car will emit a wrong prompt sound with red LED on.