5.2 Card Control Car
5.2.1 Overview
In this project, we control the car through traffic cards, including “forward”, “turn left”, “turn right”, “turn around(back)” and “stop”. The AI vision module can recognize them and control the car to perform corresponding actions based on the cards.
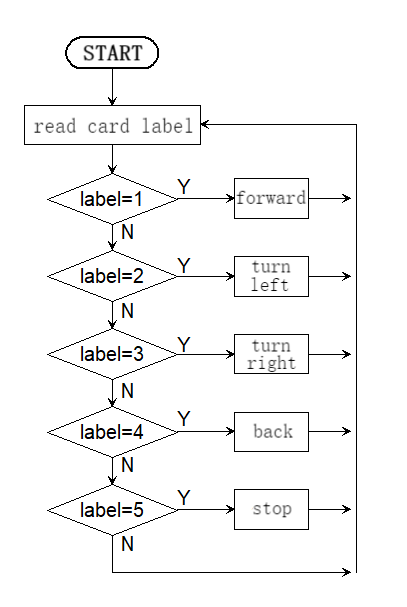
5.2.2 Code Flow
5.2.3 Test Code
#include <Arduino.h>  // Arduino core library
#include <Sentry.h>   // Sentry machine vision sensor library

// Create an alias Sengo for the Sengo1 type to simplify subsequent usage
typedef Sengo1 Sengo;

// Communication method (currently enabled I2C).
#define SENGO_I2C
// #define SENGO_UART         // UART serial communication solution (annotated as disabled)

// Include the corresponding library according to the selected communication mode
#ifdef SENGO_I2C
#include <Wire.h>  // Libraries required for I2C communication
#endif

#ifdef SENGO_UART
#include <SoftwareSerial.h>               // Soft serial library
#define TX_PIN 11                         // Customize the TX pin
#define RX_PIN 10                         // Customize the RX pin
SoftwareSerial mySerial(RX_PIN, TX_PIN);  // Create a soft serial port object
#endif

#define ML 4
#define ML_PWM 6
#define MR 2
#define MR_PWM 5

int left_speed = 150;
int right_speed = 150;

int label = 0;

// Define the visual processing type as a machine card recognition mode
#define VISION_TYPE Sengo::kVisionCard

// Create a Sengo sensor object
Sengo sengo;

// Card type name mapping table (Index corresponding to card label values)
const char* card_classes[] = {
  "unknown",      // 0: Unknown card type
  "forward",      // 1: Forward
  "left",         // 2: Turn left
  "right",        // 3: Turn right
  "turn_around",  // 4: Turn around
  "park",         // 5: Stop
  // Note: The size of the array should match the actual number of card types
};


void setup() {
  sentry_err_t err = SENTRY_OK;  // Define the error state variable and initialize it to be error-free

  Serial.begin(9600);                                 // Initialize the serial port for debugging the output
  Serial.println("Waiting for sengo initialize...");  // Print the initialization prompt

// Initialize the sensor according to the selected communication mode
#ifdef SENGO_I2C
  Wire.begin();  // Initialize the I2C bus
  // Keep trying to connect until succeed
  while (SENTRY_OK != sengo.begin(&Wire)) {
    yield();  // Allow other tasks to run while waiting
  }
#endif  // SENGO_I2C

#ifdef SENGO_UART
  mySerial.begin(9600);  // Initialize the soft serial port, set baud rate to 9600
  // Keep trying to connect until succeed
  while (SENTRY_OK != sengo.begin(&mySerial)) {
    yield();  // Allow other tasks to run while waiting
  }
#endif  // SENGO_UART

  Serial.println("Sengo begin Success.");  // Print the successful initialization information of the sensor

  // Activate the machine card recognition function
  err = sengo.VisionBegin(VISION_TYPE);

  // Print the initialization result of card recognition
  Serial.print("sengo.VisionBegin(kVisionCard) ");
  if (err) {
    Serial.print("Error: 0x");  // If an error occurs, print the error prefix
  } else {
    Serial.print("Success: 0x");  // If succeed, print the success prefix
  }
  Serial.println(err, HEX);  // Print the error code in hexadecimal format

  pinMode(ML, OUTPUT);      //Set the left motor direction control pin to output
  pinMode(ML_PWM, OUTPUT);  //Set the left motor pwm pin to output
  pinMode(MR, OUTPUT);      //Set the right motor direction control pin to output
  pinMode(MR_PWM, OUTPUT);  //Set the left motor pwm pin to output
}

void loop() {
  // Obtain the number of detected cards (kStatus returns the total number of detected cards)
  int obj_num = sengo.GetValue(VISION_TYPE, kStatus);

  // If at least one card is detected
  if (obj_num > 0) {
    // Traverse all the detected cards
    for (int i = 1; i <= obj_num; ++i) {
      // Card label value (Corresponding to the card_classes array index)
      label = sengo.GetValue(VISION_TYPE, kLabel, i);
      // Print the detailed information of the card
      Serial.print("  label:");
      Serial.println(label);
    }
    switch (label) {
      case 1: car_forward(); break;
      case 2: car_left(); break;
      case 3: car_right(); break;
      case 4: car_back(); break;
      case 5: car_stop(); break;
    }
  } else {
    car_stop();
  }
  delay(200);
}

//the car moves forward
void car_forward() {
  digitalWrite(ML, LOW);
  analogWrite(ML_PWM, left_speed);
  digitalWrite(MR, LOW);
  analogWrite(MR_PWM, right_speed);
}

//the car moves backward
void car_back() {
  digitalWrite(ML, HIGH);
  analogWrite(ML_PWM, (255 - left_speed));
  digitalWrite(MR, HIGH);
  analogWrite(MR_PWM, (255 - right_speed));
}

//the car turns left
void car_left() {
  digitalWrite(ML, HIGH);
  analogWrite(ML_PWM, 127);
  digitalWrite(MR, LOW);
  analogWrite(MR_PWM, 127);
}

//the car turns right
void car_right() {
  digitalWrite(ML, LOW);
  analogWrite(ML_PWM, 127);
  digitalWrite(MR, HIGH);
  analogWrite(MR_PWM, 127);
}

//the car stops
void car_stop() {
  digitalWrite(ML, LOW);
  analogWrite(ML_PWM, 0);
  digitalWrite(MR, LOW);
  analogWrite(MR_PWM, 0);
}
5.2.4 Test Result
After uploading the code, the AI vision module will detect the captured image to determine if there is a traffic card. If there is, assign the card label value to the variable “label”.
label = 1: the car moves forward; label = 2: the car turns left; label = 3: the car turns right; label = 4: the car moves backward; label = 5 or no card is detected: the car stops.