5.3 Color Block Following Car
5.3.1 Overview
In this project, we build a color block following car. Herein, the AI vision module locks a certain color block and detects its coordinates x and y, and width and height, and then it controls the car to move left, right, forward to track this color block.
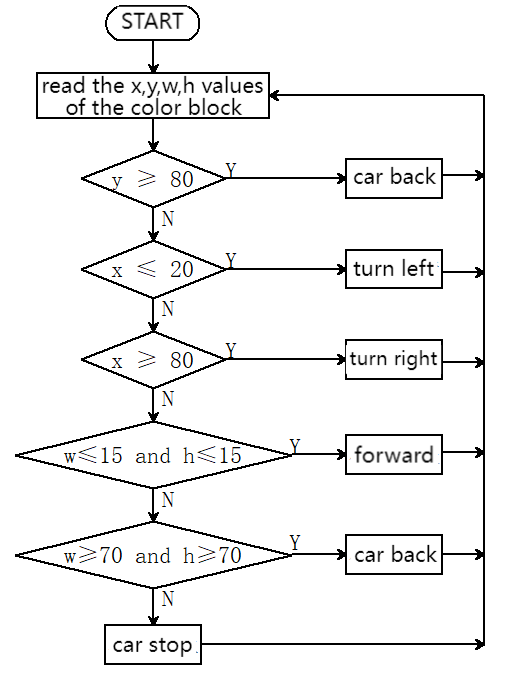
5.3.2 Code Flow
5.3.3 Test Code
from machine import I2C, Pin, PWM
import time
import random
from Sengo1 import *

# Wait for Sengo1 to initialize the operating system.
time.sleep(3)

# Initialize I2C (adjust the pins according to the actual wiring)
port = I2C(0, scl=Pin(21), sda=Pin(20), freq=400000)  # Use the pins in the reference code

# Create a Sengo1 object
sengo1 = Sengo1(0x60)

# Start sensor
err = sengo1.begin(port)
if err != SENTRY_OK:
    print(f"Initialization failed,error code:{err}")
else:
    print("Initialization succeeded")

sengo1.SetParam(sengo1_vision_e.kVisionBlob,[0, 0, 6, 8, color_label_e.kColorRed], 1)    # red

# Wait for the recognition result to be produced after the new parameter takes effect. This time interval must not be less than the time it takes for the algorithm to recognize one frame. It can be estimated through the frame rate at the bottom of the screen after the algorithm is enabled
time.sleep(0.1)

# During normal use, the main controller sends commands to control the on and off of Sengo1 algorithm, rather than manual operation by joystick.
err = sengo1.VisionBegin(sengo1_vision_e.kVisionBlob)
if err != SENTRY_OK:
    print(f"Starting algo Blob failed,error code:{err}")
else:
    print("Starting algo Blob succeeded")


# right wheel
pin1=Pin(14,Pin.OUT)
pin2=PWM(Pin(16))
pin2.freq(50)

# left wheel
pin3=Pin(15,Pin.OUT)
pin4=PWM(Pin(17))
pin4.freq(50)

# As a function of the car going forward.
def car_forward():
  pin1.value(0)
  pin2.duty_u16(20000)
  pin3.value(0)
  pin4.duty_u16(20000)

# As a function of the car going backwards.
def car_back():
  pin1.value(1)
  pin2.duty_u16(30000)
  pin3.value(1)
  pin4.duty_u16(30000)

# As a function of the car going left.
def car_left():
  pin1.value(0)
  pin2.duty_u16(5000)
  pin3.value(1)
  pin4.duty_u16(45000)
# As a function of the car going right.
def car_right():
  pin1.value(1)
  pin2.duty_u16(45000)
  pin3.value(0)
  pin4.duty_u16(5000)

# As a function of the car stopping.
def car_stop():
  pin1.value(0)
  pin2.duty_u16(0)
  pin3.value(0)
  pin4.duty_u16(0)


# loop
try:
    while True:
        # Obtain the number of detected color blocks
        obj_num = sengo1.GetValue(sengo1_vision_e.kVisionBlob,sentry_obj_info_e.kStatus)

        if obj_num:
            # Get the coordinate and size
            x = sengo1.GetValue(sengo1_vision_e.kVisionBlob,sentry_obj_info_e.kXValue,1)
            y = sengo1.GetValue(sengo1_vision_e.kVisionBlob,sentry_obj_info_e.kYValue,1)
            w = sengo1.GetValue(sengo1_vision_e.kVisionBlob,sentry_obj_info_e.kWidthValue,1)
            h = sengo1.GetValue(sengo1_vision_e.kVisionBlob,sentry_obj_info_e.kHeightValue,1)
            if y >= 80:
                # the car moves backward
                car_back()
            elif x <= 20:
                # the car turns left
                car_left()
            elif x >= 80:
                # the car turns right
                car_right()
            elif w <= 15 and h <= 15:
                # the car moves forward
                car_forward()
            elif w >= 70 and h >= 70:
                # the car moves backward
                car_back()
            else:
                car_stop()
        else: car_stop()
        time.sleep(0.1)  # delay

except KeyboardInterrupt:
    sengo1.VisionEnd(sengo1_vision_e.kVisionBlob)
    print("The program has stopped")
5.3.4 Test Result
After uploading the code, the AI vision module will detect the captured image to determine if there is a red block. If there is, it will control the movement of the car based on the x, y, w, and h values of this color block. For example, if the red block is close to the right side of the display, the car will turn right; if it is in the left, the car will turn left; and if it is at the lower part of display, the car will move backward. (Please use the color cards we provide.)