Project 7 Ultrasonic Sensor
1.Description
The ultrasonic sensor uses sonar to determine distance to an object like bats do. It offers excellent non-contact range detection with high accuracy and stable readings in an easy-to-use package. It comes complete with an ultrasonic transmitter and a receiver module.
The ultrasonic sensor is being used in a wide range of electronic projects for creating obstacle detection and distance measuring application as well as various other applications.
In this project, we will work to show simple ways for distance with Keyestudio UNO PLUS development board and the ultrasonic sensor, and learn how to use the sensor in arduino IDE.
2.Parameters and Principle
Working voltage:+5V DC
Quiescent current: <2mA
Working current: 15mA
Sensing angle: <15°
Distance range: 2cm– 400 cm
Precision: 0.3 cm
Measuring angle: 30 degree
Input trigger pulse: 10us
3.Principle
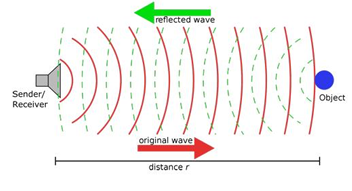
The ultrasonic transmitter emits ultrasonic waves in a certain direction, and the counter starts timing at the same time of the launch. The ultrasonic wave spreads in the air and is immediately reflected back when encountering obstacles on the way.
When it stops timing immediately, the ultrasonic wave is also a sound wave whose speed V is related to temperature. Generally, the transmission speed of the wave in the air is 340m/s. According to the time t recorded by the timer, the distance s from the launching point to the obstacle surface can be calculated, that is, S =340t/2:
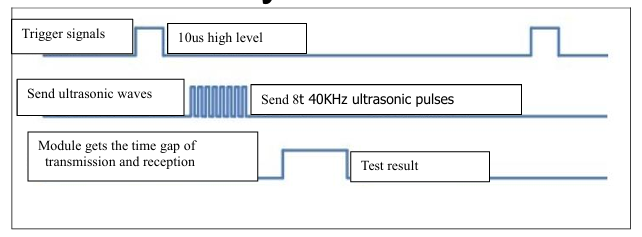
(1) Pull down TRIG then trigger high level signals with least 10us;
(2) After triggering, the module will automatically send eight 40KHz ultrasonic pulses and detect whether there is a signal return;
(3) If there is a signal return, ECHO outputs a high level, the high level read by the microcontroller time duration is the time of the ultrasonic wave from transmitting to returning.
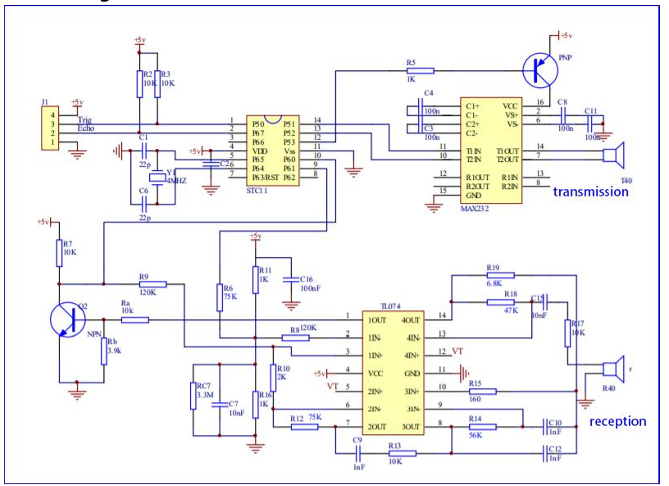
Circuit diagram of ultrasonic sensor:
4.Test Code
#define EchoPin  13  //ECHO to D13
#define TrigPin  12  //TRIG to D12

void setup()
{
  Serial.begin(9600); //Set baud rate to 9600
  pinMode(EchoPin, INPUT);    //The ECHO pin is set to input mode
  pinMode(TrigPin, OUTPUT);   //The TRIG pin is set to output mode
}

void loop()
{
  float distance = Get_Distance();  //Get the distance and save in the distance variable
  Serial.print("ditance:");
  Serial.print(distance);
  Serial.println("cm");
  delay(100);
}

float Get_Distance(void)  //Ultrasonic detects the distance
{
  float dis;
  digitalWrite(TrigPin, LOW);
  delayMicroseconds(2);
  digitalWrite(TrigPin, HIGH); //Give the TRIG a high level of at least 10 µ s to trigger
  delayMicroseconds(10);
  digitalWrite(TrigPin, LOW);
  dis = pulseIn(EchoPin, HIGH) /58.2;  //Work out the distance
  delay(50);
  return dis;
}
5.Test Result
After uploading the test code successfully, open the serial monitor, which will display the distance detected by the ultrasonic sensor. Move the obstacle in front of the car and we can see the distance will change too, as shown in the following figure.

6.Code Explanation
#define EchoPin 13
#define TrigPin 12 //Trig is connected to D12,Echo is connected to D13.
pinMode(EchoPin,INPUT);
pinMode(TrigPin,OUTPUT);  // The Echo pin is set to input mode,and the Trig pin is set to output mode.
pulseIn(EchoPin,HIGH); // This is an arduino function that returns the time when the Echo pin is high level, in us.
pulseIn(EchoPin,HIGH)/58.2; // The round-trip distance of ultrasonic wave can be calculated according to the Echo high level time to work out the distance of the obstacle ahead.