4.2 Color Block Detection
4.2.1 Algorithm
We specify a certain detection color, and it will determine whether there is a block of that color in the image. If yes, it will return its coordinates and size. The color label is the same as that in color recognition algorithm.
4.2.2 Configuration Parameters
The minimum detected color block size is configured here. You can modify the values of width and height:
Code:
  /* Set the minimum detection size (pixels) of the color block */
  param.width = 5;    // Minimum width: 5 pixels
  param.height = 5;   // Minimum height: 5 pixels
Detection color block configuration table
Colors |
Parameters |
|---|---|
Black |
kColorBlack |
White |
kColorWhite |
Red |
kColorRed |
Green |
kColorGreen |
Blue |
kColorBlur |
Yellow |
kColorYellow |
Code:
  /* Configure color block (red) */
  param.label = Sengo::kColorRed;  // Set the color label to red
4.2.3 Returned Values
When the main controller acquires the detection results, the algorithm will return the followings:
Formal parameter |
Definition |
|---|---|
kXValue |
color block central coordinate x |
kYValue |
color block central coordinate y |
kWidthValue |
color block width w |
kHeightValue |
color block height h |
kLabel |
color label |
Code:
    // Traverse all the detected color blocks
    for (int i = 1; i <= obj_num; ++i) {
      // Obtain the position and size information of the color blocks
      int x = sengo.GetValue(VISION_TYPE, kXValue, i);      // coordinate x
      int y = sengo.GetValue(VISION_TYPE, kYValue, i);      // coordinate y
      int w = sengo.GetValue(VISION_TYPE, kWidthValue, i);  // width
      int h = sengo.GetValue(VISION_TYPE, kHeightValue, i); // height
      int l = sengo.GetValue(VISION_TYPE, kLabel, i);      // color lable

      // Format and output the detection results
      Serial.print("  obj");
      Serial.print(i);
      Serial.print(": ");
      Serial.print("x=");
      Serial.print(x);
      Serial.print(",y=");
      Serial.print(y);
      Serial.print(",w=");
      Serial.print(w);
      Serial.print(",h=");
      Serial.print(h);
      Serial.print(",label=");
      Serial.println(blob_classes[l]);  // Output color names instead of numbers
    }
4.2.4 Test Code
#include <Arduino.h>
#include <Sentry.h> // Introduce the Sentry machine vision sensor library
typedef Sengo1 Sengo; // Create an alias Sengo for the Sengo1 type to simplify subsequent usage
// Communication method (currently enabled I2C)
#define SENGO_I2C
// #define SENGO_UART // UART alternative options (annotated)
#ifdef SENGO_I2C
#include <Wire.h> // Libraries required for I2C communication
#endif
#ifdef SENGO_UART
#include <SoftwareSerial.h>
#define TX_PIN 11 // Customize the TX pin
#define RX_PIN 10 // Customize the RX pin
SoftwareSerial mySerial(RX_PIN, TX_PIN); // Create a soft serial port
#endif
#define VISION_TYPE Sengo::kVisionBlob // Blob detection (color block recognition)
Sengo sengo; // Create a Sengo sensor object
// The text description of the Blob detection result label
const char* blob_classes[] = {
"UNKNOWN", "BLACK", "WHITE", "RED", "GREEN", "BLUE", "YELLOW"
};
void setup() {
sentry_err_t err = SENTRY_OK; // Error status variable
Serial.begin(9600); // Initialize the serial port for debugging the output
Serial.println("Waiting for sengo initialize...");
// Initialize the sensor according to the selected communication mode
#ifdef SENGO_I2C
Wire.begin(); // Initialize I2C bus
// Keep trying to connect until succeed
while (SENTRY_OK != sengo.begin(&Wire)) {
yield(); // Allow other tasks to run while waiting
}
#endif
#ifdef SENGO_UART
mySerial.begin(9600);
while (SENTRY_OK != sengo.begin(&mySerial)) {
yield();
}
#endif
Serial.println("Sengo begin Success.");
// ============== Blob detection parameter configuration ==============
sengo.SetParamNum(VISION_TYPE, 1); // Set the detection of color blocks of 1 color, Sengo1 can detect one color at a time
sentry_object_t param = {0}; // Initialize the parameter structure
/* Set the minimum detection size (pixels) of the color block*/
param.width = 5; // Minimum width: 5 pixels
param.height = 5; // Minimum height: 5 pixels
/* Configure the color block (red) */
param.label = Sengo::kColorRed; // Set the color label to red
err = sengo.SetParam(VISION_TYPE, ¶m); // Apply to parameter
// Output the configuration results
Serial.print("sengo.SetParam[");
Serial.print(blob_classes[param.label]); // Print color name
if (err) {
Serial.print("] Error: 0x");
} else {
Serial.print("] Success: 0x");
}
Serial.println(err, HEX); // output hex state code
// Start Blob visual recognition
err = sengo.VisionBegin(VISION_TYPE);
Serial.print("sengo.VisionBegin(kVisionBlob) ");
if (err) {
Serial.print("Error: 0x");
} else {
Serial.print("Success: 0x");
}
Serial.println(err, HEX);
}
void loop() {
// Read the total number of detected objects
int obj_num = sengo.GetValue(VISION_TYPE, kStatus);
if (obj_num > 0) { // If an object is detected
Serial.print("Totally ");
Serial.print(obj_num);
Serial.println(" objects");
// Traverse all the detected color blocks
for (int i = 1; i <= obj_num; ++i) {
// Obtain the position and size information of the color blocks
int x = sengo.GetValue(VISION_TYPE, kXValue, i); // coordinate x
int y = sengo.GetValue(VISION_TYPE, kYValue, i); // coordinate y
int w = sengo.GetValue(VISION_TYPE, kWidthValue, i); // width
int h = sengo.GetValue(VISION_TYPE, kHeightValue, i); // height
int l = sengo.GetValue(VISION_TYPE, kLabel, i); // color lable
// Format and output the detection results
Serial.print(" obj");
Serial.print(i);
Serial.print(": ");
Serial.print("x=");
Serial.print(x);
Serial.print(",y=");
Serial.print(y);
Serial.print(",w=");
Serial.print(w);
Serial.print(",h=");
Serial.print(h);
Serial.print(",label=");
Serial.println(blob_classes[l]); // Output color names instead of numbers
}
}
}
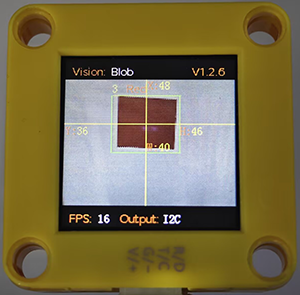
4.2.5 Test Result
After uploading the code, the module will detect red blocks in the area captured by the camera. If there are red blocks, they will be selected and marked. Then, their position coordinates x and y, width, height, and color label values will be printed on the serial monitor. In the example, we converted the label values into color names.
