Project 18: Thermometer

Description
This project aims to design a simple Arduino smart thermometer using an Thermistor NTC-MF52AT 10K and an LCD display. The Thermistor sensor detects the ambient temperature, and the LCD displays the temperature value in real-time. This project serves as a great exercise for beginners, as it helps them understand the basic working principle of sensors and practice interaction between the display and sensor.
Hardware
1. UNO R3 development board (ch340) x1
2. Thermistor NTC-MF52AT 10K x1
3. 16x2 LCD display x1
4. resistors (220 ohms) x1
5. Breadboard x1
6. Jumper wires
Working Principle
The working principle of this project is as follows:
The Thermistor NTC-MF52AT 10K detects the ambient temperature and converts it into a corresponding analog voltage signal.
The analog input pin of the Arduino development board (A0 in this case) reads the analog voltage output from the Thermistor.
The analog-to-digital converter (ADC) inside the Arduino converts the analog voltage value into a digital quantity.
Based on the conversion formula of the Thermistor (where every 10mV corresponds to 1 degree Celsius), the Arduino converts the digital quantity into a temperature value.
The Arduino then displays the computed temperature value on the LCD1602 liquid crystal display.
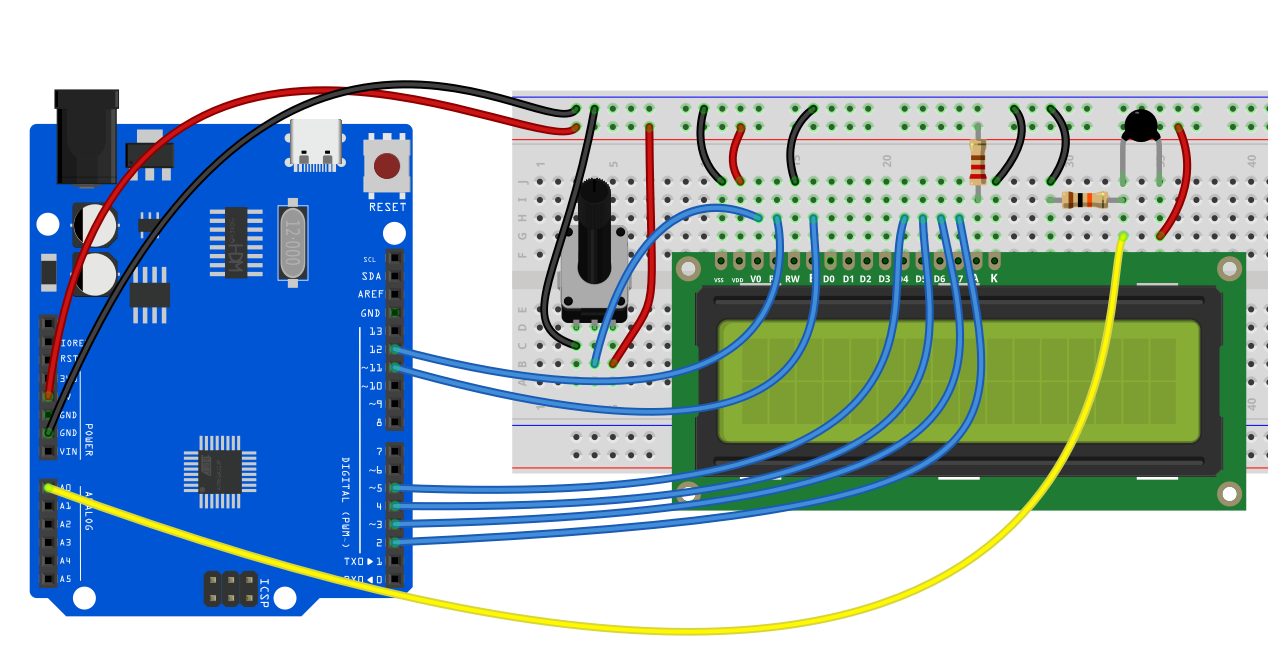
Wiring Diagram
Thermistor Sensor
VCC: Arduino’s 5V
GND: Arduino’s GND
VOUT: A0 (analog input pin)
LCD1602
RS: Connect to digital pin 11
EN: Connect to digital pin 12
D4-D7: Connect to digital pins 5, 4, 3, 2, respectively
Sample Code
/*

Electronics Learning Starter Kit for Arduino

Project 18

Thermometer

Edit By Keyes

*/

#include <LiquidCrystal.h>

// Initialize the GPIO pins: RS, E, D4, D5, D6, D7

LiquidCrystal lcd(12, 11, 5, 4, 3, 2);

const int sensorPin = A0; // Thermistor connected to A0

void setup() {

// Set LCD column and row count

lcd.begin(16, 2);

// Display text on the first line

lcd.print("Temperature:");

}

void loop() {

// Read the analog value from Thermistor (0-1023)

int sensorValue = analogRead(sensorPin);

// Convert the analog value to voltage (unit: mV)

float voltage = sensorValue * (5000.0 / 1023.0);

// Calculate the temperature value (unit: Celsius)

float temperatureC = voltage / 10.0;

// Display the temperature value on the LCD second line

lcd.setCursor(0, 1);

lcd.print(temperatureC);

lcd.print(" C ");

// Update every second

delay(1000);

}
Code Explanation
Library Inclusion and Initialization
#include <LiquidCrystal.h>

LiquidCrystal lcd(12, 11, 5, 4, 3, 2);

const int sensorPin = A0; // Thermistor connected to A0
#include <LiquidCrystal.h>: Includes the LiquidCrystal library for LCD control.
LiquidCrystal lcd(...): Initializes the lcd object based on the LCD pin connections.
const int sensorPin = A0;: Defines the analog pin connecting the Thermistor sensor as A0.
Setup Function setup()
void setup() {

lcd.begin(16, 2);

lcd.print("Temperature:");

}
lcd.begin(16, 2);: Sets the LCD to a 16-column and 2-row display mode.
lcd.print("Temperature:");: Displays “Temperature:” on the first line of the LCD.
Main Loop Function loop()
void loop() {

int sensorValue = analogRead(sensorPin);

float voltage = sensorValue * (5000.0 / 1023.0);

float temperatureC = voltage / 10.0;

lcd.setCursor(0, 1);

lcd.print(temperatureC);

lcd.print(" C ");

delay(1000);

}
Read Sensor Value
int sensorValue = analogRead(sensorPin);
analogRead(sensorPin): Reads the analog voltage value from the Thermistor sensor, returning an integer between 0 and 1023.
Convert to Voltage
float voltage = sensorValue * (5000.0 / 1023.0);
Converts the sensor value to an actual voltage value in millivolts.
5000.0 accounts for Arduino’s 5V reference voltage, which is converted to 5000mV.
1023.0 is the maximum value of the ADC (10-bit ADC scale: 0-1023).
Calculate Temperature
float temperatureC = voltage / 10.0;
Given Thermistor’s specifications, every degree Celsius equals 10mV.
Thus, dividing the voltage by 10 yields the current temperature in Celsius.
Display Temperature on LCD
lcd.setCursor(0, 1);

lcd.print(temperatureC);

lcd.print(" C ");
lcd.setCursor(0, 1);: Moves the cursor to the second line, first column on the LCD.
lcd.print(temperatureC);: Displays the temperature value.
lcd.print(" C ");: Displays the Celsius symbol with spaces to cover any leftover characters.
Delay of One Second
delay(1000);
Delays for 1000 milliseconds (1 second) to control the update frequency.
Project Result
Upon completing this project, you will have a fully functional temperature tester. This device can display the ambient temperature in real time and provide visual feedback for temperature changes.