5.2.2 カラフルなライト
5.2.2.1 概要

RGB LEDは、赤、緑、青の3原色の光を混ぜ合わせることで画像を作成するLED光源の一種で、その組み合わせにより様々な色合いを生み出します。一般的な方法としては、3原色を直接混合する方法、青色LEDと黄色蛍光体を組み合わせる方法、または紫外線LEDとRGB蛍光体を組み合わせる方法があります。白色光を直接発するLEDと比較して、RGB LEDは3原色を独立して制御できるため、より幅広い色の混合が可能です。
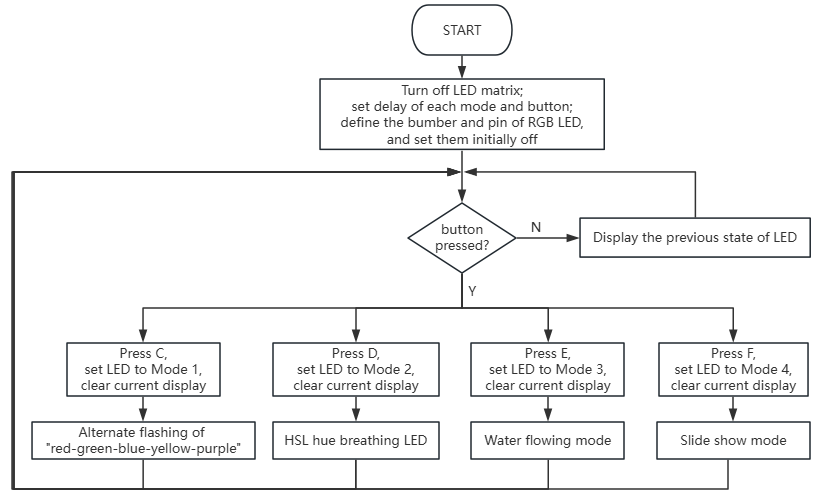
このプロジェクトでは、各ボタンがRGB LEDの異なるモードに対応しています。ボタンCを押すと、「赤、緑、青、黄、紫」の順にライトが交互に点滅します。Dを押すと呼吸ライトに切り替わり、Eを押すと水が流れるようなライト、Fを押すとマーキーライトになります。
お祭りの飾り付け用のカラフルなライトストリング、クリスマスツリーのライト、日常の雰囲気を演出するRGBストリップ、遊園地やショッピングモールのLED装飾ライトなど、これらはすべて私たちの日常生活におけるマルチモードライトの一般的な例です。

5.2.2.2 コンポーネント知識

SK6812 RGB LED
|
|
|---|---|
実物 |
回路図 |
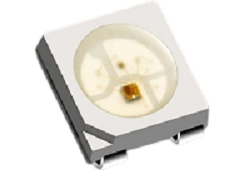
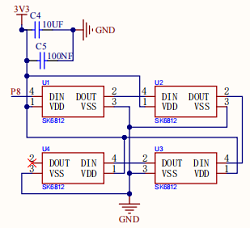
SK6812は、制御回路と照明回路を統合した外部制御型LED光源です。その主要部分は5x5mmの表面実装型LEDビーズで、それぞれが独立したピクセルとして機能し、スマートデジタルインターフェースデータラッチ回路、信号整形および増幅駆動回路、電源調整回路、内蔵定電流回路、高精度RCオシレーターなど、複数のコア回路を内蔵しています。
その通信は単極性ゼロリターンコードプロトコルを採用しています。電源投入リセット後、各ピクセルはDINポートを介してコントローラーからデータを受信します。最初の24ビットのデータは最初のピクセルによって抽出され、内部データラッチに保存されます。残りのデータは内部で整形および増幅された後、DOUTポートを介して後続のピクセルに送信されます。各ピクセルが処理されるたびに、送信される信号サイズは24ビット減少します。
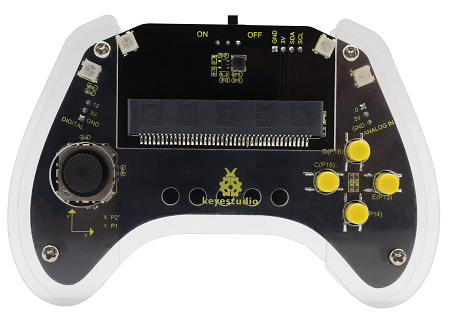
ゲームパッドには4つのSK6812 RGBライトがあります。これらはすべて、赤、緑、青の各チャンネルで256段階の明るさ調整をサポートしており、256×256×256の色を組み合わせることができます。これにより、交互点滅、呼吸グラデーション、スクロールアニメーションなど、多様な照明効果を実現し、より直感的で鮮やかなインタラクションを提供します。
ボタン
|
|
|---|---|
実物 |
回路図 |
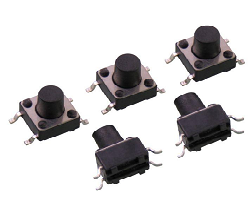
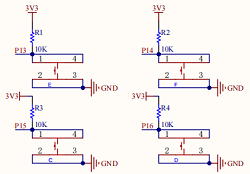
ボタンは、日本で最初に登場し、感圧スイッチと呼ばれていました。操作中、スイッチを押して力を加えることで回路を閉じます。圧力を解放すると、スイッチが開きます。その内部の金属製スプリングリーフは、加えられた力に応じて接続/切断の状態を変化させます。
4つのボタンがあり、それぞれがmicro:bitボードのピンに独立して接続されています。いずれかのボタンが押されると、回路は対応する低レベル信号を生成し、micro:bitがコマンドに迅速に応答できるようにし、インタラクションの利便性と精度を大幅に向上させます。

5.2.2.3 必要な部品
|
|
|
|---|---|---|
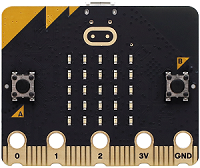
micro:bit V2 ボード (自己調達) ×1 |
micro:bit スマートゲームパッド (組み立て済み) ×1 |
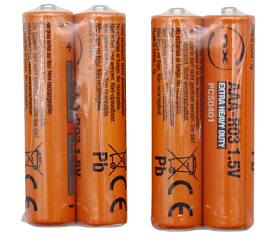
単4電池 (自己調達) ×4 |
5.2.2.4 コードフロー
5.2.2.5 テストコード
⚠️ コード内のMODE*_DELAYの遅延時間は、必要に応じて変更できます。
完全なコード:
from microbit import *
import neopixel
import utime

# Disable the LED function initially
# led.enable(False)

# Define delay times for different modes
MODE1_DELAY = 500  # Delay for mode 1 (alternating colors)
MODE2_DELAY = 5    # Delay for mode 2 (breathing light)
MODE3_DELAY = 200  # Delay for mode 3 (flowing water light)
MODE4_DELAY = 200  # Delay for mode 4 (marquee light)
BTN_DEBOUNCE = 20  # Button debounce time

# Initialize NeoPixel strip (4 LEDs connected to pin P8)
strip = neopixel.NeoPixel(pin8, 4)

# Global variables for light modes and timing
current_mode = 0
mode_timestamp = 0
mode_step = 0
button_timestamp = 0

# Initialize all LEDs to off
def clear_lights():
    for i in range(4):
        strip[i] = (0, 0, 0)  # Off
    strip.show()

clear_lights()

# Function to convert HSL to RGB (simplified for hue only)
def hsl_to_rgb(h, s, l):
    # Simplified for this example, assuming full saturation and medium lightness
    # Only hue (h) is used to determine color
    h_prime = h / 60
    c = 1 # Full saturation
    x = c * (1 - abs(h_prime % 2 - 1))
    m = l - c / 2

    r, g, b = 0, 0, 0

    if 0 <= h_prime < 1:
        r, g, b = c, x, 0
    elif 1 <= h_prime < 2:
        r, g, b = x, c, 0
    elif 2 <= h_prime < 3:
        r, g, b = 0, c, x
    elif 3 <= h_prime < 4:
        r, g, b = 0, x, c
    elif 4 <= h_prime < 5:
        r, g, b = x, 0, c
    elif 5 <= h_prime < 6:
        r, g, b = c, 0, x

    return (int((r + m) * 255), int((g + m) * 255), int((b + m) * 255))

# Main loop
while True:
    current_time = utime.ticks_ms()

    # Button debouncing
    if current_time - button_timestamp > BTN_DEBOUNCE:
        # Check button C (P13)
        if pin13.read_digital() == 0:  # Button C pressed
            current_mode = 1
            mode_step = 0
            mode_timestamp = current_time
            clear_lights()
            button_timestamp = current_time
        # Check button D (P14)
        elif pin14.read_digital() == 0:  # Button D pressed
            current_mode = 2
            mode_step = 0
            mode_timestamp = current_time
            clear_lights()
            button_timestamp = current_time
        # Check button E (P15)
        elif pin15.read_digital() == 0:  # Button E pressed
            current_mode = 3
            mode_step = 0
            mode_timestamp = current_time
            clear_lights()
            button_timestamp = current_time
        # Check button F (P16)
        elif pin16.read_digital() == 0:  # Button F pressed
            current_mode = 4
            mode_step = 0
            mode_timestamp = current_time
            clear_lights()
            button_timestamp = current_time

    # Mode 1: Alternating colors (Red, Green, Blue, Yellow, Purple)
    if current_mode == 1:
        if current_time - mode_timestamp > MODE1_DELAY:
            mode_timestamp = current_time
            colors = [(255, 0, 0), (0, 255, 0), (0, 0, 255), (255, 255, 0), (128, 0, 128)]
            clear_lights()
            strip[mode_step % 4] = colors[mode_step % len(colors)]
            strip.show()
            mode_step += 1

    # Mode 2: Breathing light (hue cycle)
    elif current_mode == 2:
        if current_time - mode_timestamp > MODE2_DELAY:
            mode_timestamp = current_time
            hue = mode_step % 360  # Cycle hue from 0 to 359
            # For breathing effect, we can vary lightness or saturation, but here we\'ll just cycle hue
            r, g, b = hsl_to_rgb(hue, 1, 0.5) # Full saturation, medium lightness
            for i in range(4):
                strip[i] = (r, g, b)
            strip.show()
            mode_step += 1

    # Mode 3: Flowing water light
    elif current_mode == 3:
        if current_time - mode_timestamp > MODE3_DELAY:
            mode_timestamp = current_time
            clear_lights()
            # Shift all pixels one position to the right
            for i in range(3, 0, -1):
                strip[i] = strip[i-1]
            # Set the first pixel to a new random color
            hue = utime.ticks_ms() % 360
            r, g, b = hsl_to_rgb(hue, 1, 0.5)
            strip[0] = (r, g, b)
            strip.show()
            mode_step += 1

    # Mode 4: Marquee light (single LED moving)
    elif current_mode == 4:
        if current_time - mode_timestamp > MODE4_DELAY:
            mode_timestamp = current_time
            clear_lights()
            hue = utime.ticks_ms() % 360
            r, g, b = hsl_to_rgb(hue, 1, 0.5)
            strip[mode_step % 4] = (r, g, b)
            strip.show()
            mode_step += 1

    utime.sleep_ms(10) # Small delay to prevent busy-waiting

簡単な説明:
① 最初はLEDの機能を無効にします(led enableをfalseに設定)。
そして、4つのLED遅延を定義し(例えば、モード2で5、モード1で500など)、ボタンのデバウンスを20に設定します。ピンP8の4つのRGB LEDを無色(すべての値を0に設定)に初期化します。つまり、オフに設定します。
from microbit import *
import neopixel
import utime

# Disable the LED function initially
# led.enable(False)

# Define delay times for different modes
MODE1_DELAY = 500  # Delay for mode 1 (alternating colors)
MODE2_DELAY = 5    # Delay for mode 2 (breathing light)
MODE3_DELAY = 200  # Delay for mode 3 (flowing water light)
MODE4_DELAY = 200  # Delay for mode 4 (marquee light)
BTN_DEBOUNCE = 20  # Button debounce time

# Initialize NeoPixel strip (4 LEDs connected to pin P8)
strip = neopixel.NeoPixel(pin8, 4)

# Global variables for light modes and timing
current_mode = 0
mode_timestamp = 0
mode_step = 0
button_timestamp = 0

# Initialize all LEDs to off
def clear_lights():
    for i in range(4):
        strip[i] = (0, 0, 0)  # Off
    strip.show()

clear_lights()

# Function to convert HSL to RGB (simplified for hue only)
def hsl_to_rgb(h, s, l):
    # Simplified for this example, assuming full saturation and medium lightness
    # Only hue (h) is used to determine color
    h_prime = h / 60
    c = 1 # Full saturation
    x = c * (1 - abs(h_prime % 2 - 1))
    m = l - c / 2

    r, g, b = 0, 0, 0

    if 0 <= h_prime < 1:
        r, g, b = c, x, 0
    elif 1 <= h_prime < 2:
        r, g, b = x, c, 0
    elif 2 <= h_prime < 3:
        r, g, b = 0, c, x
    elif 3 <= h_prime < 4:
        r, g, b = 0, x, c
    elif 4 <= h_prime < 5:
        r, g, b = x, 0, c
    elif 5 <= h_prime < 6:
        r, g, b = c, 0, x

    return (int((r + m) * 255), int((g + m) * 255), int((b + m) * 255))
② ループ中、現在の実行時間と前回の押下時間の差がプリセットされたアンチジッター閾値(BTN_DEBOUNCE)を超えているかを確認することで、物理的なジッターによる繰り返しの押下を防ぐアンチジッター操作が実装されます。
while True:
    current_time = utime.ticks_ms()

    # Button debouncing
    if current_time - button_timestamp > BTN_DEBOUNCE:
        # Check button C (P13)
        if pin13.read_digital() == 0:  # Button C pressed
            current_mode = 1
            mode_step = 0
            mode_timestamp = current_time
            clear_lights()
            button_timestamp = current_time
        # Check button D (P14)
        elif pin14.read_digital() == 0:  # Button D pressed
            current_mode = 2
            mode_step = 0
            mode_timestamp = current_time
            clear_lights()
            button_timestamp = current_time
        # Check button E (P15)
        elif pin15.read_digital() == 0:  # Button E pressed
            current_mode = 3
            mode_step = 0
            mode_timestamp = current_time
            clear_lights()
            button_timestamp = current_time
        # Check button F (P16)
        elif pin16.read_digital() == 0:  # Button F pressed
            current_mode = 4
            mode_step = 0
            mode_timestamp = current_time
            clear_lights()
            button_timestamp = current_time
③ C(/D/E/F)が押されると、モードは1(2/3/4)に設定され、対応するモードのアニメーションステップとタイミング開始点がリセットされ、ライトがクリアされ、ボタンのタイムスタンプが更新されます。これにより、異なるLEDモードの正確な切り替えと初期操作が可能になります。
    # Mode 1: Alternating colors (Red, Green, Blue, Yellow, Purple)
    if current_mode == 1:
        if current_time - mode_timestamp > MODE1_DELAY:
            mode_timestamp = current_time
            colors = [(255, 0, 0), (0, 255, 0), (0, 0, 255), (255, 255, 0), (128, 0, 128)]
            clear_lights()
            strip[mode_step % 4] = colors[mode_step % len(colors)]
            strip.show()
            mode_step += 1
④ モードが1に設定され、現在の時間と前回のモード時間の間の間隔がMODE1_DELAYを超えると、まずモードのタイムスタンプを更新し、model_stepの異なる値(0〜4)に基づいてライトを順に表示します:赤、緑、青、黄、紫。表示を更新した後、剰余演算によってmodel_stepループをリセットし、これら5つの色を定期的に変更します。
    # Mode 2: Breathing light (hue cycle)
    elif current_mode == 2:
        if current_time - mode_timestamp > MODE2_DELAY:
            mode_timestamp = current_time
            hue = mode_step % 360  # Cycle hue from 0 to 359
            # For breathing effect, we can vary lightness or saturation, but here we\'ll just cycle hue
            r, g, b = hsl_to_rgb(hue, 1, 0.5) # Full saturation, medium lightness
            for i in range(4):
                strip[i] = (r, g, b)
            strip.show()
            mode_step += 1
⑤ モードが2で、現在の時間と前回のモード時間の間の間隔がMODE2_DELAYを超えると、まずモードのタイムスタンプを更新し、色値(色相)を剰余演算(0〜359の範囲)によって周期的に増加させます。次に、ライトをクリアし、高彩度(99)と低輝度(20)で対応する色相を表示すると、グラデーションカラーがスムーズに変化します。(コード内の輝度と彩度の値は必要に応じて調整できます。)
    # Mode 3: Flowing water light
    elif current_mode == 3:
        if current_time - mode_timestamp > MODE3_DELAY:
            mode_timestamp = current_time
            clear_lights()
            # Shift all pixels one position to the right
            for i in range(3, 0, -1):
                strip[i] = strip[i-1]
            # Set the first pixel to a new random color
            hue = utime.ticks_ms() % 360
            r, g, b = hsl_to_rgb(hue, 1, 0.5)
            strip[0] = (r, g, b)
            strip.show()
            mode_step += 1
⑥ モードが3で、現在の時間と前回のモード時間の間の間隔がMODE3_DELAYを超えると、まずモードのタイムスタンプを更新し、ライトストリップのすべてのピクセルを1ビットシフトし、0番目のピクセルにランダムな色相(0〜359)、高彩度(99)、低輝度(20)を割り当てます。表示を更新すると、流れるようなライトが見えます:ライトが順次移動し、色がランダムに変化します。(コード内の輝度と彩度の値は必要に応じて調整できます。)
    # Mode 4: Marquee light (single LED moving)
    elif current_mode == 4:
        if current_time - mode_timestamp > MODE4_DELAY:
            mode_timestamp = current_time
            clear_lights()
            hue = utime.ticks_ms() % 360
            r, g, b = hsl_to_rgb(hue, 1, 0.5)
            strip[mode_step % 4] = (r, g, b)
            strip.show()
            mode_step += 1
⑦ モードが4で、現在の時間と前回のモード時間の間の間隔がMODE4_DELAYを超えると、まずモードのタイムスタンプを更新し、ライトストリップをクリアし、model_stepに対応するピクセルにランダムな色相(0〜359)、高彩度(99)、低輝度(20)を割り当て、表示を更新します。最後に、剰余演算によってmodel_stepを0〜3の範囲で循環させると、単一のLEDがランダムな色で順次点灯するのを確認できます。(コード内の輝度と彩度の値は必要に応じて調整できます。)
utime.sleep_ms(10) # Small delay to prevent busy-waiting
5.2.2.6 テスト結果

コードを書き込んだ後、micro:bitボードをゲームパッドのスロットに挿入し(電池が取り付けられていることを確認)、「ON」に切り替えます。
Cを押す: ライトが赤-緑-青-黄-紫の順に交互に点滅します。
Dを押す: ライトの色相が増加し、最終的にグラデーションカラーがスムーズに変化します。
Eを押す: ライトが0番目のピクセルからランダムな色を生成し、色を1ピクセルずつ順次シフトするため、水が流れるようなライトが見えます。
Fを押す: 各ピクセルがランダムな色で順次点灯します。
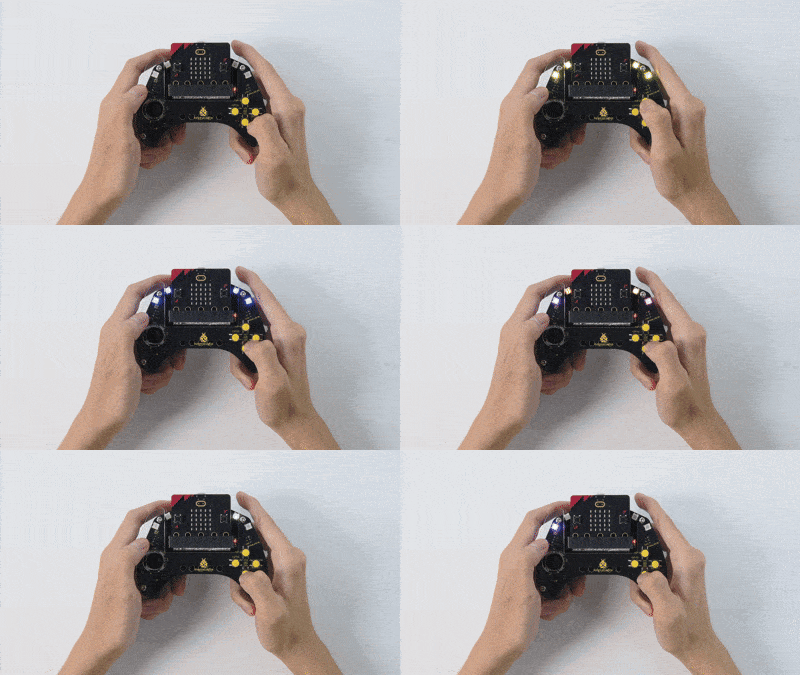
ヒント: ボードが応答しない場合は、micro:bitボードの背面にあるリセットボタンを押してください。
