5.4.19 Proyecto 11 Código Morse Abrir la puerta
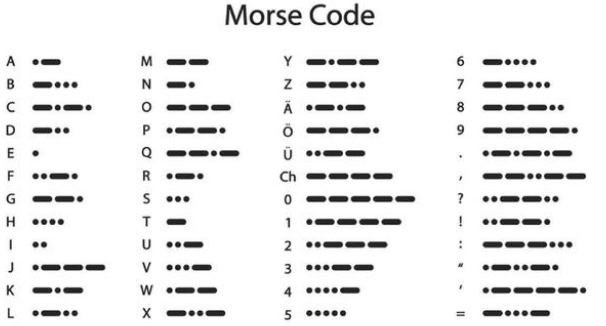
Morse code, also known as Morse password, is an on-again, off-again signal code that expresses different letters, numbers, and punctuation marks in different sequences. Now we use it as our password gate.
El código Morse corresponde a los siguientes caracteres:
1. Descripción
We use  \ as the correct password. What’s more, there is a
button library file OneButton, which is very simple to click, double
click, long press and other functions. For Morse password, click is“.”,
long press and release is “-”.
\ as the correct password. What’s more, there is a
button library file OneButton, which is very simple to click, double
click, long press and other functions. For Morse password, click is“.”,
long press and release is “-”.
2. Código de prueba
#include <Wire.h>
#include <LiquidCrystal_I2C.h>
LiquidCrystal_I2C mylcd(0x27,16,2);
#include "OneButton.h"
// Setup a new OneButton on pin 16.
OneButton button1(16, true);
// Setup a new OneButton on pin 27.
OneButton button2(27, true);
#include <ESP32Servo.h>
Servo myservo;
int servoPin = 13;
String password = "";
String correct_p = "-.-";  //password

// setup code here, to run once:
void setup() {
  Serial.begin(115200);
  mylcd.init();
  mylcd.backlight();
  // link the button 1 functions.
  button1.attachClick(click1);
  button1.attachLongPressStop(longPressStop1);
  // link the button 2 functions.
  button2.attachClick(click2);
  button2.attachLongPressStop(longPressStop2);

    // Allow allocation of all timers
    ESP32PWM::allocateTimer(0);
    ESP32PWM::allocateTimer(1);
    ESP32PWM::allocateTimer(2);
    ESP32PWM::allocateTimer(3);
    myservo.setPeriodHertz(50);    // standard 50 hz servo
    myservo.attach(servoPin, 1000, 2000); // attaches the servo on pin 18 to the servo object
    // using default min/max of 1000us and 2000us
    // different servos may require different min/max settings
    // for an accurate 0 to 180 sweep

  mylcd.setCursor(0, 0);
  mylcd.print("Enter password");
}

void loop() {
  // keep watching the push buttons:
  button1.tick();
  button2.tick();
  delay(10);
}

// ----- button 1 callback functions
// This function will be called when the button1 was pressed 1 time (and no 2. button press followed).
void click1() {
  Serial.print(".");
  password = password + '.';
  mylcd.setCursor(0, 1);
  mylcd.print(password);
} // click1

// This function will be called once, when the button1 is released after beeing pressed for a long time.
void longPressStop1() {
  Serial.print("-");
  password = password + '-';
  mylcd.setCursor(0, 1);
  mylcd.print(password);
} // longPressStop1

// ... and the same for button 2:
void click2() {
  Serial.println(password);
  if(password == correct_p)
  {
    myservo.write(180);  //open the door if the password correct
    mylcd.clear();
    mylcd.setCursor(0, 0);
    mylcd.print("open");
  }
  else
  {
    mylcd.clear();
    mylcd.setCursor(0, 0);
    mylcd.print("error");
    delay(2000);
    mylcd.clear();
    mylcd.setCursor(0, 0);
    mylcd.print("input again");
  }
  password = "";
} // click2

void longPressStop2() {
  //Serial.println("Button 2 longPress stop");
   myservo.write(0);  //open door
   mylcd.clear();
   mylcd.setCursor(0, 0);
   mylcd.print("close");
} // longPressStop2
3. Resultado de la prueba
Al principio, la LCD1602 muestra “Introduzca la contraseña”, luego pulse o mantenga pulsado el botón 1 para introducir la contraseña. Si introducimos la contraseña correcta “-.-” y luego pulsamos el botón 2, la puerta se abrirá y la LCD1602 mostrará “abierto”.
Si se ingresan otras contraseñas incorrectas, la puerta no se moverá, la LCD1602 mostrará “error” y luego “introduzca de nuevo” 2 segundos después. Además, mantener pulsado el botón 2 puede cerrar la puerta.