5.4.23 プロジェクト 13.2 IoT スマートホーム
1. 説明
IoTスマートホームは家庭のWiFiに接続します。操作に使用する携帯電話も同じWiFiに接続されている必要があります。
さらに、スマートホームは携帯電話のホットスポットにも接続できます。接続に成功するとLCD1602にIPアドレスが表示されます。携帯電話のアプリで該当するIPを入力して通信すれば、スマートホームの各機能をアプリで制御できます。
2. テストコード
⚠️ \ 注意:\ コードファイルを開いたら、ESP32開発ボードが接続するためのWiFi名とパスワードを変更する必要があります。ChinaNet-2.4G-0DF0とChinaNet@233をそれぞれご自身のWiFi名とパスワードに置き換えてください。これをアップロード前に必ず行ってください。そうしないとESP32ボードはネットワークに接続できません。
const char* ssid = "ChinaNet-2.4G-0DF0";  // Enter your own WiFi name
const char* pwd = "ChinaNet@233"; // Enter your own WiFi passwords
⚠️ 注: コード内のWiFi名とパスワードが、コンピュータ、携帯電話/タブレット、ESP32開発ボード、ルーターが接続しているネットワークと同じであることを確認してください。同じローカルエリアネットワーク(WiFi)内である必要があります。
⚠️ 注: WiFiは2.4GHz帯である必要があります。そうでないとESP32はWiFiに接続できません。
#include <Arduino.h>
#ifdef ESP32
#include <WiFi.h>
#elif defined(ESP8266)
#include <ESP8266WiFi.h>
#endif

#include <Wire.h>
#include <Adafruit_NeoPixel.h>
#define LED_PIN    26
#define LED_COUNT 4     // Number of NeoPixels attached
Adafruit_NeoPixel strip(LED_COUNT, LED_PIN, NEO_GRB + NEO_KHZ800);

//Define the variable as the detected value
String request;
const char* ssid = "ChinaNet-2.4G-0DF0";
const char* pwd = "ChinaNet@233";
WiFiServer server(80);  //Initialize the WiFi service

#include <LiquidCrystal_I2C.h>
LiquidCrystal_I2C lcd(0x27,16,2);

#include <dht11.h>
#define DHT11PIN 17
dht11 DHT11; // Initialize dht11

#include <BuzzerESP32.h>
#define buzzer_pin 25
BuzzerESP32 buzzer(buzzer_pin);   // GPIO25

#define waterPin 34
#define fanPin1 19
#define fanPin2 18
#define led_y 12           // Yellow LED pin definition
#define gasPin 23
#define pyroelectric 14

// Servo channels
int channel_PWM1 = 13;
int channel_PWM2 = 10;
int freq_PWM = 50;
int resolution_PWM = 10;
const int PWM_Pin1 = 5;
const int PWM_Pin2 = 13;

String dataBuffer = "4095,0,0,32,65";

int Rainwater, gas, pir, t, h;  //Define variables
unsigned long prevTask = 0;

void setup() {
  Serial.begin(9600);
  //Connect to WiFi
  WiFi.begin(ssid, pwd);
  //Determine whether it is connected
  Serial.println("Connecting to WiFi...");
  while (WiFi.status() != WL_CONNECTED) {
    delay(1000);
    Serial.print(".");
  }
  delay(1000);
  //The serial monitor will display the name and IP address of the wireless network
  Serial.println("Connected to WiFi");
  Serial.print("WiFi NAME:");
  Serial.println(ssid);
  Serial.print("IP:");
  Serial.println(WiFi.localIP());

  //Initialize LCD
  lcd.init();
  //Turn on the LCD backlight
  lcd.backlight();
  //lcd.noBacklight();
  lcd.clear();
  //Set the position of the cursor
  lcd.setCursor(0, 0);
  //LCD printing
  lcd.print("IP:");
  //Set the position of the cursor
  lcd.setCursor(0, 1);
  //LCD printing
  lcd.print(WiFi.localIP());

  pinMode(led_y, OUTPUT);
  pinMode(fanPin1, OUTPUT);
  pinMode(fanPin2, OUTPUT);
  pinMode(waterPin, INPUT);

  buzzer.setTimbre(30);                                  // Set timbre
  buzzer.playTone(0,0);                                  // Turn off buzzer

  pinMode(gasPin, INPUT);
  pinMode(pyroelectric, INPUT);

  ledcAttach(PWM_Pin1, freq_PWM, resolution_PWM);
  ledcAttachChannel(PWM_Pin1, freq_PWM, resolution_PWM, channel_PWM1);
  ledcAttach(PWM_Pin2, freq_PWM, resolution_PWM);
  ledcAttachChannel(PWM_Pin2, freq_PWM, resolution_PWM, channel_PWM2);
  ledcWrite(PWM_Pin1, 25);
  delay(500);
  ledcWrite(PWM_Pin2, 25);
  delay(500);
  //Start the service
  server.begin();
}

void loop() {
  //Check whether the client has been connected to the network server
  //When the client establishes a connection with the server, the "server.available()" function returns a WiFiClient object for client-side communication.
  WiFiClient client = server.available();
  if (client) {
    Serial.println("New client connected");
    while (client.connected()) {
      //Determine whether the server sends data
      if (client.available()) {
        request = client.readStringUntil('s');
        Serial.print("Received message: ");
        Serial.println(request);
      }
      //Obtain all sensor data
      getSensorsData();
      //Put all the data into "dataBuffer"
      dataBuffer = "";
      dataBuffer += String(Rainwater);
      dataBuffer += ",";
      dataBuffer += String(gas);
      dataBuffer += ",";
      dataBuffer += String(pir);
      dataBuffer += ",";
      dataBuffer += String(t);
      dataBuffer += ",";
      dataBuffer += String(h);
      //Send the data to the server and then transfer it to the application.
      if (millis() - prevTask >= 1000) {  // Execute every second
        prevTask = millis();
        client.print(dataBuffer);
      }

      delay(500);

      //LED
      if (request == "a") {
        digitalWrite(led_y, HIGH);
      } else if (request == "A") {
        digitalWrite(led_y, LOW);
      }

      //window servo
      if (request == "b") {
        ledcWrite(PWM_Pin1, 100); //The high level of 20ms is approximately 2.5ms, that is, 2.5/20*1024, and the servo rotates at the specified Angle.
        delay(500);
      } else if (request == "B") {
        ledcWrite(PWM_Pin1, 25);  //The high level of 20ms is approximately 0.5ms, that is, 0.5/20*1024, and the servo rotates at the specified Angle.
        delay(500);
      }

      //buzzer plays music
      if (request == "c") {
        birthday();
        buzzer.playTone(0,0);
      } else if (request == "C") {
        buzzer.playTone(0,0);
      }

      //The buzzer sounds
      if (request == "d") {
        buzzer.playTone(392,250);
      } else if (request == "D") {
        buzzer.playTone(0,0);
      }

      //door servo
      if (request == "e") {
        ledcWrite(PWM_Pin2, 120);
        delay(500);
      } else if (request == "E") {
        ledcWrite(PWM_Pin2, 25);
        delay(500);
      }

      //fan
      if (request == "f") {
        digitalWrite(fanPin2, LOW); //pwm = 0
        analogWrite(fanPin1, 100); //LEDC channel 5 is bound to the specified left motor output PWM value as 100.
      } else if (request == "F") {
        digitalWrite(fanPin2, LOW); //pwm = 0
        analogWrite(fanPin1, 0); //LEDC channel 5 is bound to the specified left motor output PWM value as 0.
      }

      //SK6812RGB turns on and off its red light
      if (request == "g") {
        colorWipe(strip.Color(255,   0,   0), 50);
      } else if (request == "G") {
        colorWipe(strip.Color(0,   0,   0), 50);
      }

      //SK6812RGB turns on and off its orange light
      if (request == "h") {
        colorWipe(strip.Color(200,   100,   0), 50);
      } else if (request == "H") {
        colorWipe(strip.Color(0,   0,   0), 50);
      }

      //SK6812RGB turns on and off its yellow light
      if (request == "i") {
        colorWipe(strip.Color(200,   200,   0), 50);
      } else if (request == "I") {
        colorWipe(strip.Color(0,   0,   0), 50);
      }

      //SK6812RGB turns on and off its green light
      if (request == "j") {
        colorWipe(strip.Color(0,   255,   0), 50);
      } else if (request == "J") {
        colorWipe(strip.Color(0,   0,   0), 50);
      }

      //SK6812RGB turns on and off its blue-green light
      if (request == "k") {
        colorWipe(strip.Color(0,   100,   255), 50);
      } else if (request == "K") {
        colorWipe(strip.Color(0,   0,   0), 50);
      }

      //SK6812RGB turns on and off its blue light
      if (request == "l") {
        colorWipe(strip.Color(0,   0,   255), 50);
      } else if (request == "L") {
        colorWipe(strip.Color(0,   0,   0), 50);
      }

      //SK6812RGB turns on and off its purple light
      if (request == "m") {
        colorWipe(strip.Color(100,   0,   255), 50);
      } else if (request == "M") {
        colorWipe(strip.Color(0,   0,   0), 50);
      }

      //SK6812RGB turns on and off its white light
      if (request == "n") {
        colorWipe(strip.Color(255,   255,   255), 50);
      } else if (request == "N") {
        colorWipe(strip.Color(0,   0,   0), 50);
      }

      //SK6812RGB-sfx1
      if (request == "o") {
        rainbow(10);
      } else if (request == "O") {
        colorWipe(strip.Color(0,   0,   0), 50);
      }

      //SK6812RGB-sfx2
      if (request == "p") {
        theaterChaseRainbow(50);
      } else if (request == "P") {
        colorWipe(strip.Color(0,   0,   0), 50);
      }
      request = "";
    }
    Serial.println("Client disconnected");
  }
}

void getSensorsData() {
   //Obtain data
   int chk = DHT11.read(DHT11PIN);
   t = DHT11.temperature;
   h = DHT11.humidity;

   //steam sensor
   Rainwater = analogRead(waterPin); //read steam sensor analog value and assign it to variable Rainwater

   //gas sensor
   gas = digitalRead(gasPin); //read gas sensor analog value and assign it to variable gas

   //PIR motion sensor
   pir = digitalRead(pyroelectric); //read PIR motion sensor analog value and assign it to variable gas
}

//Convert the data into percentages
String dataHandle(int data) {
  // Convert the analog values to percentages
  int percentage = (data / 4095.0) * 100;
  // If the converted percentage is greater than 100, output 10.
  percentage = percentage > 100 ? 100 : percentage;
  // Six characters are used to store a hexadecimal string, with one serving as the terminator
  char hexString[3];
  // Convert the hexadecimal value to a 6-bit hexadecimal string and add leading zeros in front: 0 represents 00, 1 represents 01...
  sprintf(hexString, "%02X", percentage);

  return hexString;
}

void birthday()
{
  buzzer.playTone(294,250);  //The four parameters are frequency, delay, etc
  buzzer.playTone(440,250);
  buzzer.playTone(392,250);
  buzzer.playTone(532,250);
  buzzer.playTone(494,250);
  buzzer.playTone(392,250);
  buzzer.playTone(440,250);
  buzzer.playTone(392,250);
  buzzer.playTone(587,250);
  buzzer.playTone(532,250);
  buzzer.playTone(392,250);
  buzzer.playTone(784,250);
  buzzer.playTone(659,250);
  buzzer.playTone(532,250);
  buzzer.playTone(494,250);
  buzzer.playTone(440,250);
  buzzer.playTone(698,250);
  buzzer.playTone(659,250);
  buzzer.playTone(532,250);
  buzzer.playTone(587,250);
  buzzer.playTone(532,500);
  buzzer.playTone(0,0);  //off
}

void colorWipe(uint32_t color, int wait) {
  for(int i=0; i<strip.numPixels(); i++) { // For each pixel in the strip...
    strip.setPixelColor(i, color);         // Set the color of the pixels (in RAM)
    strip.show();                          // Update the stripe to match
    delay(wait);                           // delay
  }
}

// The rainbow circulates along the entire band. Transfer the delay time (in milliseconds) between frames.
void rainbow(int wait) {
  for(long firstPixelHue = 0; firstPixelHue < 5*65536; firstPixelHue += 256) {
    for(int i=0; i<strip.numPixels(); i++) { // For each pixel in strip...
      int pixelHue = firstPixelHue + (i * 65536L / strip.numPixels());
      strip.setPixelColor(i, strip.gamma32(strip.ColorHSV(pixelHue)));
    }
    strip.show(); // Update strip content
    delay(wait);  // delay
  }
}

// Rainbow-enhanced Marquise-style. Transfer delay time (milliseconds) between frames
void theaterChaseRainbow(int wait) {
  int firstPixelHue = 0;     // The first pixel starts from red (hue 0).
  for(int a=0; a<30; a++) {  // Repeat 30 times...
    for(int b=0; b<3; b++) { // 'b' counts from 0 to 2...
      strip.clear();         // Set all pixels in RAM to 0(off)
      // 'c' is counted starting from 'b' and increments in units of 3...
      for(int c=b; c<strip.numPixels(); c += 3) {
        int      hue   = firstPixelHue + c * 65536L / strip.numPixels();
        uint32_t color = strip.gamma32(strip.ColorHSV(hue)); // color -> RGB
        strip.setPixelColor(c, color); // Set the value of pixel c to color
      }
      strip.show();                // Update strip content
      delay(wait);                 // delay
      firstPixelHue += 65536 / 90; // The color wheel of one cycle exceeds 90 frames
    }
  }
}
3. テスト結果
⚠️ 注: 携帯電話やタブレットはESP32開発ボードと同じWiFiに接続されている必要があります。そうでないと制御ページにアクセスできません。また、ESP32開発ボードがWiFi機能を使用すると大きな電力を消費します。動作に必要な電力を供給するために外部のDC電源が必要です。電力が不足するとESP32ボードが再起動を繰り返し、コードが正常に動作しなくなります。
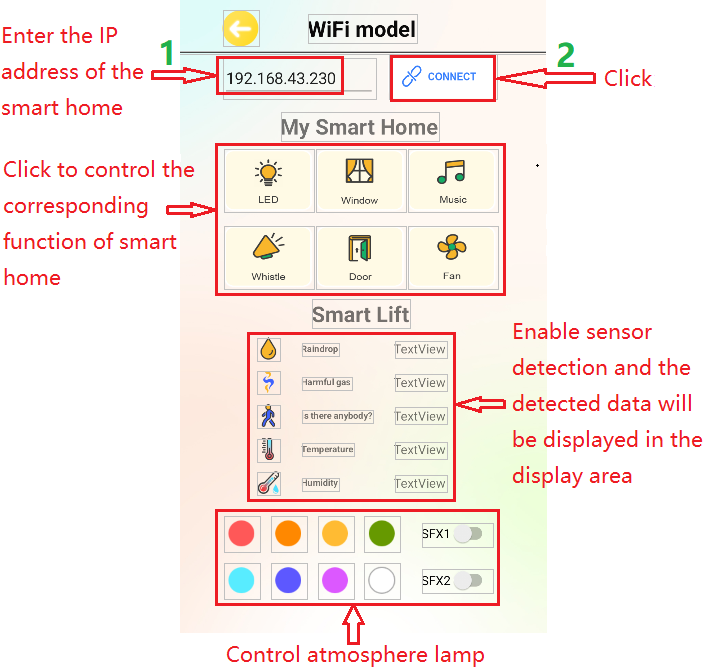
A. アプリにIPアドレスを入力します(割り当てられたIPアドレスはLCD1602またはIDEのシリアルモニタウィンドウに表示されます)。
B. 「CONNECT」をクリックしてIPアドレスに接続します。
C. 接続に成功すると「Connected」という表示がポップアップします。ご注意ください。
D. IPアドレスに接続したら、アプリのインターフェース上の対応するボタンを押して対応するセンサーモジュールを作動させます。