5.7 Temperatuurregelsysteem
5.7.1 DHT11 temperatuur- en vochtigheidssensor
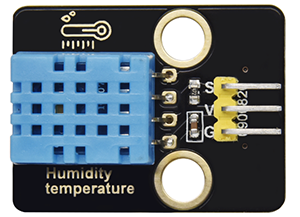
De DHT11 temperatuur- en vochtigheidssensor geeft digitale signalen af. Het past principes van analoge signaalacquisitie en -conversie toe, evenals temperatuur- en vochtigheidsdetectietechnologie, waardoor het een langdurige stabiliteit en hoge betrouwbaarheid heeft. Bovendien integreert de sensor een zeer nauwkeurige resistieve vochtigheidssensor en een resistieve thermo-gevoelige temperatuursensor, en is deze verbonden met een 8-bit krachtige MCU.
Open de 5.7.4Temperature-Control-System code met Arduino IDE
#include <dht11.h>
#define DHT11PIN 17

dht11 DHT11;

void setup()
{
  Serial.begin(9600);
  Serial.println("DHT11 TEST PROGRAM ");
  Serial.print("LIBRARY VERSION: ");
  Serial.println(DHT11LIB_VERSION);
  Serial.println();
}

void loop()
{
  Serial.println("\n");

  int chk = DHT11.read(DHT11PIN);

  Serial.print("Read sensor: ");
  switch (chk)
  {
    case DHTLIB_OK:
                Serial.println("OK");
                break;
    case DHTLIB_ERROR_CHECKSUM:
                Serial.println("Checksum error");
                break;
    case DHTLIB_ERROR_TIMEOUT:
                Serial.println("Time out error");
                break;
    default:
                Serial.println("Unknown error");
                break;
  }

  Serial.print("Humidity (%): ");
  Serial.println((float)DHT11.humidity, 2);

  Serial.print("Temperature (oC): ");
  Serial.println((float)DHT11.temperature, 2);

  Serial.print("Temperature (oF): ");
  Serial.println(Fahrenheit(DHT11.temperature), 2);

  Serial.print("Temperature (K): ");
  Serial.println(Kelvin(DHT11.temperature), 2);

  Serial.print("Dew Point (oC): ");
  Serial.println(dewPoint(DHT11.temperature, DHT11.humidity));

  Serial.print("Dew PointFast (oC): ");
  Serial.println(dewPointFast(DHT11.temperature, DHT11.humidity));

  delay(2000);
}

double Fahrenheit(double celsius)
{
        return 1.8 * celsius + 32;
}    //Convert Celsius degree to Fahrenheit degree

double Kelvin(double celsius)
{
        return celsius + 273.15;
}     //Convert Celsius degree to Kelvins

//Dew Point. The air is saturated and dews are produced under this temperature.
//Reference: http://wahiduddin.net/calc/density_algorithms.htm
double dewPoint(double celsius, double humidity)
{
        double A0= 373.15/(273.15 + celsius);
        double SUM = -7.90298 * (A0-1);
        SUM += 5.02808 * log10(A0);
        SUM += -1.3816e-7 * (pow(10, (11.344*(1-1/A0)))-1) ;
        SUM += 8.1328e-3 * (pow(10,(-3.49149*(A0-1)))-1) ;
        SUM += log10(1013.246);
        double VP = pow(10, SUM-3) * humidity;
        double T = log(VP/0.61078);   // temp var
        return (241.88 * T) / (17.558-T);
}

// Fast calculate the Dew Point, its speed is 5 times of dewPoint()
// Reference: http://en.wikipedia.org/wiki/Dew_point
double dewPointFast(double celsius, double humidity)
{
        double a = 17.271;
        double b = 237.7;
        double temp = (a * celsius) / (b + celsius) + log(humidity/100);
        double Td = (b * temp) / (a - temp);
        return Td;
}
Kies het ESP32 Dev Module bord en de COM poort, en upload de code.

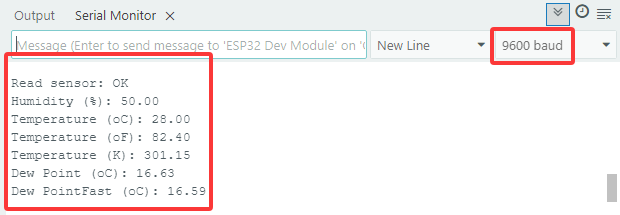
Testresultaat:
Open de seriële monitor en stel de baudrate in op 9600, de seriële monitor zal de huidige temperatuur- en vochtigheidswaarde weergeven.
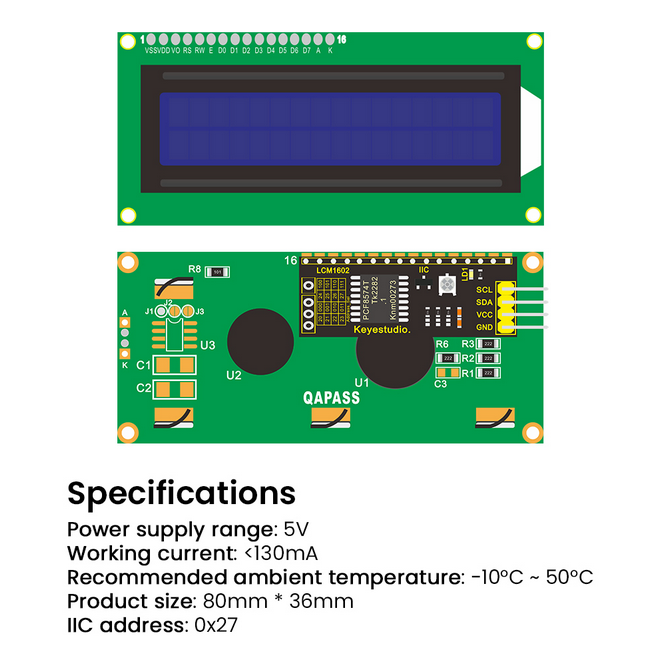
5.7.2 LCD 1602 Module
LCD 1602 heeft een standaard 14-pins (zonder achtergrondverlichting) of 16-pins (met achtergrondverlichting) interface, waardoor de pinnen van de MCU worden bespaard. De display-driver IC realiseert I2C-besturing.
Open de 5.7.2LCD1602 code met Arduino IDE.
#include <LiquidCrystal_I2C.h>

//Initialize LCD 1602, 0x27 is I2C address
LiquidCrystal_I2C lcd(0x27,16,2);

void setup() {
  //Initialize LCD
  lcd.init();
  // Turn the (optional) backlight off/on
  lcd.backlight();
  //lcd.noBacklight();

  //Set the position o dcursor
  lcd.setCursor(0, 0);
  //LCD prints
  lcd.print("HELLO WORLD 0");
  lcd.setCursor(0, 1);
  lcd.print("HELLO WORLD 1");

  //Clear displays
  // lcd.clear();
}

void loop() {

  // Turn the display on/off (quickly)
  //lcd.noDisplay();
  //lcd.display();

  // Turns the underline cursor on/off
  //lcd.noCursor();
  //lcd.cursor();

  // Turn on and off the blinking cursor
  // lcd.noBlink();
  // lcd.blink();

  // These commands scroll the display without changing the RAM
  //lcd.scrollDisplayLeft();
  //lcd.scrollDisplayRight();

  // This is for text that flows Left to Right
  //lcd.leftToRight();
  //lcd.rightToLeft();

  // This will 'right justify' text from the cursor
  //lcd.autoscroll();
  //lcd.noAutoscroll();

}
Kies het ESP32 Dev Module bord en de COM poort, en upload de code.
Testresultaat:
LCD1602 schakelt de achtergrondverlichting in en toont “HELLO WORLD 0” en “HELLO WORLD 1”.

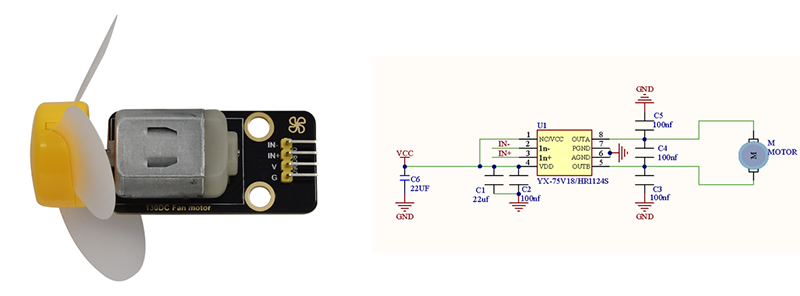
5.7.3 Motor en Ventilator
De 130 Motor kan de snelheid aanpassen via PWM. Hierbij zijn twee pinnen nodig voor de besturing.
Open de 5.7.3Motor code met Arduino IDE.
#define MotorPin1 19  //(IN+)
#define MotorPin2 18  //(IN-)

void setup() {
  pinMode(MotorPin1, OUTPUT);
  pinMode(MotorPin2, OUTPUT);
}

void loop() {
  //corotation
  analogWrite(MotorPin1, 255); //Adjust the motor speed by modifying the analog value output range from 0-255
  analogWrite(MotorPin2, 0);
  delay(2000);
  //Stop Transition
  delay(200);
  analogWrite(MotorPin1, 0);
  analogWrite(MotorPin2, 0);
  delay(200);
  //reversal
  analogWrite(MotorPin1, 0);
  analogWrite(MotorPin2, 255);