Project 15 Button Controls Servo
1. Description
In the previous project, we learned how to control the servo automatically. In this project, we are going to use the A/B buttons on the Micro:bit mainboard to manually control the rotation of the servo. This mimics how we might control a robot arm using a remote controller.
Button A: Controls rotation in one direction.
Button B: Controls rotation in the opposite direction.
2. Wiring Diagram
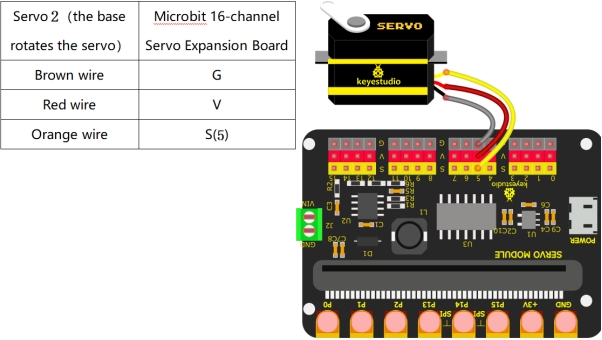
3. Test Code
1. Preparations
Insert the Micro:bit into the robot arm’s 16-channel servo shield.
Connect the external power supply.
Connect the Micro:bit to your computer via a Micro USB cable.
Open the MakeCode editor (web or offline version).
Import Hex file, or drag the code manually (add the pca9685 extension first).
2. drag the code manually
Add pca9685 Extension
⚠️ Prerequisite: This project requires importing a specific extension to function. If you are new to this or unsure how to import extensions, please refer to our “General Guide on Importing Micro:bit Extensions” first. Once you are familiar with the process, please return to this tutorial.
Extensions_URL: https://github.com/keyestudio2019/pxt-pca9685-smallest
(Note: The code block above is for display. Please ensure the logic matches: On Button A pressed -> Servo write 0; On Button B pressed -> Servo write 180, or specific angles as required.)
3. Import Hex file
To import the Hex file directly, please locate the downloaded Hex file and drag it into the editor.
🏡Click to download the code for this lesson
After downloading the code, simply drag it directly into the coding area to upload it. (Note: The image below is for demonstration purposes only—please drag in the code you downloaded for this lesson above.)

4. Test Result
Download the code to the Micro:bit and power on using external power. Press the reset button on the Micro:bit board.
Then:
Press Button A → Servo 2 rotates to the left (e.g., 0°).
Press Button B → Servo 2 rotates to the right (e.g., 180°).