5.4.20 Progetto 12.1 Test WiFi
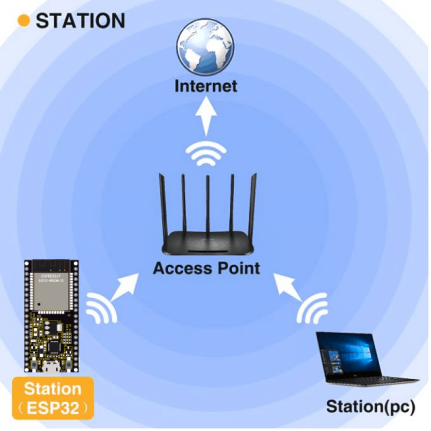
Il modo più semplice per accedere a Internet è usare una connessione WiFi. La scheda di controllo principale ESP32 è dotata di un modulo WiFi, rendendo la nostra casa intelligente facilmente accessibile a Internet.
1. Descrizione
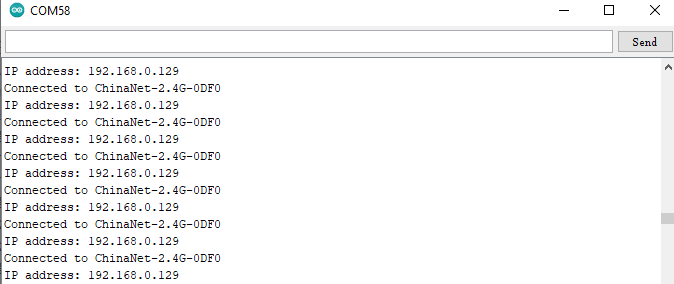
Colleghiamo la casa intelligente a una LAN, cioè il WiFi di casa o l’hotspot del tuo telefono. Dopo la connessione verrà assegnato un indirizzo utilizzabile per la comunicazione. Stamperemo l’indirizzo assegnato nel monitor seriale.
2. Codice di test
⚠️ ATTENZIONE: Dopo aver aperto il file di codice, devi modificare il nome WiFi e la password a cui la scheda di sviluppo ESP32 deve connettersi. Sostituisci ChinaNet-2.4G-0DF0 e ChinaNet@233 rispettivamente con il tuo nome WiFi e la tua password. Devi farlo prima di caricare il codice; altrimenti la scheda ESP32 non riuscirà a connettersi alla rete.
const char* ssid = "ChinaNet-2.4G-0DF0";  // Enter your own WiFi name
const char* password = "ChinaNet@233"; // Enter your own WiFi passwords
⚠️ NOTA: Assicurati che il nome WiFi e le password nel codice siano gli stessi della rete a cui sono connessi il tuo computer, il tuo telefono/tablet, la scheda di sviluppo ESP32 e il router. Devono trovarsi nella stessa rete locale (WiFi).
⚠️ NOTA: Il WiFi deve essere a frequenza 2.4Ghz; altrimenti l’ESP32 non può connettersi al WiFi.
#include <Arduino.h>
#include <WiFi.h>
#include <ESPmDNS.h>
#include <WiFiClient.h>

// Network Configuration
const char* ssid = "ChinaNet-2.4G-0DF0";
const char* password = "ChinaNet@233";
WiFiServer server(80);

// Global Variables
String requestPath = "/";  // Stores the HTTP request path

void setup() {
  Serial.begin(115200);

  // Connect to WiFi
  Serial.println("\nConnecting to WiFi...");
  WiFi.begin(ssid, password);

  while (WiFi.status() != WL_CONNECTED) {
    delay(500);
    Serial.print(".");
  }

  // Network information
  Serial.println("\nWiFi connected");
  printNetworkInfo();

  // Start server and mDNS
  server.begin();
  if (!MDNS.begin("esp32")) {
    Serial.println("Error setting up MDNS responder!");
  }
  MDNS.addService("http", "tcp", 80);
  Serial.println("HTTP server started");
}

void loop() {
  WiFiClient client = server.available();

  if (!client) {
    return;
  }

  // Wait for client data
  while (client.connected() && !client.available()) {
    delay(1);
  }

  // Read HTTP request
  String request = client.readStringUntil('\r');
  parseHttpRequest(request);

  // Handle request
  String response;
  if (requestPath == "/") {
    response = buildHomepageResponse();
    Serial.println("Serving homepage");
  } else {
    response = buildNotFoundResponse();
    Serial.println("Unknown request: " + requestPath);
  }

  // Send HTTP response
  client.println(response);
  client.stop();

  // Small delay between requests
  delay(100);
}

// Helper Functions
void printNetworkInfo() {
  Serial.print("SSID: ");
  Serial.println(WiFi.SSID());
  Serial.print("IP Address: ");
  Serial.println(WiFi.localIP());
}

void parseHttpRequest(String req) {
  int addr_start = req.indexOf(' ');
  int addr_end = req.indexOf(' ', addr_start + 1);

  if (addr_start == -1 || addr_end == -1) {
    Serial.print("Invalid request: ");
    Serial.println(req);
    requestPath = "/404";
    return;
  }

  requestPath = req.substring(addr_start + 1, addr_end);
  Serial.println("Requested path: " + requestPath);
}

String buildHomepageResponse() {
  IPAddress ip = WiFi.localIP();
  String ipStr = String(ip[0]) + '.' + ip[1] + '.' + ip[2] + '.' + ip[3];

  String html = "HTTP/1.1 200 OK\r\n";
  html += "Content-Type: text/html\r\n";
  html += "Connection: close\r\n";
  html += "\r\n";
  html += "<!DOCTYPE HTML>\n";
  html += "<html><head><title>ESP32 Web Server</title></head>\n";
  html += "<body><h1>Hello from ESP32</h1>\n";
  html += "<p>IP Address: " + ipStr + "</p>\n";
  html += "</body></html>\n";

  return html;
}

String buildNotFoundResponse() {
  String html = "HTTP/1.1 404 Not Found\r\n";
  html += "Content-Type: text/html\r\n";
  html += "Connection: close\r\n";
  html += "\r\n";
  html += "<!DOCTYPE HTML>\n";
  html += "<html><head><title>404 Not Found</title></head>\n";
  html += "<body><h1>404</h1><p>Page not found</p></body></html>\n";

  return html;
}
3. Risultato del test
⚠️ Nota: Il telefono o il tablet devono essere connessi alla scheda di sviluppo ESP32 tramite lo stesso WiFi. Altrimenti non potranno accedere alla pagina di controllo. Inoltre, quando la scheda di sviluppo ESP32 utilizza la funzione WiFi, consuma molta energia. È necessario un alimentatore DC esterno per soddisfare il suo fabbisogno energetico durante il funzionamento. Se il fabbisogno energetico non è soddisfatto, la scheda ESP32 si riavvierà continuamente, causando il malfunzionamento del codice.
Se il WiFi si connette con successo, il monitor seriale stamperà l’indirizzo IP assegnato.
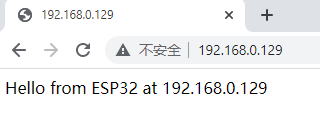
Apri un browser per accedere all’indirizzo IP, poi leggeremo il contenuto della stringa S inviata da client.println(s); nel codice.