5.4.23 Progetto 13.2 IoT Smart Home
1. Descrizione
La IoT smart home si collega al WiFi di casa tramite WiFi, e il telefono cellulare utilizzato per l’operazione dovrebbe essere anch’esso collegato allo stesso WiFi.
Inoltre, la smart home può anche connettersi all’hotspot del telefono cellulare. Se la connessione ha successo, l’LCD1602 mostrerà l’indirizzo IP. Usando l’APP del telefono per inserire l’IP corrispondente per la comunicazione è possibile realizzare il controllo tramite APP delle varie funzioni della smart home.
2. Test Code
⚠️ \ ATTENZIONE:\ Dopo aver aperto il file del codice, è necessario
modificare il nome e la password del WiFi a cui la scheda di sviluppo ESP32 deve
connettersi. Sostituire ChinaNet-2.4G-0DF0 e ChinaNet@233 con
il proprio nome e password WiFi rispettivamente. È obbligatorio farlo prima
di caricare il codice; altrimenti, la scheda ESP32 non potrà connettersi
alla rete.
const char* ssid = "ChinaNet-2.4G-0DF0";  // Enter your own WiFi name
const char* pwd = "ChinaNet@233"; // Enter your own WiFi passwords
⚠️ NOTA: Assicurarsi che il nome e la password del WiFi nel codice siano gli stessi della rete a cui sono connessi il computer, il telefono/tablet, la scheda di sviluppo ESP32 e il router. Devono essere all’interno della stessa rete locale (WiFi).
⚠️ NOTA: Il WiFi deve essere sulla frequenza 2.4Ghz; altrimenti, la ESP32 non può connettersi al WiFi.
#include <Arduino.h>
#ifdef ESP32
#include <WiFi.h>
#elif defined(ESP8266)
#include <ESP8266WiFi.h>
#endif

#include <Wire.h>
#include <Adafruit_NeoPixel.h>
#define LED_PIN    26
#define LED_COUNT 4     // Number of NeoPixels attached
Adafruit_NeoPixel strip(LED_COUNT, LED_PIN, NEO_GRB + NEO_KHZ800);

//Define the variable as the detected value
String request;
const char* ssid = "ChinaNet-2.4G-0DF0";
const char* pwd = "ChinaNet@233";
WiFiServer server(80);  //Initialize the WiFi service

#include <LiquidCrystal_I2C.h>
LiquidCrystal_I2C lcd(0x27,16,2);

#include <dht11.h>
#define DHT11PIN 17
dht11 DHT11; // Initialize dht11

#include <BuzzerESP32.h>
#define buzzer_pin 25
BuzzerESP32 buzzer(buzzer_pin);   // GPIO25

#define waterPin 34
#define fanPin1 19
#define fanPin2 18
#define led_y 12           // Yellow LED pin definition
#define gasPin 23
#define pyroelectric 14

// Servo channels
int channel_PWM1 = 13;
int channel_PWM2 = 10;
int freq_PWM = 50;
int resolution_PWM = 10;
const int PWM_Pin1 = 5;
const int PWM_Pin2 = 13;

String dataBuffer = "4095,0,0,32,65";

int Rainwater, gas, pir, t, h;  //Define variables
unsigned long prevTask = 0;

void setup() {
  Serial.begin(9600);
  //Connect to WiFi
  WiFi.begin(ssid, pwd);
  //Determine whether it is connected
  Serial.println("Connecting to WiFi...");
  while (WiFi.status() != WL_CONNECTED) {
    delay(1000);
    Serial.print(".");
  }
  delay(1000);
  //The serial monitor will display the name and IP address of the wireless network
  Serial.println("Connected to WiFi");
  Serial.print("WiFi NAME:");
  Serial.println(ssid);
  Serial.print("IP:");
  Serial.println(WiFi.localIP());

  //Initialize LCD
  lcd.init();
  //Turn on the LCD backlight
  lcd.backlight();
  //lcd.noBacklight();
  lcd.clear();
  //Set the position of the cursor
  lcd.setCursor(0, 0);
  //LCD printing
  lcd.print("IP:");
  //Set the position of the cursor
  lcd.setCursor(0, 1);
  //LCD printing
  lcd.print(WiFi.localIP());

  pinMode(led_y, OUTPUT);
  pinMode(fanPin1, OUTPUT);
  pinMode(fanPin2, OUTPUT);
  pinMode(waterPin, INPUT);

  buzzer.setTimbre(30);                                  // Set timbre
  buzzer.playTone(0,0);                                  // Turn off buzzer

  pinMode(gasPin, INPUT);
  pinMode(pyroelectric, INPUT);

  ledcAttach(PWM_Pin1, freq_PWM, resolution_PWM);
  ledcAttachChannel(PWM_Pin1, freq_PWM, resolution_PWM, channel_PWM1);
  ledcAttach(PWM_Pin2, freq_PWM, resolution_PWM);
  ledcAttachChannel(PWM_Pin2, freq_PWM, resolution_PWM, channel_PWM2);
  ledcWrite(PWM_Pin1, 25);
  delay(500);
  ledcWrite(PWM_Pin2, 25);
  delay(500);
  //Start the service
  server.begin();
}

void loop() {
  //Check whether the client has been connected to the network server
  //When the client establishes a connection with the server, the "server.available()" function returns a WiFiClient object for client-side communication.
  WiFiClient client = server.available();
  if (client) {
    Serial.println("New client connected");
    while (client.connected()) {
      //Determine whether the server sends data
      if (client.available()) {
        request = client.readStringUntil('s');
        Serial.print("Received message: ");
        Serial.println(request);
      }
      //Obtain all sensor data
      getSensorsData();
      //Put all the data into "dataBuffer"
      dataBuffer = "";
      dataBuffer += String(Rainwater);
      dataBuffer += ",";
      dataBuffer += String(gas);
      dataBuffer += ",";
      dataBuffer += String(pir);
      dataBuffer += ",";
      dataBuffer += String(t);
      dataBuffer += ",";
      dataBuffer += String(h);
      //Send the data to the server and then transfer it to the application.
      if (millis() - prevTask >= 1000) {  // Execute every second
        prevTask = millis();
        client.print(dataBuffer);
      }

      delay(500);

      //LED
      if (request == "a") {
        digitalWrite(led_y, HIGH);
      } else if (request == "A") {
        digitalWrite(led_y, LOW);
      }

      //window servo
      if (request == "b") {
        ledcWrite(PWM_Pin1, 100); //The high level of 20ms is approximately 2.5ms, that is, 2.5/20*1024, and the servo rotates at the specified Angle.
        delay(500);
      } else if (request == "B") {
        ledcWrite(PWM_Pin1, 25);  //The high level of 20ms is approximately 0.5ms, that is, 0.5/20*1024, and the servo rotates at the specified Angle.
        delay(500);
      }

      //buzzer plays music
      if (request == "c") {
        birthday();
        buzzer.playTone(0,0);
      } else if (request == "C") {
        buzzer.playTone(0,0);
      }

      //The buzzer sounds
      if (request == "d") {
        buzzer.playTone(392,250);
      } else if (request == "D") {
        buzzer.playTone(0,0);
      }

      //door servo
      if (request == "e") {
        ledcWrite(PWM_Pin2, 120);
        delay(500);
      } else if (request == "E") {
        ledcWrite(PWM_Pin2, 25);
        delay(500);
      }

      //fan
      if (request == "f") {
        digitalWrite(fanPin2, LOW); //pwm = 0
        analogWrite(fanPin1, 100); //LEDC channel 5 is bound to the specified left motor output PWM value as 100.
      } else if (request == "F") {
        digitalWrite(fanPin2, LOW); //pwm = 0
        analogWrite(fanPin1, 0); //LEDC channel 5 is bound to the specified left motor output PWM value as 0.
      }

      //SK6812RGB turns on and off its red light
      if (request == "g") {
        colorWipe(strip.Color(255,   0,   0), 50);
      } else if (request == "G") {
        colorWipe(strip.Color(0,   0,   0), 50);
      }

      //SK6812RGB turns on and off its orange light
      if (request == "h") {
        colorWipe(strip.Color(200,   100,   0), 50);
      } else if (request == "H") {
        colorWipe(strip.Color(0,   0,   0), 50);
      }

      //SK6812RGB turns on and off its yellow light
      if (request == "i") {
        colorWipe(strip.Color(200,   200,   0), 50);
      } else if (request == "I") {
        colorWipe(strip.Color(0,   0,   0), 50);
      }

      //SK6812RGB turns on and off its green light
      if (request == "j") {
        colorWipe(strip.Color(0,   255,   0), 50);
      } else if (request == "J") {
        colorWipe(strip.Color(0,   0,   0), 50);
      }

      //SK6812RGB turns on and off its blue-green light
      if (request == "k") {
        colorWipe(strip.Color(0,   100,   255), 50);
      } else if (request == "K") {
        colorWipe(strip.Color(0,   0,   0), 50);
      }

      //SK6812RGB turns on and off its blue light
      if (request == "l") {
        colorWipe(strip.Color(0,   0,   255), 50);
      } else if (request == "L") {
        colorWipe(strip.Color(0,   0,   0), 50);
      }

      //SK6812RGB turns on and off its purple light
      if (request == "m") {
        colorWipe(strip.Color(100,   0,   255), 50);
      } else if (request == "M") {
        colorWipe(strip.Color(0,   0,   0), 50);
      }

      //SK6812RGB turns on and off its white light
      if (request == "n") {
        colorWipe(strip.Color(255,   255,   255), 50);
      } else if (request == "N") {
        colorWipe(strip.Color(0,   0,   0), 50);
      }

      //SK6812RGB-sfx1
      if (request == "o") {
        rainbow(10);
      } else if (request == "O") {
        colorWipe(strip.Color(0,   0,   0), 50);
      }

      //SK6812RGB-sfx2
      if (request == "p") {
        theaterChaseRainbow(50);
      } else if (request == "P") {
        colorWipe(strip.Color(0,   0,   0), 50);
      }
      request = "";
    }
    Serial.println("Client disconnected");
  }
}

void getSensorsData() {
   //Obtain data
   int chk = DHT11.read(DHT11PIN);
   t = DHT11.temperature;
   h = DHT11.humidity;

   //steam sensor
   Rainwater = analogRead(waterPin); //read steam sensor analog value and assign it to variable Rainwater

   //gas sensor
   gas = digitalRead(gasPin); //read gas sensor analog value and assign it to variable gas

   //PIR motion sensor
   pir = digitalRead(pyroelectric); //read PIR motion sensor analog value and assign it to variable gas
}

//Convert the data into percentages
String dataHandle(int data) {
  // Convert the analog values to percentages
  int percentage = (data / 4095.0) * 100;
  // If the converted percentage is greater than 100, output 10.
  percentage = percentage > 100 ? 100 : percentage;
  // Six characters are used to store a hexadecimal string, with one serving as the terminator
  char hexString[3];
  // Convert the hexadecimal value to a 6-bit hexadecimal string and add leading zeros in front: 0 represents 00, 1 represents 01...
  sprintf(hexString, "%02X", percentage);

  return hexString;
}

void birthday()
{
  buzzer.playTone(294,250);  //The four parameters are frequency, delay, etc
  buzzer.playTone(440,250);
  buzzer.playTone(392,250);
  buzzer.playTone(532,250);
  buzzer.playTone(494,250);
  buzzer.playTone(392,250);
  buzzer.playTone(440,250);
  buzzer.playTone(392,250);
  buzzer.playTone(587,250);
  buzzer.playTone(532,250);
  buzzer.playTone(392,250);
  buzzer.playTone(784,250);
  buzzer.playTone(659,250);
  buzzer.playTone(532,250);
  buzzer.playTone(494,250);
  buzzer.playTone(440,250);
  buzzer.playTone(698,250);
  buzzer.playTone(659,250);
  buzzer.playTone(532,250);
  buzzer.playTone(587,250);
  buzzer.playTone(532,500);
  buzzer.playTone(0,0);  //off
}

void colorWipe(uint32_t color, int wait) {
  for(int i=0; i<strip.numPixels(); i++) { // For each pixel in the strip...
    strip.setPixelColor(i, color);         // Set the color of the pixels (in RAM)
    strip.show();                          // Update the stripe to match
    delay(wait);                           // delay
  }
}

// The rainbow circulates along the entire band. Transfer the delay time (in milliseconds) between frames.
void rainbow(int wait) {
  for(long firstPixelHue = 0; firstPixelHue < 5*65536; firstPixelHue += 256) {
    for(int i=0; i<strip.numPixels(); i++) { // For each pixel in strip...
      int pixelHue = firstPixelHue + (i * 65536L / strip.numPixels());
      strip.setPixelColor(i, strip.gamma32(strip.ColorHSV(pixelHue)));
    }
    strip.show(); // Update strip content
    delay(wait);  // delay
  }
}

// Rainbow-enhanced Marquise-style. Transfer delay time (milliseconds) between frames
void theaterChaseRainbow(int wait) {
  int firstPixelHue = 0;     // The first pixel starts from red (hue 0).
  for(int a=0; a<30; a++) {  // Repeat 30 times...
    for(int b=0; b<3; b++) { // 'b' counts from 0 to 2...
      strip.clear();         // Set all pixels in RAM to 0(off)
      // 'c' is counted starting from 'b' and increments in units of 3...
      for(int c=b; c<strip.numPixels(); c += 3) {
        int      hue   = firstPixelHue + c * 65536L / strip.numPixels();
        uint32_t color = strip.gamma32(strip.ColorHSV(hue)); // color -> RGB
        strip.setPixelColor(c, color); // Set the value of pixel c to color
      }
      strip.show();                // Update strip content
      delay(wait);                 // delay
      firstPixelHue += 65536 / 90; // The color wheel of one cycle exceeds 90 frames
    }
  }
}
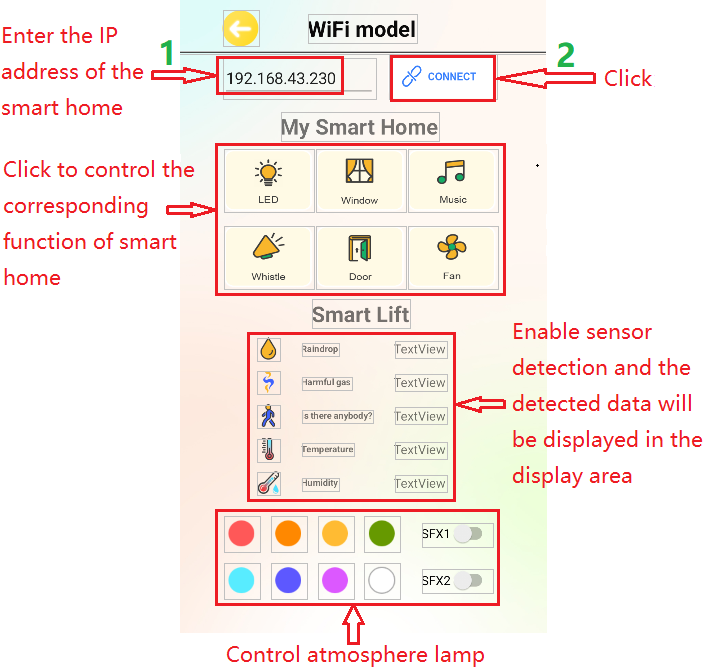
3. Risultato del Test
⚠️ Nota: Il telefono cellulare o il tablet devono essere connessi alla scheda di sviluppo ESP32 tramite lo stesso WiFi. Altrimenti, non sarà possibile accedere alla pagina di controllo. Inoltre, quando la scheda di sviluppo ESP32 utilizza la funzione WiFi, consuma molta energia. È necessario un alimentatore DC esterno per soddisfare la richiesta di alimentazione per il suo funzionamento. Se la richiesta di alimentazione non viene soddisfatta, la scheda ESP32 continuerà a resettarsi, causando il mancato funzionamento corretto del codice.
A. Inserire l’indirizzo IP nell’APP (L’indirizzo IP assegnato sarà visualizzato sull’LCD1602 o nella finestra del monitor seriale dell’IDE.)
B. Fare clic su “CONNECT” per connettersi all’indirizzo IP.
C. La connessione avvenuta con successo è indicata dalla comparsa della parola “Connected”. Prestare attenzione a questo messaggio.
D. Dopo la connessione all’indirizzo IP, fare clic sul pulsante corrispondente nell’interfaccia APP per controllare il modulo sensore corrispondente.