Projet 27 Stationnement Intelligent
1. Description
Ce système de stationnement intelligent détecte et optimise la position de stationnement grâce à un capteur ultrasonique. Avec ce système, les erreurs de stationnement sont largement évitées.
Tout d’abord, vous devez installer le capteur autour du parking. Ensuite, il détectera la distance entre la voiture et ses bords et enverra l’information à la carte de développement afin de contrôler la voiture pour qu’elle s’ajuste automatiquement à la position de stationnement optimale.
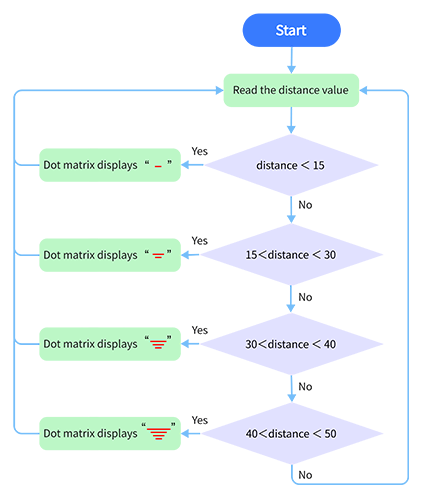
2. Organigramme
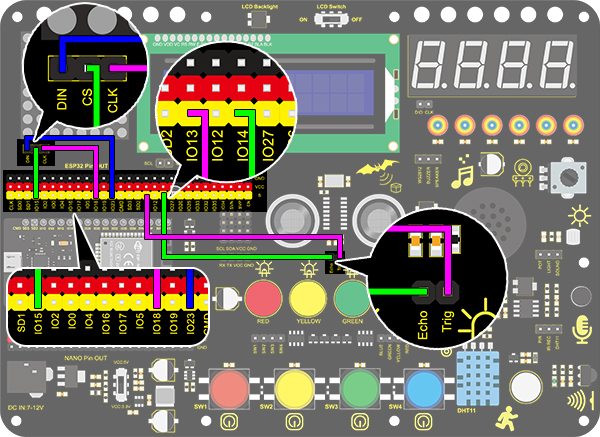
3. Schéma de câblage
4. Code de test
/*
  keyestudio ESP32 Inventor Learning Kit
  Project 27 Intelligent Parking
  http://www.keyestudio.com
*/
#include <LedControl.h>

int DIN = 23;  //Define DIN pin to IO23
int CS = 15;   //Define CS pin to IO15
int CLK = 18;  //Define CLK pin to IO18

int temp = 0;

int distance = 0;  //Define a variable to receive the distance
int EchoPin = 14;  //Connect Echo pin to IO14
int TrigPin = 13;  //Connect Trig pin to IO13

float checkdistance() {  //Acquire distance
  // preserve a short low level to ensure a clear high pulse:
  digitalWrite(TrigPin, LOW);
  delayMicroseconds(2);
  // Trigger the sensor by a high pulse of 10um or longer
  digitalWrite(TrigPin, HIGH);
  delayMicroseconds(10);
  digitalWrite(TrigPin, LOW);
  // Read the signal from the sensor: a high level pulse
  //Duration is detected from the point sending "ping" command to the time receiving echo signal (unit: um).
  float distance = pulseIn(EchoPin, HIGH) / 58.00;  //Convert into distance
  delay(10);
  return distance;
}

LedControl lc = LedControl(DIN, CLK, CS, 4);
byte data_val[4][8] =
{
  { 0x00, 0x00, 0x00, 0x01, 0x01, 0x00, 0x00, 0x00 },
  { 0x00, 0x00, 0x04, 0x05, 0x05, 0x04, 0x00, 0x00 },
  { 0x00, 0x10, 0x14, 0x15, 0x15, 0x14, 0x10, 0x00 },
  { 0x40, 0x50, 0x54, 0x55, 0x55, 0x54, 0x50, 0x40 },
};


void setup()
{
  lc.shutdown(0, false);  //MAX72XX is in power-saving mode at startup
  lc.setIntensity(0, 8);  //Set the brightness to its maximum value
  lc.clearDisplay(0);     //Clear display

  pinMode(TrigPin, OUTPUT);  //Set Trig pin to output
  pinMode(EchoPin, INPUT);   //Set Echo pin to input
  Serial.begin(9600);
}

void loop()
{
  distance = checkdistance();
  Serial.println(distance);
  if (distance < 15)
  {
    temp = 0;
  }
  else if (distance < 30 && distance > 15)
  {
    temp = 1;
  }
  else if (distance < 40 && distance > 30)
  {
    temp = 2;
  }
  else if (distance > 50)
  {
    temp = 3;
  }
  for (int i = 0; i < 8; i++)
  {
    lc.setRow(0, i, data_val[temp][i]);
  }
}
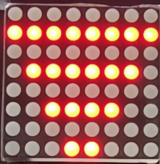
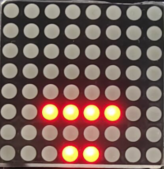
5. Résultat du test
Après avoir connecté le câblage et téléchargé le code, des lignes s’afficheront sur la matrice de points. Si la distance détectée est inférieure à 50 cm, il y aura moins de lignes.