Project 8 Obstacle Avoidance Smart Car
1.Description
It is not suitable for human to work in some relatively harsh environments. At this moment, if we have a robot that can shuttle freely in such environments, then how good should it be! Based on this original intention, our team develop this smart car that be able to automatically avoid an obstacle when running on complicated terrain.
Application occasions and market prospects: It can be used for material transportation of unmanned cars in harsh geographical environments, and automatic obstacle avoidance of toy cars. So it can be seen that application prospect of this obstacle avoidance car is indeed extensive.
This project is a simple and automatic obstacle avoidance car system based on Arduino. The smart car with UNO R3 as the controlling core, makes use of ultrasonic module and obstacle detector sensor to detect the obstacle in front of the car, and the detection signal will feed back to the control board.
Arduino main board will then analyze and judge the collected signals to control the motor driving in time, thus adjust the direction of smart car. Finally control the smart car automatically avoid an obstacle ahead to run forward smoothly.
2.Project Principle
Use the ultrasonic module to detect the distance between the smart car and the obstacle ahead.
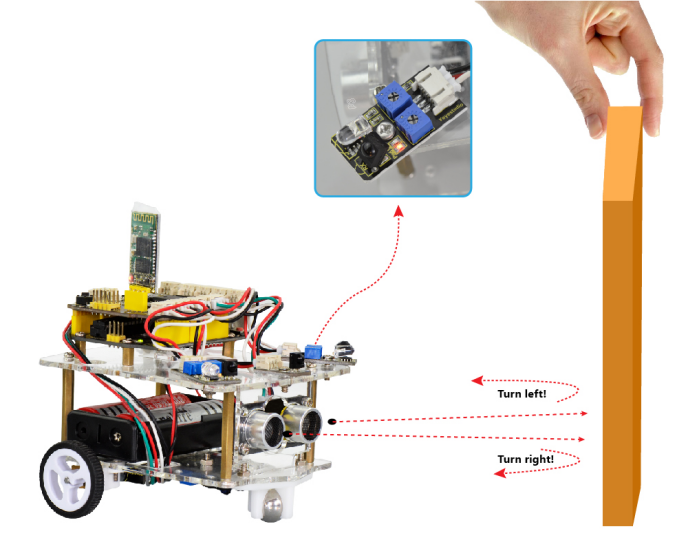
Use the obstacle detector sensor to detect the obstacle ahead or on the left or right side of smart car. The sensitivity can be adjusted through rotating the two small potentiometers on the sensor. If detectsan obstacle, the signal end of sensor will output 0; if no, the signal end of sensor will output 1.
According to both output signal of obstacle detector sensor and distance value detected by ultrasonic sensor between the car and obstacle, thus Arduino can control the turning direction of motor.
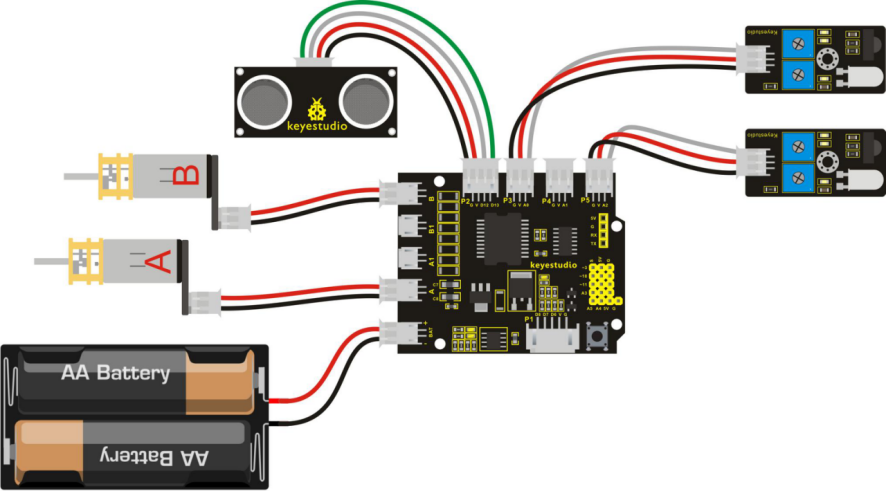
3.Wiring Diagram
Next, let’s start connecting the ultrasonic module, obstacle detector sensor and motors to the shield board. Have a try to make an amazing smart car with obstacle avoidance function. Think about it and do it right now!
Firstly you can follow the connection diagram below.
4.Example Code 10 as below
Wire it up well as the above figure. Let’s move on to an example code for this obstacle avoidance smart car. You can see the source code for reference as follows:
int E1 = 9;   // set the speed pin of motor A as D9
int E2 = 5;   // set the speed pin of motor B as D5
int M1 = 2;   // set the direction pin of motor A as D2
int M2 = 4;   // set the direction pin of motor B as D4
int pinTrip=12; // connect the SR04 Trip , more than 10us High level
int pinEcho=13;//connect the SR04 Echo,the time to receive High level
float distance=0; // save the distance
int sensorleft = 16; // input pin of obstacle detector sensor on the left side
int sensorright= 14;// input pin of obstacle detector sensor on the right side
int RS;// set the state of right side obstacle sensor
int MS;// set the detection distance of ultrasonic module
int LS;// set the state of left side obstacle sensor

void setup(void)
{
  pinMode(M1,OUTPUT); // set M1 as OUTPUT mode
  pinMode(M2,OUTPUT); // set M2 as OUTPUT mode
  pinMode(E1,OUTPUT); //  set E1 as OUTPUT mode
  pinMode(E2,OUTPUT); //  set E2 as OUTPUT mode
  pinMode(pinTrip,OUTPUT);//define the SR04 Trip as OUTPUT
  pinMode(pinEcho,INPUT);// define SR04 Echo as INPUT
  pinMode(sensorleft,INPUT);// define the left side obstacle sensor as INPUT
  pinMode(sensorright,INPUT);// define the right side obstacle sensor as INPUT
}

void advance(void)        // set the forward motion
{
  digitalWrite(M1,HIGH);  // motor A turns forward, and wheels go forward.
  digitalWrite(M2,HIGH);  // motor B turns forward, and wheels go forward.
  analogWrite(E1,150);    // speed of motor A(can be adjusted according to the actual speed of motor. Turn up the value to accelerate, lower the value to decelerate.)
  analogWrite(E2,150);    // speed of motor B(can be adjusted according to the actual speed of motor. Turn up the value to accelerate, lower the value to decelerate.)
}

void back(void)        // set the backward motion
{
  digitalWrite(M1,LOW);   // motor A turns reverse, and wheels go backward.
  digitalWrite(M2, LOW);   // motor B turns reverse, and wheels go backward.
  analogWrite(E1,150);     // speed of motor A
  analogWrite(E2,150);    //  speed of motor B
}

void turnL(void)     // set the left turn motion
{
   digitalWrite(M1,LOW);    // motor A turns reverse, and wheels go backward.
   digitalWrite(M2, HIGH);  // motor B turns forward, and wheels go forward, the whole car turns left.
   analogWrite(E1,150);  // speed of motor A
   analogWrite(E2,150);  // speed of motor B
}

void turnR(void)            // set the right turn motion
{
   digitalWrite(M1,HIGH);   //  motor A turns forward, and wheels go forward
   digitalWrite(M2,LOW);    //  motor A turns reverse, and wheels go backward, and the whole car turns right.
   analogWrite(E1,150);     // speed of motor A
   analogWrite(E2,150);    // speed of motor B
}

void stopp(void)   // set the stop motion
{
   digitalWrite(M1,LOW);  //  motor A turns reverse
   digitalWrite(M2, LOW);  //  motor B turns reverse
   analogWrite(E1, 0);      // speed of motor A, speed as zero, means Stop.
   analogWrite(E2, 0);      // speed of motor B, speed as zero, means Stop.
}

void Sensor_Scan()
{
  // put your main code here, to run repeatedly:
    digitalWrite(pinTrip,LOW);
    delayMicroseconds(2); // pull down level
    digitalWrite(pinTrip,HIGH);
    delayMicroseconds(12); // input 12us HIGH level
    digitalWrite(pinTrip,LOW); // pull down Level
    distance=pulseIn(pinEcho,HIGH); // check the HIGH level time
    delay(10);
    distance=distance/58; // get the distance
    MS=distance;//set the detection distance for the middle ultrasonic module
    delay(500);
    RS = digitalRead(sensorleft);// right state value read is the digital input of right side obstacle sensor
    LS = digitalRead(sensorright);// left state value read is the digital input of left side obstacle sensor
}

void loop()
{
    Sensor_Scan();//ultrasonic module detects the distance; right and left side obstacle sensors detect the state of right and left side.
    if(MS>8)  // if detection distance of ultrasonic module is greater than 8cm.
    {
    	if(LS==1&&RS==1)
    		advance();  // if both left and right side sensors fail to detect an obstacle, the car goes forward.
    	else if(LS==0&&RS==1)
    		turnR();  // if left side sensor detects an obstacle, but right side sensor fails to detect it, the car will turn right.
    	else if(LS==1&&RS==0)
    		turnL();  // if left side sensor detects no obstacle, but right side sensor detects an obstacle, the car will turn left.
     	else  //none of the above three states. That is, both side sensors detect the obstacle, the car will go backward one second and then turn left for 0.5 second, finally go on to the detection state.
        {
          back();// go backward
          delay(1000); //delay 1S
          turnL();// turn left
          delay(500); // delay 0.5S
        }
    }
    else  // if detection distance of ultrasonic module is not greater than 8cm
    {
        if(LS==0&&RS==1)
           turnR();    // if left side sensor detects the obstacle, but right side sensor detects no obstacle, the car will turn right.
        else if(LS==1&&RS==1)
           turnR();    // if left side sensor detects no obstacle, but right side sensor detects no obstacle, the car will turn right.
        else if(LS==1&&RS==0)
           turnL();  // if left side sensor detects no obstacle, but right side sensor detects the obstacle, the car will turn left.
        else  // none of the above three states. That is, both side sensors detect the obstacle, the car will go backward one second and then turn left for 0.5 second, finally go on to the detection state.
        {
           back();// go backward
           delay(1000); // delay 1S
           turnL();// turn left
           delay(500); // delay 0.5S
        }
     }
}
5.Test Result
Upload the above program code to the main board, then stack well the motor shield onto main board, press lightly down the POWER button on the motor drive shield. When detects an obstacle ahead, our smart car will be able to automatically avoid it to run forward freely. You can try it out and see if it works that way.