Project 9 Principle and Application of Infrared Receiver
1.Principle of IR Remote Control
There is no doubt that infrared remote control is commonly seen in our daily life. It’s hard to imagine our world without it. In reality, an infrared remote control can be used to control a wide range of home appliances such as television, audio, video recorders and satellite signal receivers. It is so practical. Well, in the following let’s get a better understanding of the infrared remote control.
Infrared remote control is composed of infrared transmitting and infrared receiving systems. That is, consist of an infrared remote control, an infrared receiver module and a microcontroller that can decode. You can refer to the figure below.

The 38K infrared carrier signal transmitted by an infrared remote controller is encoded by an encoding chip inside the remote controller. It is composed of a pilot code, user code, data code, and data inversion code. The time interval between pulses is used to distinguish whether it is a signal0 or 1. (when the ratio of high level to low level is about 1:1, considered as signal 0.) And the encoding is just well composed of signal 0 and 1.
The user code of the same button on remote controller is unchanged. Using difference data distinguish the key pressed on the remote control. When press down a button on the remote control, it will send out an infrared carrier signal. And when infrared receiver receives that signal, its program will decode the carrier signal, and through different data codes, thus can judge which key is pressed.
The microcontroller is decoded by an received signal 0 or 1 to determine which key is pressed by the remote control.
As for an infrared receiver module, it is mainly composed of an infrared receiving head.This device integrates with reception, amplification and demodulation. Its internal IC has been demodulated, able to complete all the work from infrared reception to output TTL level signal compatible.It outputs Digital signal. Suitable for IR remote control and infrared data transmission.
The infrared receiver module has only three pins (Signal line, VCC, GND), very convenient to communicate with Arduino and other microcontrollers.
2.Parameters of IR Receiver
Operating Voltage: 3.3-5V(DC)
Interface: 3PIN
Output Signal: Digital signal
Receiving Angle: 90 degrees
Frequency: 38khz
Receiving Distance: 18m
3.Decoding and Control of IR Remote Control
First of all, let’s figure out the part of decoding. You can refer to the steps as follows:
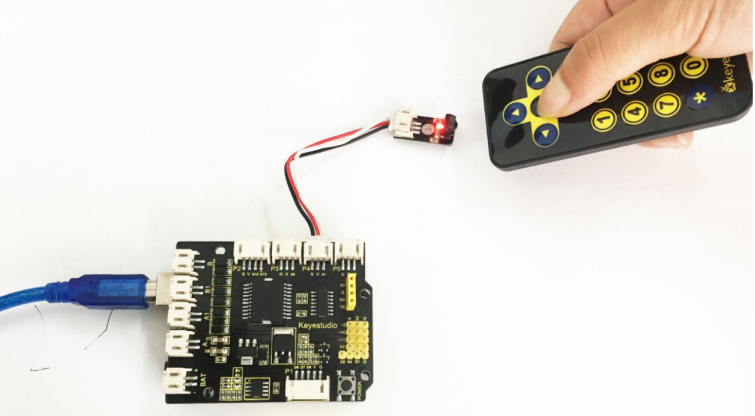
Connect the infrared receiver module to the P4 connector on the shield using the connector wire.
Code 11
#include <IRremote.h>library file
int RECV_PIN = 15;  //receiver module is connected to A1,namely Digital 15
IRrecv irrecv(RECV_PIN);
decode_results results;

void setup()
{
  Serial.begin(9600); // set the baud rate
  irrecv.enableIRIn(); // Start the receiver
}

void loop()
{
  if (irrecv.decode(&results)) // if receive the code
  {
    Serial.println(results.value, HEX);  // print the value of remote control
    irrecv.resume(); // Receive the next value
  }
}
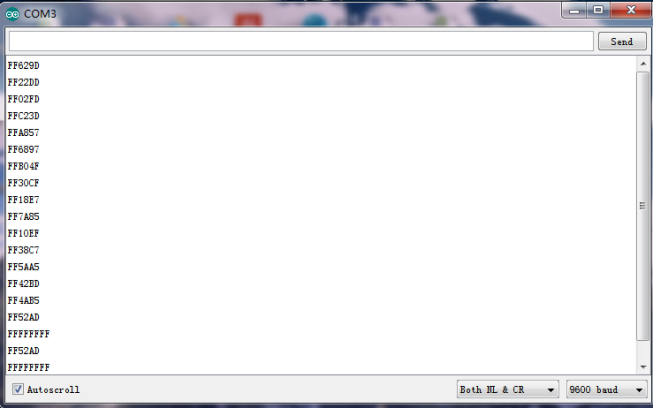
Upload well the above code to ARDUINO controller, then open the serial monitor and set the baud rate as 9600. Aimed at the IR receiver sensor, press down the button of remote control, you will see the corresponding encode of button is displayed on the monitor. If you press the button too long, it will easily appear a messy code like FFFFFF shown as below.
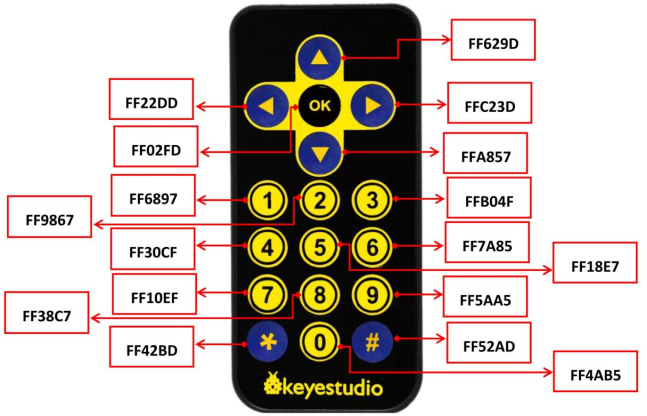
Here we have worked out each button value of keyestudio remote control as follows. You can keep it for reference.
Okay, next let’s use this remote control to make a small experiment, controlling an LED on and off. At this moment, based on the program mentioned above, just need to add the program part of light. So it is much more easier to write the code. Below is an example code.
Code12
#include <IRremote.h>
int RECV_PIN = 15; // IR Receiver module is connected to pin 15
int LEDpin = 11; // set LED output pin
IRrecv irrecv(RECV_PIN);
decode_results results; // used to save the decoding result

void setup()
{
    pinMode(LEDpin,OUTPUT);
    irrecv.enableIRIn(); // initialize the infrared decoding
}

void loop()
{
    if (irrecv.decode(&results))
    {
        Serial.println( results.value);
        if( results.value == 0xFF629D) //if receive the command of button ON
        {
            digitalWrite(LEDpin,HIGH);// turn on LED
        }
        else if(results.value == 0xFFA857) // if receive the command of button OFF
        {
        	digitalWrite(LEDpin,LOW);// turn off LED
        }
    irrecv.resume(); // receive the next encode
    }
}
4.Test Result
Upload well the code to the board, then press the up or down button on the remote control, thus control an LED on and off.