Project 4: Line Tracking Sensor
(1)Description:
The tracking sensor is actually an infrared sensor. The component used here is the TCRT5000 infrared tube.
Its working principle is to use different reflectivity of infrared light to colors, then convert the strength of the reflected signal into a current signal.
During the process of detection, black is active at HIGH level while white is active at LOW level. The detection height is 0-3 cm.
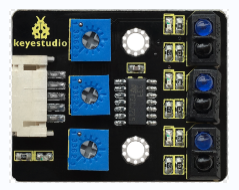
Keyestudio 3-channel line tracking module has integrated 3 sets of TCRT5000 infrared tube on a single board, which is more convenient for wiring and control.
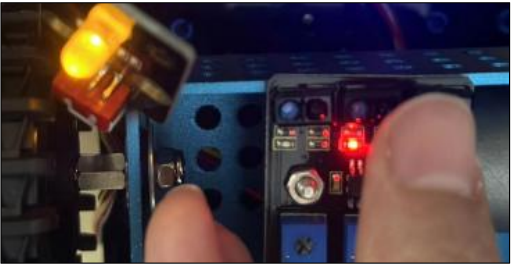
If the Line Tracking Sensor does not work as expected, you will need to use a screwdriver to adjust its potentiometerto make it more sensitive. When yourfinger is close to the sensor, its on-board LED light turns on, and when yourfinger moves away, its on-board LED light turns off. At thistime, itssensitivity isrelatively good.

(2)Parameters:
Operating Voltage: 3.3-5V (DC)
Interface: 5PIN
Output Signal: Digital signal
Detection Height: 0-3 cm
Special note: before testing,rotate the potentiometer on the sensor to adjust the detection sensitivity. When adjust the LED at the threshold between ON and OFF, the sensitivity is the best.
Note: the line tracking sensor is installed under the bottom of the robot.
(3)Connection Diagram:

(4)Test Code:
(Note: Do not connect the Bluetooth module before uploading the code, because uploading the code also uses serial communication, and there may be conflicts with the Bluetooth serial communication, which can cause the upload to fail.)
/*

Keyestudio Mini Tank Robot V3 (Popular Edition)

lesson 4.1

Line Track sensor

http://www.keyestudio.com

*/

//The wiring of line tracking sensors

#define L_pin 11 //left

#define M_pin 7 //middle

#define R_pin 8 //right

void setup()
{
    Serial.begin(9600); //Set the baud rate to 9600
    pinMode(L_pin, INPUT); //Set all pins of the line tracking sensors to input mode
    pinMode(M_pin, INPUT);
    pinMode(R_pin, INPUT);
}

void loop ()
{
    int L_val = digitalRead(L_pin); //Read the value of the left sensor
    int M_val = digitalRead(M_pin); //Read the value of the middle sensor
    int R_val = digitalRead(R_pin); //Read the value of the right sensor

    Serial.print(L_val);
    Serial.print(" ");
    Serial.print(M_val);
    Serial.print(" ");
    Serial.print(R_val);
    Serial.println(" ");
    delay(100); //delay in 100ms
}
(5)Test Results:
Upload the code on development board, open serial monitor to check line tracking sensors. And the displayed value is 1(high level) when no signals are received. The value shifts into 0 when the sensor is covered with paper.

(6)Code Explanation:
Serial.begin(9600)- Initialize serial port, set baud rate to 9600
pinMode- Define the pin as input or output mode
digitalRead- Read the state of pin, which are generally HIGH and LOW level
(7)Extension Practice:
After knowing its working principle, you can connect an LED to D9. so as to control LED by line tracking sensor.

Test Code
(Note: Do not connect the Bluetooth module before uploading the code, because uploading the code also uses serial communication, and there may be conflicts with the Bluetooth serial communication, which can cause the upload to fail.)
/*
Keyestudio Mini Tank Robot V3 (Popular Edition)

lesson 4.2

Line Track sensor

http://www.keyestudio.com

*/

//LED pin

#define LED 9
//The wiring of line tracking sensors
#define L_pin 11 //left
#define M_pin 7 //middle
#define R_pin 8 //right

void setup()
{
    Serial.begin(9600); //Set the baud rate to 9600
    pinMode(LED, OUTPUT); //Set LED to output mode
    pinMode(L_pin, INPUT); //Set all pins of the line tracking sensors to input mode
    pinMode(M_pin, INPUT);
    pinMode(R_pin, INPUT);
}

void loop ()
{
    int L_val = digitalRead(L_pin); //Read the value of the left sensor
    int M_val = digitalRead(M_pin); //Read the value of the middle sensor
    int R_val = digitalRead(R_pin); //Read the value of the right sensor
    Serial.print(L_val);
    Serial.print(" ");
    Serial.print(M_val);
    Serial.print(" ");
    Serial.print(R_val);
    Serial.println(" ");
    delay(100); //Delay in

    if (L_val == 0 || M_val == 0 || R_val == 0)
    {
    	digitalWrite(LED, HIGH);
    }
    else
    {
    	digitalWrite(LED, LOW);
    }
}