Projekt 27 Intelligentes Parken
1. Beschreibung
Dieses intelligente Parksystem erkennt und optimiert die Parkposition mittels eines Ultraschallsensors. Mit diesem System wird falsches Parken weitgehend vermieden.
Zuerst müssen Sie den Sensor rund um den Parkplatz installieren. Anschließend erkennt er den Abstand zwischen dem Auto und seinen Begrenzungen und sendet die Informationen an das Entwicklungsboard, um das Auto automatisch auf die optimale Parkposition einzustellen.
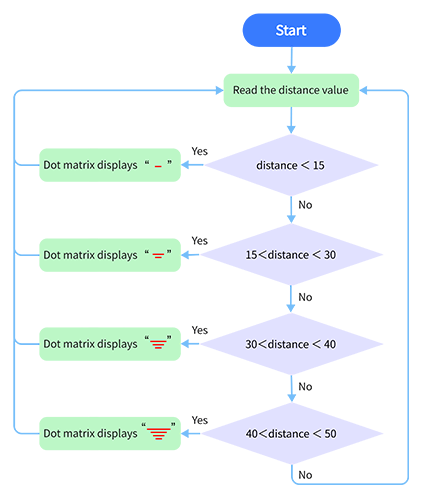
2. Flussdiagramm
3. Schaltplan

4. Testcode
/*
  keyestudio ESP32 Inventor Learning Kit
  Project 27 Intelligent Parking
  http://www.keyestudio.com
*/
#include <LedControl.h>

int DIN = 23;  //Define DIN pin to IO23
int CS = 15;   //Define CS pin to IO15
int CLK = 18;  //Define CLK pin to IO18

int temp = 0;

int distance = 0;  //Define a variable to receive the distance
int EchoPin = 14;  //Connect Echo pin to IO14
int TrigPin = 13;  //Connect Trig pin to IO13

float checkdistance() {  //Acquire distance
  // preserve a short low level to ensure a clear high pulse:
  digitalWrite(TrigPin, LOW);
  delayMicroseconds(2);
  // Trigger the sensor by a high pulse of 10um or longer
  digitalWrite(TrigPin, HIGH);
  delayMicroseconds(10);
  digitalWrite(TrigPin, LOW);
  // Read the signal from the sensor: a high level pulse
  //Duration is detected from the point sending "ping" command to the time receiving echo signal (unit: um).
  float distance = pulseIn(EchoPin, HIGH) / 58.00;  //Convert into distance
  delay(10);
  return distance;
}

LedControl lc = LedControl(DIN, CLK, CS, 4);
byte data_val[4][8] =
{
  { 0x00, 0x00, 0x00, 0x01, 0x01, 0x00, 0x00, 0x00 },
  { 0x00, 0x00, 0x04, 0x05, 0x05, 0x04, 0x00, 0x00 },
  { 0x00, 0x10, 0x14, 0x15, 0x15, 0x14, 0x10, 0x00 },
  { 0x40, 0x50, 0x54, 0x55, 0x55, 0x54, 0x50, 0x40 },
};


void setup()
{
  lc.shutdown(0, false);  //MAX72XX is in power-saving mode at startup
  lc.setIntensity(0, 8);  //Set the brightness to its maximum value
  lc.clearDisplay(0);     //Clear display

  pinMode(TrigPin, OUTPUT);  //Set Trig pin to output
  pinMode(EchoPin, INPUT);   //Set Echo pin to input
  Serial.begin(9600);
}

void loop()
{
  distance = checkdistance();
  Serial.println(distance);
  if (distance < 15)
  {
    temp = 0;
  }
  else if (distance < 30 && distance > 15)
  {
    temp = 1;
  }
  else if (distance < 40 && distance > 30)
  {
    temp = 2;
  }
  else if (distance > 50)
  {
    temp = 3;
  }
  for (int i = 0; i < 8; i++)
  {
    lc.setRow(0, i, data_val[temp][i]);
  }
}
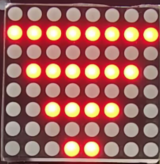
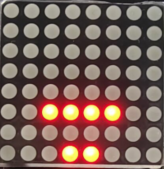
5. Testergebnis
Nach dem Anschließen der Verkabelung und Hochladen des Codes werden Linien auf der Punktmatrix angezeigt. Wenn der erkannte Abstand weniger als 50 cm beträgt, werden weniger Linien angezeigt.