Projekt 5 Regenbogen-Ambientebeleuchtung
1. Beschreibung
Arduino 2812RGB LED ist ein programmierbares, farbenfrohes, traumhaftes Licht, dessen Farbe, Helligkeit und Rhythmus einstellbar sind. Diese Regenbogen-Ambientebeleuchtung kann nach Belieben als dynamische Dekoration verwendet werden. Oder Sie können sie steuern, um „mit der Musik zu tanzen“. Wichtig ist, dass sie als Alarm verbessert werden kann. Ihr eingebauter Sensor erkennt die Umgebung und warnt die Benutzer durch Änderung von Farbe, Helligkeit und Rhythmus.
2. Funktionsprinzip
Das Datenprotokoll verwendet einen Kommunikationsmodus mit einadrigem Return-to-Zero-Code. Nach dem Zurücksetzen des Pixels beim Einschalten empfängt der DIN-Anschluss Daten vom Controller. Die zuerst ankommenden 24-Bit-Daten werden vom ersten Pixel extrahiert und in das interne Datenregister gesendet.
Die verbleibenden Daten werden von einer Verstärkerschaltung verstärkt und über den DOUT-Anschluss an das nächste kaskadierte Pixel weitergeleitet. Beim Durchlaufen der Pixel verringert sich das Signal jeweils um 24 Bit.
Außerdem verwendet das Pixel eine automatische Formungs- und Weiterleitungstechnologie, sodass die Anzahl der kaskadierten Pixel nur durch die Signalübertragungsgeschwindigkeit begrenzt ist.
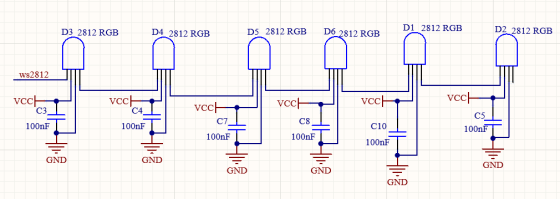
3. Schaltplan
4. Testcode
/*
keyestudio ESP32 Inventor Learning Kit
Project 5.1 Rainbow Ambient Light
http://www.keyestudio.com
*/
//Add 2812RGB library file
#include <NeoPixel_ESP32.h>
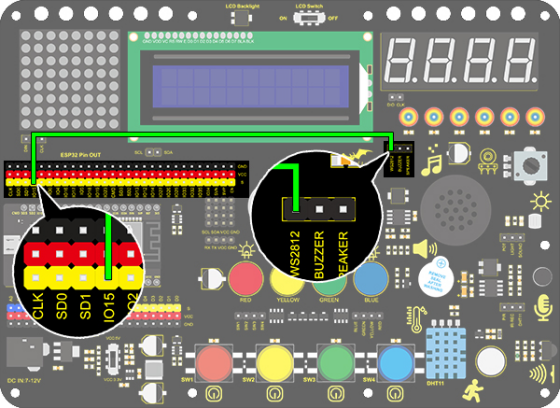
#define PIN 15
Adafruit_NeoPixel strip = Adafruit_NeoPixel(6, PIN); //Defines the instance strip and assigns the RGB LED number pins to the library code
void setup()
{
strip.begin(); //Activate RGB LED
strip.show(); // Refresh the display
}
void loop()
{
strip.setPixelColor(0, strip.Color(255, 0, 0)); //The frist RGB LED is red
strip.setPixelColor(1, strip.Color(0, 255, 0)); //The second RGB LED is green
strip.setPixelColor(2, strip.Color(0, 0, 255)); //The third RGB LED is blue
strip.setPixelColor(3, strip.Color(255, 255, 0)); //The fourth RGB LED is yellow
strip.setPixelColor(4, strip.Color(255, 0, 255)); //The fifth RGB LED is purple
strip.setPixelColor(5, strip.Color(255, 255, 255)); //The sixth RGB LED is white
strip.show(); //Refresh the display
delay(100); //Give a delay to save the stability of the display
}
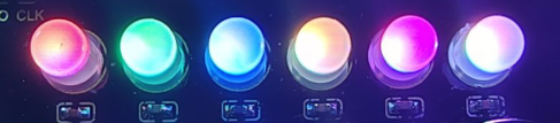
5. Testergebnis
Nach dem Hochladen des Codes und Einschalten leuchten die LEDs in verschiedenen Farben.
Von links nach rechts:
Die erste RGB-LED ist rot
Die zweite RGB-LED ist grün
Die dritte RGB-LED ist blau
Die vierte RGB-LED ist gelb
Die fünfte RGB-LED ist lila
Die sechste RGB-LED ist weiß
6. Erweiterter Code
/*
  keyestudio ESP32 Inventor Learning Kit
  Project 5.2  Rainbow Ambient Light
  http://www.keyestudio.com
*/
//Add 2812RGB library file
#include <NeoPixel_ESP32.h>
#define PIN 15
Adafruit_NeoPixel strip = Adafruit_NeoPixel(6, PIN, NEO_GRB + NEO_KHZ800);

void setup()
{
  strip.begin();
  strip.show(); // Initialize all pixels to 'off'
}

void loop()
{
  // Some example procedures showing how to display to the pixels:
  colorWipe(strip.Color(255, 0, 0), 50); // Red
  colorWipe(strip.Color(0, 255, 0), 50); // Green
  colorWipe(strip.Color(0, 0, 255), 50); // Blue
  // Send a theater pixel chase in...
  theaterChase(strip.Color(127, 127, 127), 50); // White
  theaterChase(strip.Color(127,   0,   0), 50); // Red
  theaterChase(strip.Color(  0,   0, 127), 50); // Blue

  rainbow(20);
  rainbowCycle(20);
  theaterChaseRainbow(50);
}

// Fill the dots one after the other with a color
void colorWipe(uint32_t c, uint8_t wait)
{
  for(uint16_t i=0; i<strip.numPixels(); i++)
  {
      strip.setPixelColor(i, c);
      strip.show();
      delay(wait);
  }
}

void rainbow(uint8_t wait)
{
  uint16_t i, j;

  for(j=0; j<256; j++)
  {
    for(i=0; i<strip.numPixels(); i++)
    {
      strip.setPixelColor(i, Wheel((i+j) & 255));
    }
    strip.show();
    delay(wait);
  }
}

// Slightly different, this makes the rainbow equally distributed throughout
void rainbowCycle(uint8_t wait)
{
  uint16_t i, j;
  for(j=0; j<256*5; j++) // 5 cycles of all colors on wheel
  {
    for(i=0; i< strip.numPixels(); i++)
    {
      strip.setPixelColor(i, Wheel(((i * 256 / strip.numPixels()) + j) & 255));
    }
    strip.show();
    delay(wait);
  }
}

//Theatre-style crawling lights.
void theaterChase(uint32_t c, uint8_t wait)
{
  for (int j=0; j<10; j++) //do 10 cycles of chasing
  {
    for (int q=0; q < 3; q++)
    {
      for (int i=0; i < strip.numPixels(); i=i+3)
      {
        strip.setPixelColor(i+q, c);    //turn every third pixel on
      }
      strip.show();
      delay(wait);
      for (int i=0; i < strip.numPixels(); i=i+3)
      {
        strip.setPixelColor(i+q, 0);        //turn every third pixel off
      }
    }
  }
}

//Theatre-style crawling lights with rainbow effect
void theaterChaseRainbow(uint8_t wait)
{
  for (int j=0; j < 256; j++) // cycle all 256 colors in the wheel
  {
    for (int q=0; q < 3; q++)
    {
        for (int i=0; i < strip.numPixels(); i=i+3)
        {
          strip.setPixelColor(i+q, Wheel( (i+j) % 255));    //turn every third pixel on
        }
        strip.show();
        delay(wait);
        for (int i=0; i < strip.numPixels(); i=i+3)
        {
          strip.setPixelColor(i+q, 0);        //turn every third pixel off
        }
    }
  }
}

// Input a value 0 to 255 to get a color value.
// The colours are a transition r - g - b - back to r.
uint32_t Wheel(byte WheelPos)
{
  if(WheelPos < 85)
  {
  	return strip.Color(WheelPos * 3, 255 - WheelPos * 3, 0);
  }
  else if(WheelPos < 170)
  {
      WheelPos -= 85;
      return strip.Color(255 - WheelPos * 3, 0, WheelPos * 3);
  }
  else
  {
      WheelPos -= 170;
      return strip.Color(0, WheelPos * 3, 255 - WheelPos * 3);
  }
}
7. Testergebnis
Nach dem Hochladen des Codes und Einschalten leuchten die LEDs in verschiedenen Farben und erzeugen eine Lichtshow.