Projekt 3 SOS-Notrufgerät
1. Beschreibung
Das Arduino SOS-Gerät kann Notsignale aussenden, die dem Prinzip des Morse-Codes entsprechen. Es ist praktisch für Notfälle.
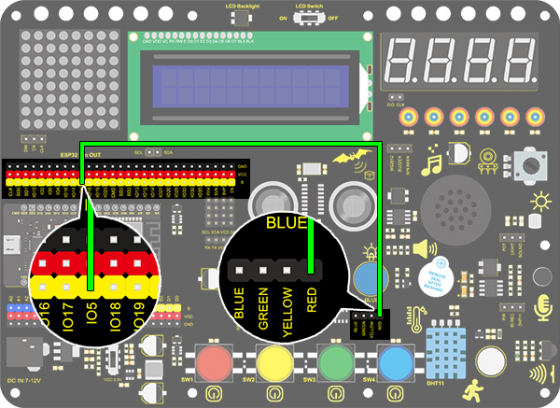
2. Schaltplan
3. Testcode
/*
  keyestudio ESP32 Inventor Learning Kit
  Project 3:SOS Distress Device
  http://www.keyestudio.com
*/
int ledPin = 5;  //Define pin as IO5

void setup()
{
	pinMode(ledPin, OUTPUT);
}

void loop()
{
    //Three quickly blinks mean “S”
    for(int x=0;x<3;x++)
    {
        digitalWrite(ledPin,HIGH);            //Set LED to light up
        delay(150);                           //Delay 150ms
        digitalWrite(ledPin,LOW);             //Set LED to turn off
        delay(100);                           //Delay 100ms
	}
    delay(200);//delay 200ms to generate the space between letters

    //Three slowly blinks mean “O”
    for(int x=0;x<3;x++)
    {
        digitalWrite(ledPin,HIGH);            //Set LED to light up
        delay(400);                           //Delay 400ms
        digitalWrite(ledPin,LOW);             //Set LED to turn off
        delay(200);                           //Delay 200ms
    }
	delay(100);//Delay 100ms to generate the space between letters

    // Three quickly blinks mean “S”
    for(int x=0;x<3;x++)
    {
        digitalWrite(ledPin,HIGH);            //Set LED to light up
        delay(150);                           //Delay 150ms
        digitalWrite(ledPin,LOW);             //Set LED to turn off
        delay(100);                           //Delay 100ms
    }
	delay(5000);// Wait 5s before repeating S.0.S
}
4. Testergebnis
Nachdem der Code erfolgreich hochgeladen wurde, sieht man, dass die LED 3-mal schnell blinkt, dann 3-mal langsam blinkt und anschließend wieder 3-mal schnell blinkt, wobei sich schnelle und langsame Blinks abwechseln.