Project 5 Rainbow Ambient Light
1. Beschrijving
Arduino 2812RGB LED is een programmeerbare kleurrijke dromerige lichtbron, waarvan kleur, helderheid en ritme verstelbaar zijn. Dit regenboog sfeerverlichting kan naar wens worden gebruikt als dynamische decoratie. Of je kunt het laten “dansen met muziek”. Belangrijk is dat het kan worden verbeterd als alarm. De ingebouwde sensor detecteert de omgeving om gebruikers te waarschuwen door kleur, helderheid en ritme te veranderen.
2. Werking
Het dataprotocol gebruikt een communicatiemodus van single-line return-to-zero code. Nadat de pixel is gereset bij inschakeling, ontvangt de DIN-terminal data van de controller. De eerst binnenkomende 24bit data wordt door de eerste pixel uitgelezen en naar het interne dataregister gestuurd.
De resterende data wordt versterkt door een versterkingscircuit en via de DOUT-poort doorgestuurd naar de volgende gekoppelde pixel. Bij doorgifte via pixels neemt het signaal telkens met 24bit af.
Daarnaast gebruikt de pixel automatische vormgeving en doorstuurtechnologie, waardoor het aantal gekoppelde pixels alleen wordt beperkt door de signaaltransmissiesnelheid.
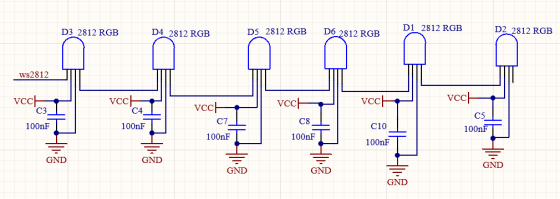
3. Aansluitschema
4. Testcode
/*
  keyestudio ESP32 Inventor Learning Kit
  Project 5.1  Rainbow Ambient Light
  http://www.keyestudio.com
*/
//Add 2812RGB library file
#include <NeoPixel_ESP32.h>
#define PIN 15

Adafruit_NeoPixel strip = Adafruit_NeoPixel(6, PIN);  //Defines the instance strip and assigns the RGB LED number pins to the library code

void setup()
{
  strip.begin();        //Activate RGB LED
  strip.show(); // Refresh the display
}

void loop()
{
  strip.setPixelColor(0, strip.Color(255, 0, 0));       //The frist RGB LED is red
  strip.setPixelColor(1, strip.Color(0, 255, 0));       //The second RGB LED is green
  strip.setPixelColor(2, strip.Color(0, 0, 255));       //The third RGB LED is blue
  strip.setPixelColor(3, strip.Color(255, 255, 0));     //The fourth RGB LED is yellow
  strip.setPixelColor(4, strip.Color(255, 0, 255));     //The fifth RGB LED is purple
  strip.setPixelColor(5, strip.Color(255, 255, 255));   //The sixth RGB LED is white
  strip.show();       //Refresh the display
  delay(100);         //Give a delay to save the stability of the display
}
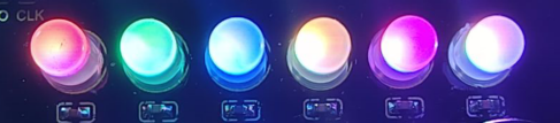
5. Testresultaat
Na het uploaden van de code en inschakelen, zal de LED oplichten in verschillende kleuren.
Van links naar rechts:
De eerste RGB LED is rood
De tweede RGB LED is groen
De derde RGB LED is blauw
De vierde RGB LED is geel
De vijfde RGB LED is paars
De zesde RGB LED is wit
6. Uitgebreide code
/*
  keyestudio ESP32 Inventor Learning Kit
  Project 5.2  Rainbow Ambient Light
  http://www.keyestudio.com
*/
//Add 2812RGB library file
#include <NeoPixel_ESP32.h>
#define PIN 15
Adafruit_NeoPixel strip = Adafruit_NeoPixel(6, PIN, NEO_GRB + NEO_KHZ800);

void setup()
{
  strip.begin();
  strip.show(); // Initialize all pixels to 'off'
}

void loop()
{
  // Some example procedures showing how to display to the pixels:
  colorWipe(strip.Color(255, 0, 0), 50); // Red
  colorWipe(strip.Color(0, 255, 0), 50); // Green
  colorWipe(strip.Color(0, 0, 255), 50); // Blue
  // Send a theater pixel chase in...
  theaterChase(strip.Color(127, 127, 127), 50); // White
  theaterChase(strip.Color(127,   0,   0), 50); // Red
  theaterChase(strip.Color(  0,   0, 127), 50); // Blue

  rainbow(20);
  rainbowCycle(20);
  theaterChaseRainbow(50);
}

// Fill the dots one after the other with a color
void colorWipe(uint32_t c, uint8_t wait)
{
  for(uint16_t i=0; i<strip.numPixels(); i++)
  {
      strip.setPixelColor(i, c);
      strip.show();
      delay(wait);
  }
}

void rainbow(uint8_t wait)
{
  uint16_t i, j;

  for(j=0; j<256; j++)
  {
    for(i=0; i<strip.numPixels(); i++)
    {
      strip.setPixelColor(i, Wheel((i+j) & 255));
    }
    strip.show();
    delay(wait);
  }
}

// Slightly different, this makes the rainbow equally distributed throughout
void rainbowCycle(uint8_t wait)
{
  uint16_t i, j;
  for(j=0; j<256*5; j++) // 5 cycles of all colors on wheel
  {
    for(i=0; i< strip.numPixels(); i++)
    {
      strip.setPixelColor(i, Wheel(((i * 256 / strip.numPixels()) + j) & 255));
    }
    strip.show();
    delay(wait);
  }
}

//Theatre-style crawling lights.
void theaterChase(uint32_t c, uint8_t wait)
{
  for (int j=0; j<10; j++) //do 10 cycles of chasing
  {
    for (int q=0; q < 3; q++)
    {
      for (int i=0; i < strip.numPixels(); i=i+3)
      {
        strip.setPixelColor(i+q, c);    //turn every third pixel on
      }
      strip.show();
      delay(wait);
      for (int i=0; i < strip.numPixels(); i=i+3)
      {
        strip.setPixelColor(i+q, 0);        //turn every third pixel off
      }
    }
  }
}

//Theatre-style crawling lights with rainbow effect
void theaterChaseRainbow(uint8_t wait)
{
  for (int j=0; j < 256; j++) // cycle all 256 colors in the wheel
  {
    for (int q=0; q < 3; q++)
    {
        for (int i=0; i < strip.numPixels(); i=i+3)
        {
          strip.setPixelColor(i+q, Wheel( (i+j) % 255));    //turn every third pixel on
        }
        strip.show();
        delay(wait);
        for (int i=0; i < strip.numPixels(); i=i+3)
        {
          strip.setPixelColor(i+q, 0);        //turn every third pixel off
        }
    }
  }
}

// Input a value 0 to 255 to get a color value.
// The colours are a transition r - g - b - back to r.
uint32_t Wheel(byte WheelPos)
{
  if(WheelPos < 85)
  {
  	return strip.Color(WheelPos * 3, 255 - WheelPos * 3, 0);
  }
  else if(WheelPos < 170)
  {
      WheelPos -= 85;
      return strip.Color(255 - WheelPos * 3, 0, WheelPos * 3);
  }
  else
  {
      WheelPos -= 170;
      return strip.Color(0, WheelPos * 3, 255 - WheelPos * 3);
  }
}
7. Testresultaat
Na het uploaden van de code en inschakelen, zal de LED oplichten in verschillende kleuren en een lichtshow geven.