Project 19 Fire Alarm
1.Introduction
In this lesson, we will make a commonly seen alarm, fire alarm. Fire alarm is very useful and critical in our life. It has helped save many lives. Similarly to many alarms we’ve made, it includes a sensor and a buzzer. Be careful with the flame when you are doing the test!
2.Components Needed
EASY plug Control Board V2.0 *1
EASY plug Cable *2
USB Cable *1
Lighter *1 (not included)
EASY plug Active Buzzer Module
EASY plug Flame Sensor *1
Let’s take a look at this EASY plug flame sensor first.
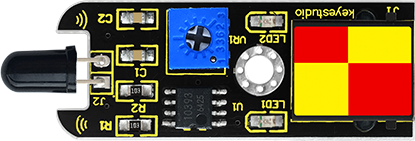
This flame sensor can be used to detect fire or other lights whose wavelength stands at 760 nm ~ 1100 nm. In the fire-fighting robot game, the flame plays an important role in the probe, which can be used as the robot’s eyes to find fire source. Below are its specifications:
Supply Voltage: 3.3V to 5V
Detection range: 500px (4.8V) ~ 2500px (1V)
Rang of Spectral Bandwidth: 760nm to 1100nm
Operating temperature: -25℃to 85℃
Interface: digital
Size: 49*16.7mm
Weight: 5g
3.Connection Diagram
Now, connect the buzzer module to the D6 port of the controller board, and flame sensor to D9 port using the EASY plug cables.

4.Test Code
Connect the board to your PC using the USB cable; copy below code into Arduino IDE, and click upload to upload it to your board.
const int flamePin = 9;   // the number of the flame pin
const int buzzPin = 6;    // the number of the buzzer pin
// variables will change:
int State = 0;  // variable for reading status

void setup()
{
  // initialize the buzzer pin as an output:
  pinMode(buzzPin, OUTPUT);
  // initialize the flame pin as an input:
  pinMode(flamePin, INPUT);
}

void loop()
{
  // read the state of the value:
  State = digitalRead(flamePin);
  if(State == HIGH)
  {
      // turn buzzer off:
      digitalWrite(buzzPin, LOW);
  }
  else
  {
      // turn buzzer on:
      digitalWrite(buzzPin, HIGH);
  }
}
5.Test Results
Turn on the lighter, put the flame near the flame sensor, the buzzer will ring.