5.10 自動灌漑システム
5.10.1 揚水システム
この実験では、ESP32開発ボードを使用してリレーモジュールでウォーターポンプのオン/オフを切り替えます。ポンプは水を汲み上げ、液体を輸送し、通常はリレーモジュールと組み合わせて使用されます。
リレーモジュール:
使用時には、モーター、高電流センサー、高出力ライトなど、高電圧および負荷電流の管理によく使用されます。
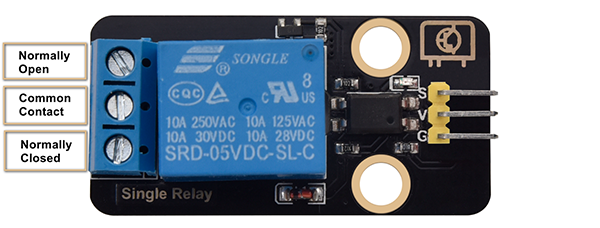
ノーマリーオープン (NO): このピンは通常開いています。リレーの信号ピンが信号を受信しない限り開いています。したがって、共通ピンはNCピンを介して切断され、NOピンを介して接続されます。
コモンコンタクト (COM): このピンは、ウォーターポンプなど、他のモジュールに接続します。
ノーマリークローズ (NC): NCピンはCOMピンとリンクして閉回路を形成します。ESP32ボードを使用してリレーモジュールの閉鎖と切断を制御します。

ウォーターポンプ:
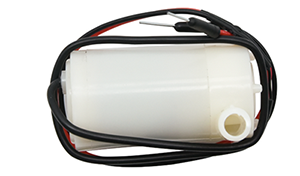
パラメータ:
電源電圧: 5V
静止電流: 2mA
最大接触電圧: 250VAC/30VDC
最大電流: 10A
Arduino IDEで5.10.1Water-Pumpコードを開きます。
#define RelayPin 25
char content;  //Define a character string as the received value from serial port

void setup() {
  Serial.begin(9600);
  pinMode(RelayPin,OUTPUT);
}

void loop() {
  //Serial.read() receives one byte once. For example, when input "aaa", it receives one "a" at a time for three times in total.
  if(Serial.available() > 0) {
    if (Serial.read() == 'a') //When the input value equals to "a", irrigation begins.
    {
      digitalWrite(RelayPin,HIGH);
      delay(400);//irrigation delay
      digitalWrite(RelayPin,LOW);
      delay(700);
    }
  }
}
ESP32 Dev ModuleボードとCOMポートを選択し、コードをアップロードします。

テスト結果:
シリアルモニターを開き、「a」を入力すると、水が1回ポンプされます。
注意:実験中にプラスチックプールから水があふれないようにしてください。他のセンサーに水をこぼすと、短絡やモジュールの故障だけでなく、発熱や爆発の原因にもなります。細心の注意を払ってください!特に若いユーザーは、保護者と一緒に操作してください。
5.10.2 自動灌漑システム
この実験では、ESP32開発ボードに2つのセンサーを接続し、その出力値を読み取ってリレーとウォーターポンプを制御するプログラムを作成します。
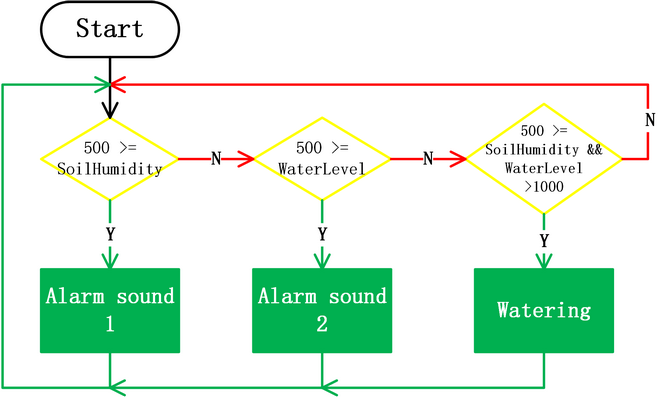
土壌が非常に乾燥している場合、リレーがオンになり、ウォーターポンプを制御して植物に水をやります。水位が低すぎる場合、ウォーターポンプは作動せず、ブザーが警報を発します。
Arduino IDEで5.10.2Auto-irrigationコードを開きます。
#include <LiquidCrystal_I2C.h>

#define BuzzerPin 16
#define SoilHumidityPin 32
#define WaterLevelPin 33
#define RelayPin 25
#define ButtonPin 5  //Define a button pin
int value = 0;       //Set an initial button value

LiquidCrystal_I2C lcd(0x27, 16, 2);

void setup() {
  //Set the pins mode
  pinMode(SoilHumidityPin, INPUT);
  pinMode(WaterLevelPin, INPUT);
  pinMode(RelayPin, OUTPUT);
  pinMode(ButtonPin, INPUT);

  //Initialize LCD
  lcd.init();
  //Turn on LCD backlight
  lcd.backlight();
  //Clear LCD displays
  lcd.clear();

  ledcAttachChannel(BuzzerPin, 1000, 8, 4);
}

void loop() {
  //define variables as the read values of water level, humidity and button state
  int shvalue = analogRead(SoilHumidityPin);
  int wlvalue = analogRead(WaterLevelPin);
  int ReadValue = digitalRead(ButtonPin);

  //Set the display position of cursor
  lcd.setCursor(0, 0);
  //Set the display position of character strings
  lcd.print("SoilHum:");
  lcd.setCursor(9, 0);
  lcd.print(shvalue);
  lcd.setCursor(0, 1);
  lcd.print("WaterLevel:");
  lcd.setCursor(11, 1);
  lcd.print(wlvalue);

  //Determine whether the button is pressed
  if (ReadValue == 0) {
    //Eliminate the button shake
    delay(10);
    if (ReadValue == 0) {
      value = !value;
      Serial.print("The current status of the button is : ");
      Serial.println(value);
    }
    //Again, determine whether the button is still pressed
    //Pressed: execute the loop; Released: exit the loop to next execution
    while (digitalRead(ButtonPin) == 0)
      ;
  }
  //When the detected humidity is lower than the set threshold, the buzzer starts to alarm. Press button to stop alarming.
  if (500 >= shvalue && value == 0) {
    ledcWriteTone(BuzzerPin, 532);
    delay(100);
    ledcWriteTone(BuzzerPin, 532);
    delay(100);
    ledcWriteTone(BuzzerPin, 659);
    delay(100);
    ledcWriteTone(BuzzerPin, 0);  //Stop alarming
  }
  //When the detected water level is lower than the set threshold, the buzzer starts to alarm. Press button to stop alarming.
  if (500 >= wlvalue && value == 0) {
    ledcWriteTone(BuzzerPin, 411);
    delay(100);
    ledcWriteTone(BuzzerPin, 639);
    delay(100);
    ledcWriteTone(BuzzerPin, 411);
    delay(100);
    ledcWriteTone(BuzzerPin, 0);  //Stop alarming
  }
  //When the detected humidity is lower than the set threshold, and the water is sufficient in the pool, irrigation starts automatically.
  if (500 >= shvalue && wlvalue >= 1000) {
    digitalWrite(RelayPin, HIGH);
    delay(400);  //Irrigation delay.
    digitalWrite(RelayPin, LOW);
    delay(700);
  }
  delay(500);
  //Clear displays
  lcd.clear();
}
ESP32 Dev ModuleボードとCOMポートを選択し、コードをアップロードします。
テスト結果:
LCD 1602には、土壌湿度と水位の現在の値が表示されます。
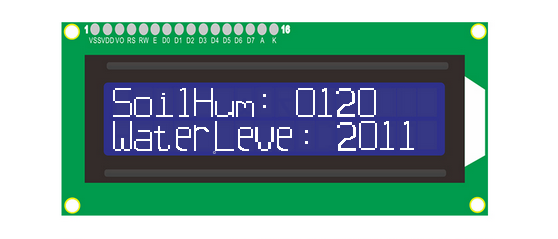
検出された土壌湿度の値が500より低い場合、土壌が乾燥していることを知らせるためにブザーが鳴ります。水位の値が1000より大きい場合、自動的に灌漑が開始されます。
検出された水位が500より低い場合、揚水システムは作動せず、水が不足していることを知らせるためにブザーが鳴ります。ボタンを押すと警報が停止します。