5.7 温度制御システム
5.7.1 DHT11 温湿度センサー
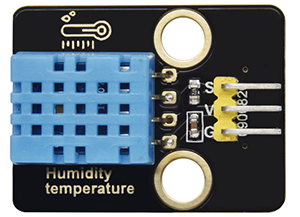
DHT11 温湿度センサーはデジタル信号を出力します。アナログ信号の取得と変換、および温湿度センシング技術の原理を応用しているため、長期的な安定性と高い信頼性を特徴としています。さらに、このセンサーは高精度抵抗式湿度センサーと抵抗式感熱温度センサーを統合しており、8ビット高性能MCUに接続されています。
5.7.4Temperature-Control-System コードを Arduino IDE で開きます。
#include <dht11.h>
#define DHT11PIN 17

dht11 DHT11;

void setup()
{
  Serial.begin(9600);
  Serial.println("DHT11 TEST PROGRAM ");
  Serial.print("LIBRARY VERSION: ");
  Serial.println(DHT11LIB_VERSION);
  Serial.println();
}

void loop()
{
  Serial.println("\n");

  int chk = DHT11.read(DHT11PIN);

  Serial.print("Read sensor: ");
  switch (chk)
  {
    case DHTLIB_OK:
                Serial.println("OK");
                break;
    case DHTLIB_ERROR_CHECKSUM:
                Serial.println("Checksum error");
                break;
    case DHTLIB_ERROR_TIMEOUT:
                Serial.println("Time out error");
                break;
    default:
                Serial.println("Unknown error");
                break;
  }

  Serial.print("Humidity (%): ");
  Serial.println((float)DHT11.humidity, 2);

  Serial.print("Temperature (oC): ");
  Serial.println((float)DHT11.temperature, 2);

  Serial.print("Temperature (oF): ");
  Serial.println(Fahrenheit(DHT11.temperature), 2);

  Serial.print("Temperature (K): ");
  Serial.println(Kelvin(DHT11.temperature), 2);

  Serial.print("Dew Point (oC): ");
  Serial.println(dewPoint(DHT11.temperature, DHT11.humidity));

  Serial.print("Dew PointFast (oC): ");
  Serial.println(dewPointFast(DHT11.temperature, DHT11.humidity));

  delay(2000);
}

double Fahrenheit(double celsius)
{
        return 1.8 * celsius + 32;
}    //摂氏度を華氏度に変換

double Kelvin(double celsius)
{
        return celsius + 273.15;
}     //摂氏度をケルビンに変換

//露点。この温度で空気は飽和し、露が生成されます。
//参照: http://wahiduddin.net/calc/density_algorithms.htm
double dewPoint(double celsius, double humidity)
{
        double A0= 373.15/(273.15 + celsius);
        double SUM = -7.90298 * (A0-1);
        SUM += 5.02808 * log10(A0);
        SUM += -1.3816e-7 * (pow(10, (11.344*(1-1/A0)))-1) ;
        SUM += 8.1328e-3 * (pow(10,(-3.49149*(A0-1)))-1) ;
        SUM += log10(1013.246);
        double VP = pow(10, SUM-3) * humidity;
        double T = log(VP/0.61078);   // temp var
        return (241.88 * T) / (17.558-T);
}

// 露点を高速計算。dewPoint() の5倍の速さです。
// 参照: http://en.wikipedia.org/wiki/Dew_point
double dewPointFast(double celsius, double humidity)
{
        double a = 17.271;
        double b = 237.7;
        double temp = (a * celsius) / (b + celsius) + log(humidity/100);
        double Td = (b * temp) / (a - temp);
        return Td;
}
ESP32 Dev Module ボードと COM ポートを選択し、コードをアップロードします。

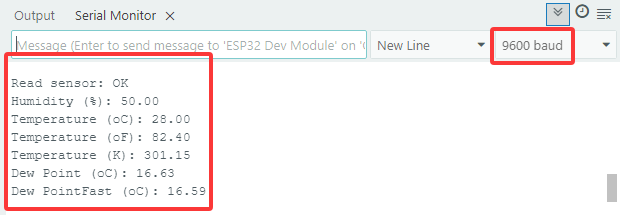
テスト結果:
シリアルモニターを開き、ボーレートを9600に設定すると、シリアルモニターに現在の温度と湿度の値が表示されます。
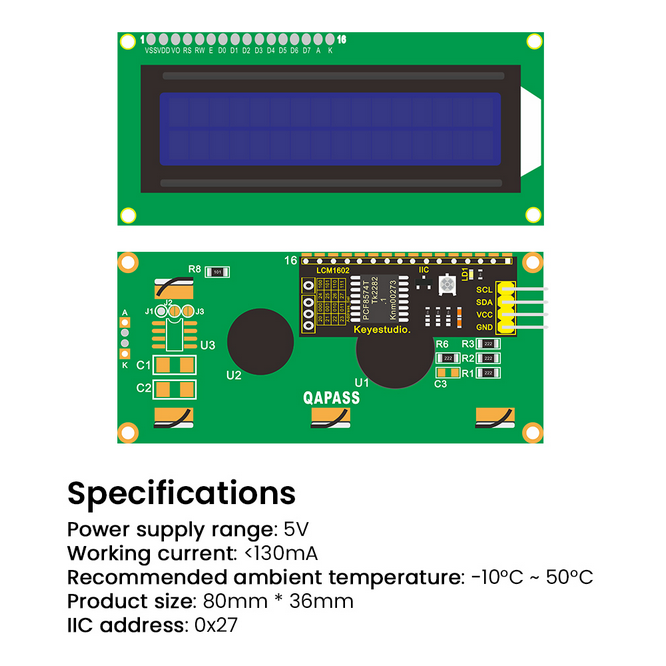
5.7.2 LCD 1602 モジュール
LCD 1602 は、標準の14ピン(バックライトなし)または16ピン(バックライトあり)インターフェースを備えており、MCUのピンを節約します。そのディスプレイは、I2C制御を実現するためにICを駆動します。
5.7.2LCD1602 コードを Arduino IDE で開きます。
#include <LiquidCrystal_I2C.h>

//LCD 1602 を初期化、0x27 は I2C アドレス
LiquidCrystal_I2C lcd(0x27,16,2);

void setup() {
  //LCD を初期化
  lcd.init();
  // (オプションの) バックライトをオフ/オンにする
  lcd.backlight();
  //lcd.noBacklight();

  //カーソルの位置を設定
  lcd.setCursor(0, 0);
  //LCD に表示
  lcd.print("HELLO WORLD 0");
  lcd.setCursor(0, 1);
  lcd.print("HELLO WORLD 1");

//Clear displays
  // lcd.clear();
}

void loop() {

  // Turn the display on/off (quickly)
  //lcd.noDisplay();
  //lcd.display();

  // Turns the underline cursor on/off
  //lcd.noCursor();
  //lcd.cursor();

  // Turn on and off the blinking cursor
  // lcd.noBlink();
  // lcd.blink();

  // These commands scroll the display without changing the RAM
  //lcd.scrollDisplayLeft();
  //lcd.scrollDisplayRight();

  // This is for text that flows Left to Right
  //lcd.leftToRight();
  //lcd.rightToLeft();

  // This will 'right justify' text from the cursor
  //lcd.autoscroll();
  //lcd.noAutoscroll();

}
ESP32 Dev ModuleボードとCOMポートを選択し、コードをアップロードします。
テスト結果:
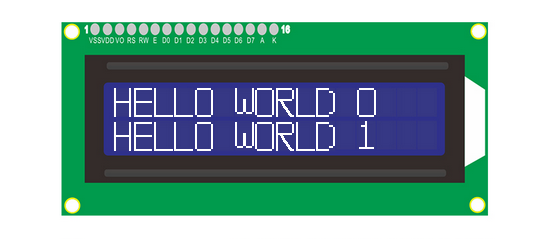
LCD1602のバックライトが点灯し、「HELLO WORLD 0」と「HELLO WORLD 1」が表示されます。
5.7.3 モーターとファン
130モーターはPWMで速度を調整できます。このプロセスでは、制御のために2つのピンを接続する必要があります。

Arduino IDEで5.7.3Motorコードを開きます。
#define MotorPin1 19  //(IN+)
#define MotorPin2 18  //(IN-)

void setup() {
  pinMode(MotorPin1, OUTPUT);
  pinMode(MotorPin2, OUTPUT);
}

void loop() {
  //corotation
  analogWrite(MotorPin1, 255); //アナログ値の出力範囲0-255を変更してモーター速度を調整します
  analogWrite(MotorPin2, 0);
  delay(2000);
  //Stop Transition
  delay(200);
  analogWrite(MotorPin1, 0);
  analogWrite(MotorPin2, 0);
  delay(200);
  //reversal
  analogWrite(MotorPin1, 0);
  analogWrite(MotorPin2, 255);
  delay(2000);
  //Stop
  analogWrite(MotorPin1, 0);
  analogWrite(MotorPin2, 0);
  delay(2000);
}
ESP32 Dev ModuleボードとCOMポートを選択し、コードをアップロードします。
テスト結果:
130モーターは2秒ごとに左右に交互に回転します。
注:ファンは高出力の電子デバイスであるため、必ずバッテリーを使用して電源を供給してください。
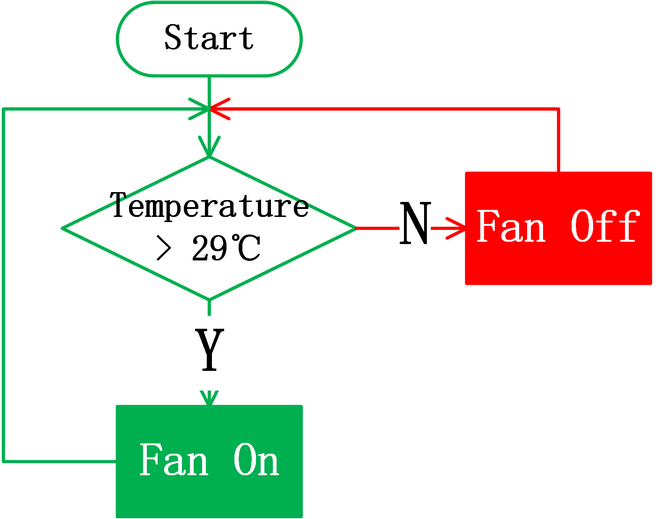
5.7.4 温度制御システム
Arduino IDEで5.7.4Temperature-Control-Systemコードを開きます。
#include <LiquidCrystal_I2C.h>
#include <dht11.h>

#define DHT11PIN 17
#define MotorPin1 19  //(IN+)
#define MotorPin2 18  //(IN-)

dht11 DHT11;

LiquidCrystal_I2C lcd(0x27, 16, 2);

void setup() {
  lcd.init();
  lcd.backlight();

  pinMode(MotorPin1, OUTPUT);
  pinMode(MotorPin2, OUTPUT);
}

void loop() {
  //Difine temperature and humidity value
  int Temperature;
  int Humidity;
  //Read the value
  int chk = DHT11.read(DHT11PIN);

  Temperature = DHT11.temperature;
  Humidity = DHT11.humidity;
  lcd.setCursor(0, 0);
  lcd.print("Temp:");
  lcd.setCursor(5, 0);
  lcd.print(Temperature);

  lcd.setCursor(0, 1);
  lcd.print("Hum:");
  lcd.setCursor(5, 1);
  lcd.print(Humidity);
  delay(500);

if (Temperature >= 29) {
    //左に回す
    analogWrite(MotorPin1, 150);  //0-255の範囲でアナログ値出力を変更してモーター速度を調整します
    analogWrite(MotorPin2, 0);
  } else {
    //停止
    delay(3000);
    analogWrite(MotorPin1, 0);
    analogWrite(MotorPin2, 0);
    delay(200);
  }
}
ESP32 Dev ModuleボードとCOMポートを選択し、コードをアップロードします。
テスト結果:
温度が29°Cに達すると、ファンがオンになり熱を放散します。29°Cを下回ると、ファンはオフになります(ファンは熱放散をシミュレートするだけなので、効果は良くありません)。これにより、農場のエネルギーを節約できます。