Project 18:Ultrasonic Sensor
Project 18.1:Ultrasonic Ranging
1. Description
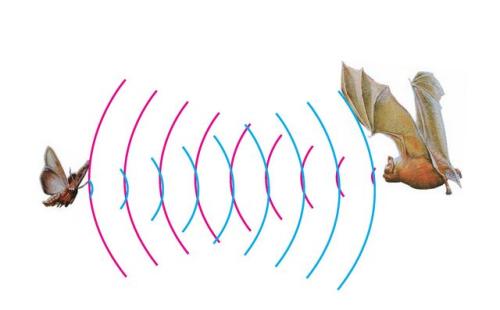
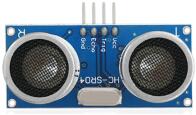
The ultrasonic sensor uses sonar to determine distance to an object like bats do. It offers excellent non-contact range detection with high accuracy and stable readings in an easy-to-use package. It comes complete with ultrasonic transmitter and receiver modules.
The ultrasonic sensor is being used in a wide range of electronics projects for creating obstacle detection and distance measuring application as well as various other applications.
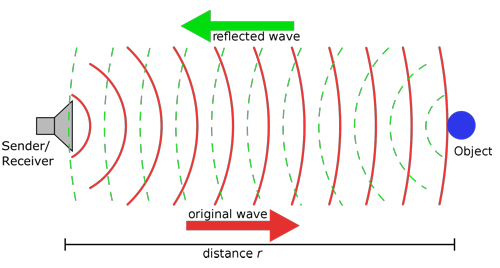
The ultrasonic module will emit the ultrasonic waves after trigger signals. When the ultrasonic waves encounter the object and are reflected back, the module outputs an echo signal, so it can determine the distance of object from the time difference between trigger signal (TRIG)and echo signal(ECHO).
As the picture shows, it is like two eyes. One is transmitting end, the other is receiving end.
According to the above wiring diagram, the integrated port of the ultrasonic sensor module is connected to the 5V G P15 P16 port on the micro:bit motor driver base plate. The Trig (T) pin is controlled by P15 of the micro:bit and the pin of Echo (E) the P16.
2. Working Principle
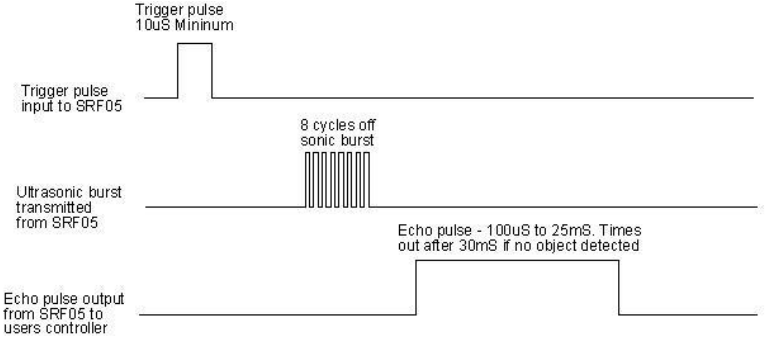
(1)Pull down TRIG then trigger high level signals with least 10us;
(2)After triggering, the module will automatically send eight 40KHz ultrasonic pulses and detect whether there is a signal return;
(3)If there is a signal return, when ECHO (E) outputs a high level, then the duration of the high level is the time from transmission to reception of the ultrasonic waves. Then test distance = high level duration *340m/s*0.5.
3. Parameters
Working voltage: 3-5.5V (DC)
Working current: 15mA
Working frequency: 40khz
Maximum detection distance: about 3m
Minimum detection distance: 2-3cm
Precision: up to 0.2cm
Sensing angle: less than 15 degrees
Input trigger pulse: 10us TTL level
Output echo signal: output TTL level signal (high), proportional t range
4. Preparation
Insert micro:bit board into the slot of keyestudio 4WD Mecanum Robot CarV2.0
Place batteries into battery holder
Dial power switch to ON end
Connect micro:bit to the computer via an USB cable
Open the offline version of Mu.
5. Test Code
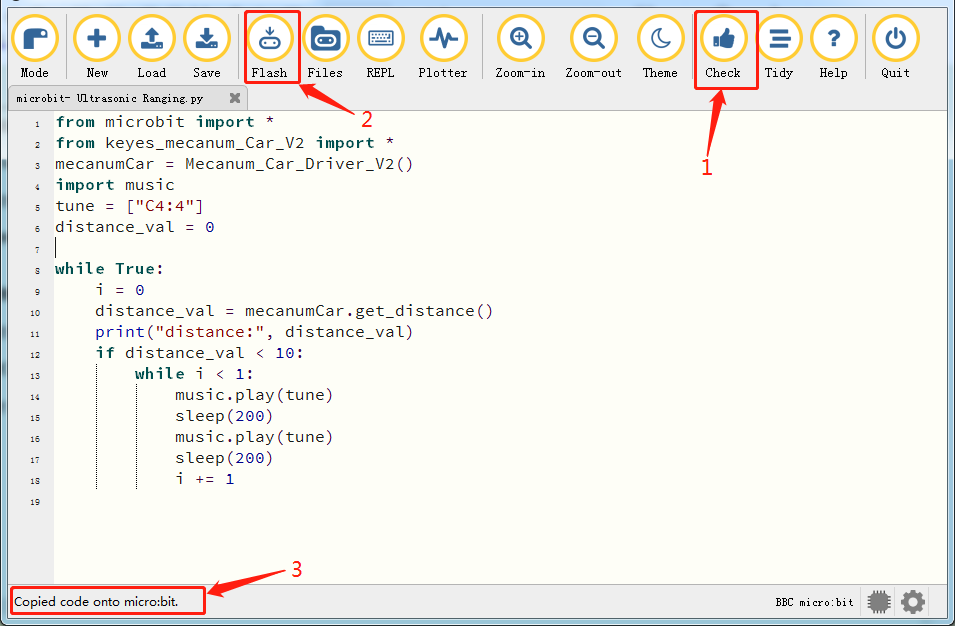
Enter Mu software and open the file“Ultrasonic Ranging.py”to import code. You can also input code in the edit window yourself.
(Note: All English words and symbols must be written in English.)
Click“Files”to import“keyes_mecanum_Car_V2.py“library file to micro:bit.
Click“Check”to examine errors in the code. The program proves wrong if underlines and cursors are shown.
If the code is correct, connect the micro:bit to your computer and click“Flash”to download the code to the micro:bit board.
from microbit import *
from keyes_mecanum_Car_V2 import *
mecanumCar = Mecanum_Car_Driver_V2()
import music
tune = ["C4:4"]
distance_val = 0

while True:
    i = 0
    distance_val = mecanumCar.get_distance()
    print("distance:", distance_val)
    if distance_val < 10:
        while i < 1:
            music.play(tune)
            sleep(200)
            music.play(tune)
            sleep(200)
            i += 1
6. Test Result
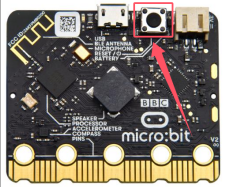
After downloading the code to the board successfully and don’t plug off the USB cable. Click“REPL”and then press the reset button.
The distance value of obstacle will be displayed, as shown below.
When the distance is less than 10cm, the passive buzzer of smart will emit sound.

7. Code Explanation

Project 18.2:Ultrasonic Avoidance

1. Description
In this project, we will integrate an ultrasonic sensor and a car to make an ultrasonic avoidance car.
Its principle is to detect the distance between the car and obstacle via the ultrasonic sensor to control the motion of smart car.
2. Preparation
Insert micro:bit board into the slot of keyestudio 4WD Mecanum Robot CarV2.0
Place batteries into battery holder
Dial power switch to ON end
Connect micro:bit to the computer via an USB cable
Open the offline version of Mu.
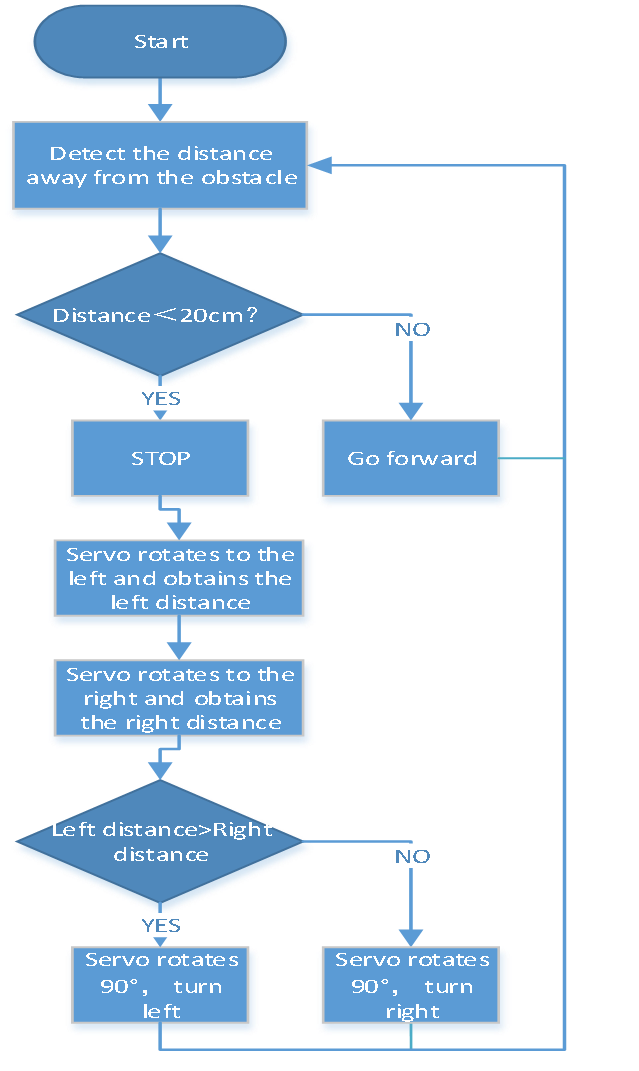
3. Flow Chart
4. Test Code
Enter Mu software and open the file“Ultrasonic Avoid Smart Car.py”to import code. You can also input code in the edit window yourself.
(Note: All English words and symbols must be written in English.)
Click“Files”to import“keyes_mecanum_Car_V2.py“library file to micro:bit .
Click“Check”to examine errors in the code. The program proves wrong if underlines and cursors are shown.
If the code is correct, connect the micro:bit to your computer and click“Flash”to download the code to the micro:bit board.
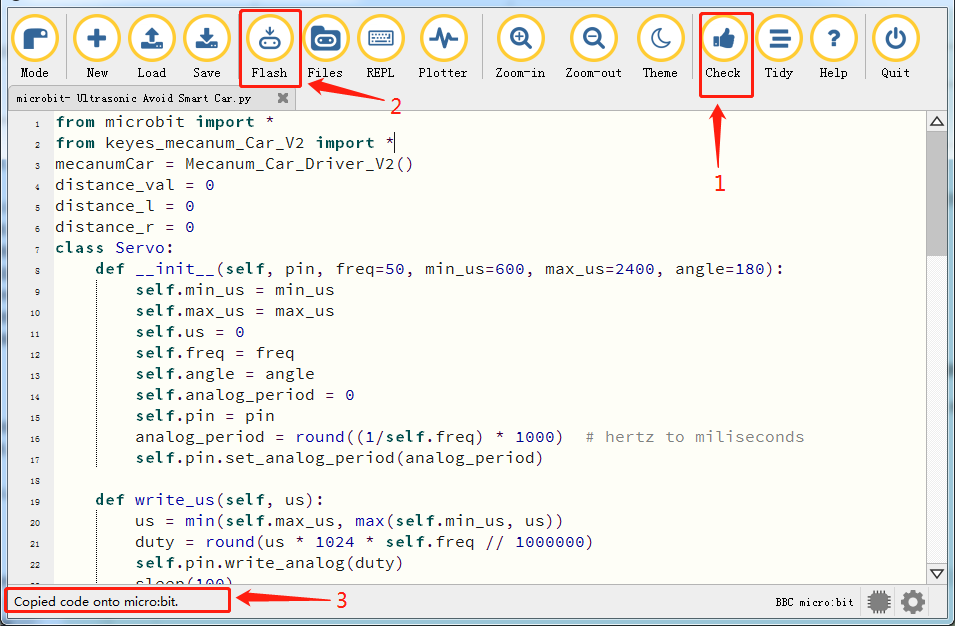
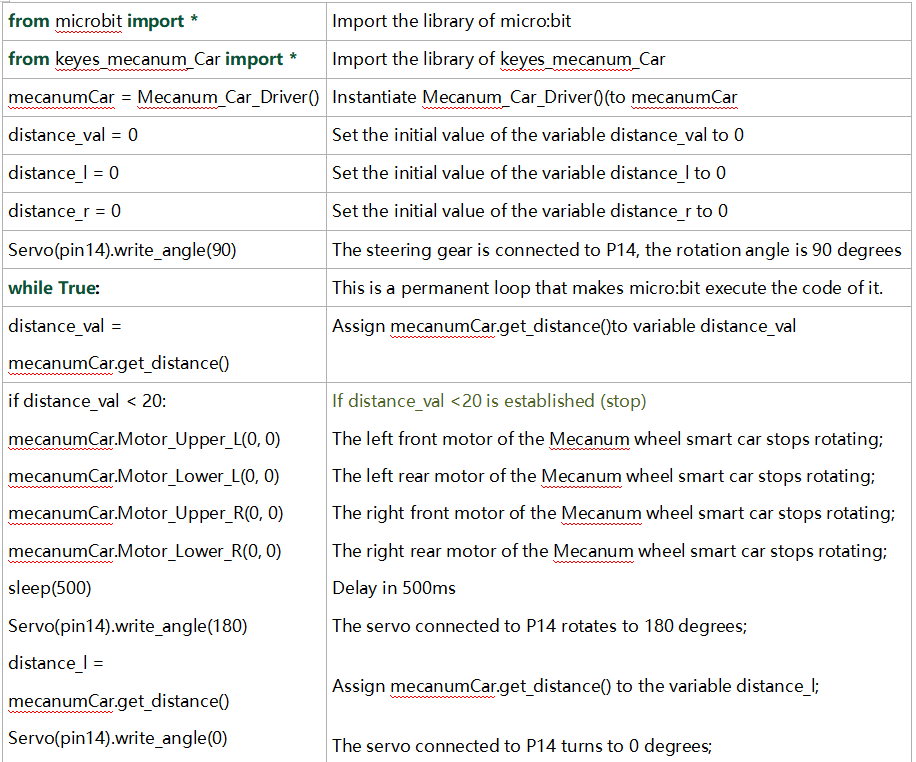
from microbit import *
from keyes_mecanum_Car_V2 import *
mecanumCar = Mecanum_Car_Driver_V2()
distance_val = 0
distance_l = 0
distance_r = 0
class Servo:
def __init__(self, pin, freq=50, min_us=600, max_us=2400, angle=180):
self.min_us = min_us
self.max_us = max_us
self.us = 0
self.freq = freq
self.angle = angle
self.analog_period = 0
self.pin = pin
analog_period = round((1/self.freq) * 1000) # hertz to miliseconds
self.pin.set_analog_period(analog_period)
def write_us(self, us):
us = min(self.max_us, max(self.min_us, us))
duty = round(us * 1024 * self.freq // 1000000)
self.pin.write_analog(duty)
sleep(100)
self.pin.write_analog(0)
def write_angle(self, degrees=None):
if degrees is None:
degrees = math.degrees(radians)
degrees = degrees % 360
total_range = self.max_us - self.min_us
us = self.min_us + total_range * degrees // self.angle
self.write_us(us)
Servo(pin14).write_angle(90)
while True:
distance_val = mecanumCar.get_distance()
if distance_val < 20:
mecanumCar.Motor_Upper_L(0, 0)
mecanumCar.Motor_Lower_L(0, 0)
mecanumCar.Motor_Upper_R(0, 0)
mecanumCar.Motor_Lower_R(0, 0)
sleep(500)
Servo(pin14).write_angle(180)
sleep(500)
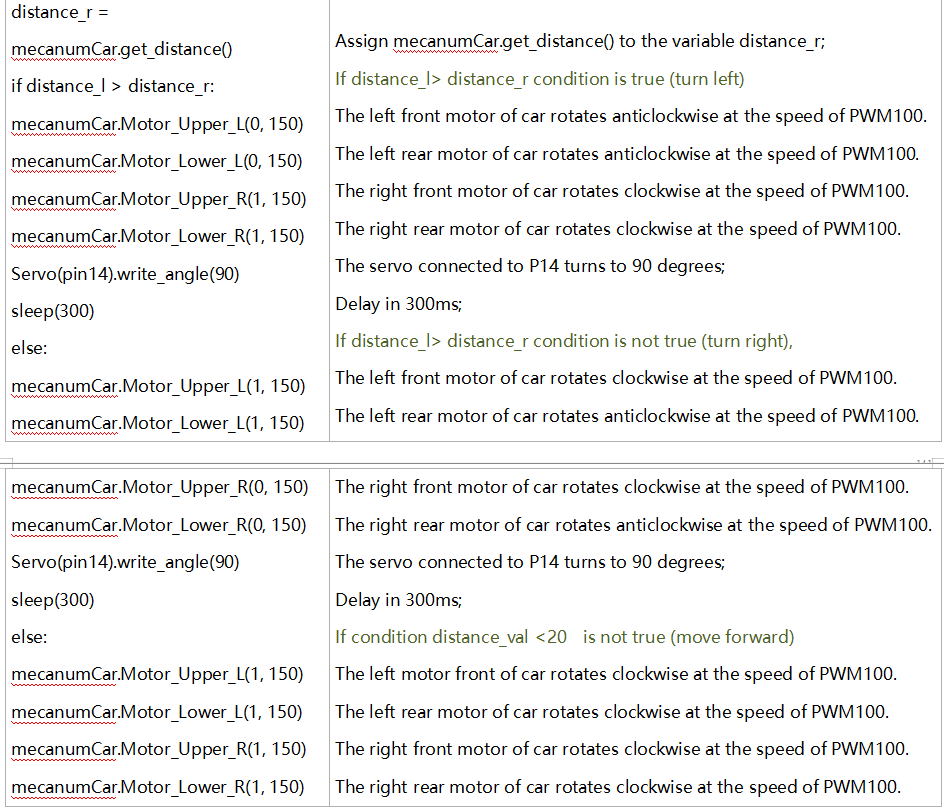
distance_l = mecanumCar.get_distance()
sleep(500)
Servo(pin14).write_angle(0)
sleep(500)
distance_r = mecanumCar.get_distance()
sleep(500)
if distance_l > distance_r:
mecanumCar.Motor_Upper_L(0, 100)
mecanumCar.Motor_Lower_L(0, 100)
mecanumCar.Motor_Upper_R(1, 100)
mecanumCar.Motor_Lower_R(1, 100)
Servo(pin14).write_angle(90)
sleep(300)
else:
mecanumCar.Motor_Upper_L(1, 100)
mecanumCar.Motor_Lower_L(1, 100)
mecanumCar.Motor_Upper_R(0, 100)
mecanumCar.Motor_Lower_R(0, 100)
Servo(pin14).write_angle(90)
sleep(300)
else:
mecanumCar.Motor_Upper_L(1, 100)
mecanumCar.Motor_Lower_L(1, 100)
mecanumCar.Motor_Upper_R(1, 100)
mecanumCar.Motor_Lower_R(1, 100)
5. Test Result
After downloading the code to the board successfully, external power supply(turn the DIP switch to ON),and press the reset button on micro:bit.
When the obstacle distance is greater than 20cm, the car goes forward ; on the contrary, the smart car turns left.
6. Code Explanation
Project 18.3:Ultrasonic Following

1. Description
In previous lesson, we’ve learned the basic principle of line tracking sensor. Next, we will combine the ultrasonic sensor with the car to make an ultrasonic following car.
The ultrasonic sensor detects the obstacle distance and control the motion status of car.
2. Preparation
Insert micro:bit board into the slot of keyestudio 4WD Mecanum Robot CarV2.0
Place batteries into battery holder
Dial power switch to ON end
Connect micro:bit to the computer via an USB cable
Open the offline version of Mu.
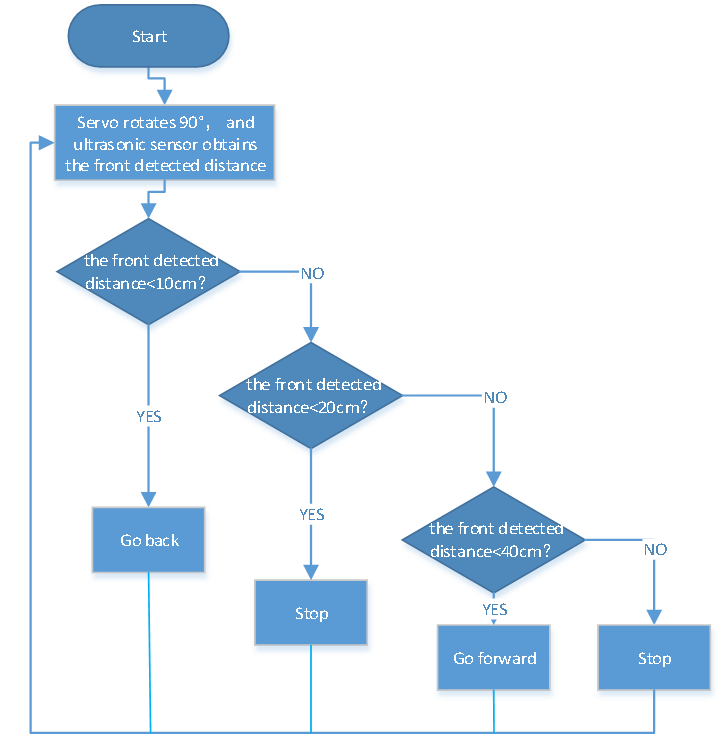
2. Flow Chart
3. Test Code
Enter Mu software and open the file“Ultrasonic Follow Smart Car.py”to import code. You can also input code in the edit window yourself.
(Note: All English words and symbols must be written in English.)
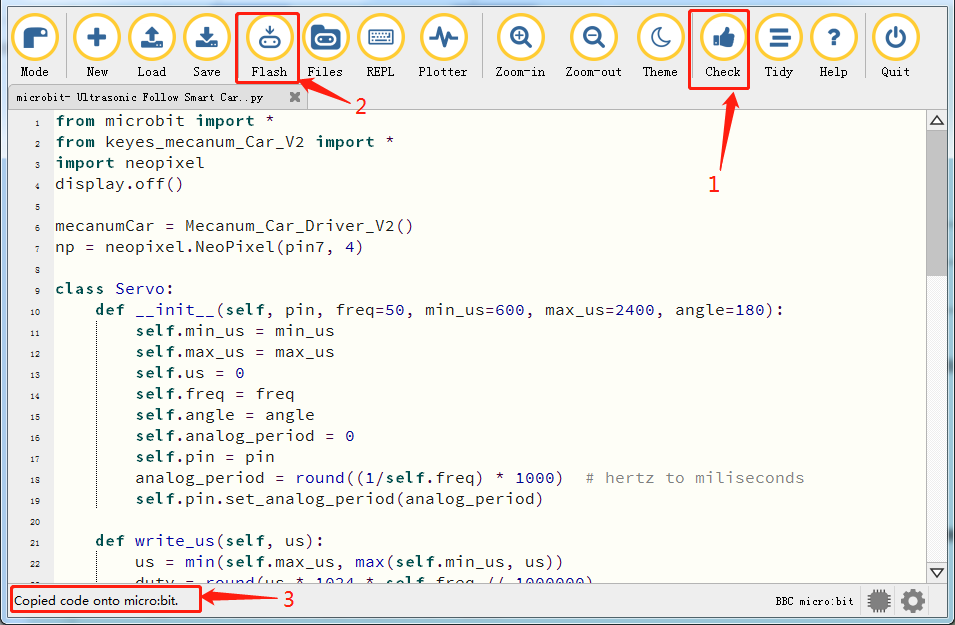
Click“Files”to import“keyes_mecanum_Car_V2.py“library file to micro:bit.
Click“Check”to examine errors in the code. The program proves wrong if underlines and cursors are shown.
If the code is correct, connect the micro:bit to your computer and click“Flash”to download the code to the micro:bit board.
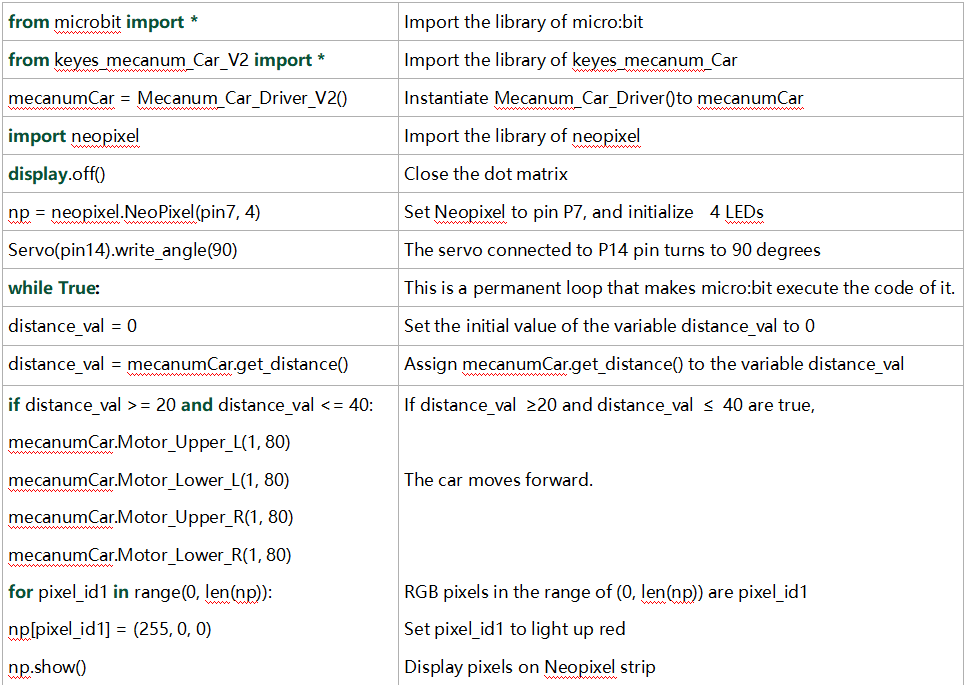
from microbit import *
from keyes_mecanum_Car_V2 import *
import neopixel
display.off()
mecanumCar = Mecanum_Car_Driver_V2()
np = neopixel.NeoPixel(pin7, 4)
class Servo:
def __init__(self, pin, freq=50, min_us=600, max_us=2400, angle=180):
self.min_us = min_us
self.max_us = max_us
self.us = 0
self.freq = freq
self.angle = angle
self.analog_period = 0
self.pin = pin
analog_period = round((1/self.freq) * 1000) # hertz to miliseconds
self.pin.set_analog_period(analog_period)
def write_us(self, us):
us = min(self.max_us, max(self.min_us, us))
duty = round(us * 1024 * self.freq // 1000000)
self.pin.write_analog(duty)
sleep(100)
self.pin.write_analog(0)
def write_angle(self, degrees=None):
if degrees is None:
degrees = math.degrees(radians)
degrees = degrees % 360
total_range = self.max_us - self.min_us
us = self.min_us + total_range * degrees // self.angle
self.write_us(us)
Servo(pin14).write_angle(90)
while True:
distance_val = 0
distance_val = mecanumCar.get_distance()
if distance_val >= 20 and distance_val <= 40:
mecanumCar.Motor_Upper_L(1, 80)
mecanumCar.Motor_Lower_L(1, 80)
mecanumCar.Motor_Upper_R(1, 80)
mecanumCar.Motor_Lower_R(1, 80)
for pixel_id1 in range(0, len(np)):
np[pixel_id1] = (255, 0, 0)
np.show()
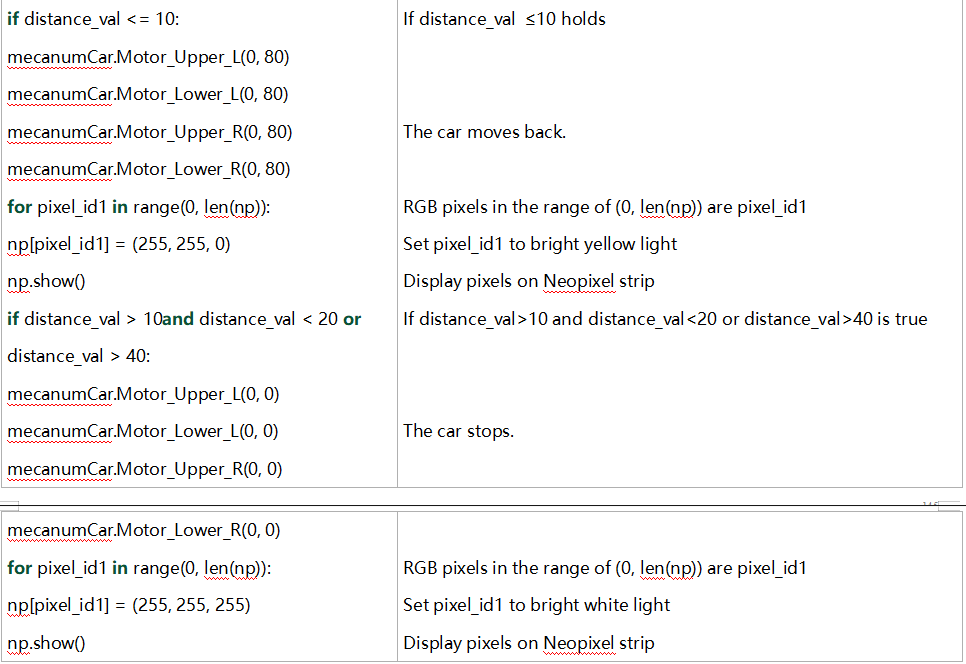
if distance_val <= 10:
mecanumCar.Motor_Upper_L(0, 80)
mecanumCar.Motor_Lower_L(0, 80)
mecanumCar.Motor_Upper_R(0, 80)
mecanumCar.Motor_Lower_R(0, 80)
for pixel_id1 in range(0, len(np)):
np[pixel_id1] = (255, 255, 0)
np.show()
if distance_val > 10 and distance_val < 20 or distance_val > 40:
mecanumCar.Motor_Upper_L(0, 0)
mecanumCar.Motor_Lower_L(0, 0)
mecanumCar.Motor_Upper_R(0, 0)
mecanumCar.Motor_Lower_R(0, 0)
for pixel_id1 in range(0, len(np)):
np[pixel_id1] = (255, 255, 255)
np.show()
4. Test Result
After downloading the code to the board successfully, external power supply(turn the DIP switch to ON), and press the reset button on micro:bit.
The smart car could follow the obstacle to move and 4 WS2812 RGB lights will display different colors.
Note: the obstacle can only move in front of smart car.
5. Code Explanation