Project 27 Intelligent Parking
1. Description
This intelligent parking system detects and optimizes parking position via an ultrasonic sensor. With this system, wrong parking is avoided to a large extent.
Firstly, you need to install the sensor around the carpark. And then it will detect the distance between the car and its edges and send the information to the development board so as to control the car to automatically adjust to the optimal parking position.
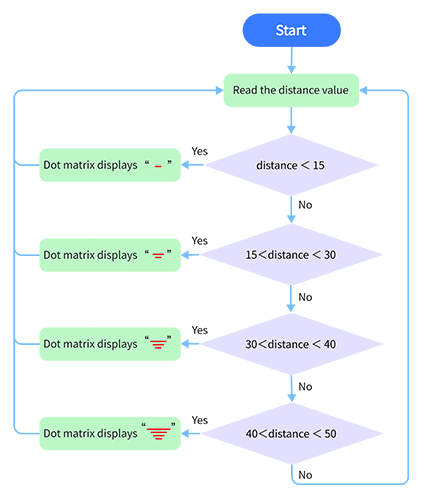
2. Flow Chart
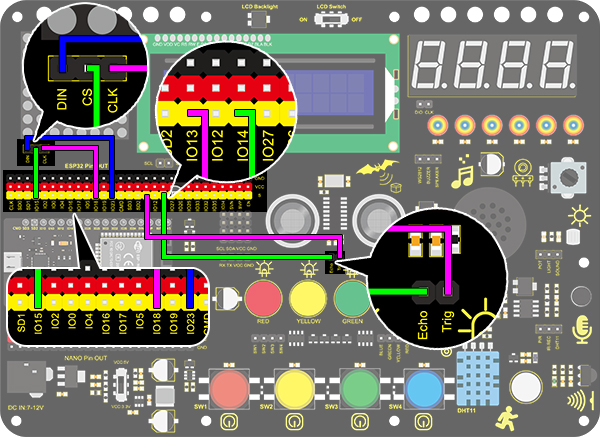
3. Wiring Diagram
4. Test Code
/*
  keyestudio ESP32 Inventor Learning Kit
  Project 27 Intelligent Parking
  http://www.keyestudio.com
*/
#include <LedControl.h>

int DIN = 23;  //Define DIN pin to IO23
int CS = 15;   //Define CS pin to IO15
int CLK = 18;  //Define CLK pin to IO18

int temp = 0;

int distance = 0;  //Define a variable to receive the distance
int EchoPin = 14;  //Connect Echo pin to IO14
int TrigPin = 13;  //Connect Trig pin to IO13

float checkdistance() {  //Acquire distance
  // preserve a short low level to ensure a clear high pulse:
  digitalWrite(TrigPin, LOW);
  delayMicroseconds(2);
  // Trigger the sensor by a high pulse of 10um or longer
  digitalWrite(TrigPin, HIGH);
  delayMicroseconds(10);
  digitalWrite(TrigPin, LOW);
  // Read the signal from the sensor: a high level pulse
  //Duration is detected from the point sending "ping" command to the time receiving echo signal (unit: um).
  float distance = pulseIn(EchoPin, HIGH) / 58.00;  //Convert into distance
  delay(10);
  return distance;
}

LedControl lc = LedControl(DIN, CLK, CS, 4);
byte data_val[4][8] =
{
  { 0x00, 0x00, 0x00, 0x01, 0x01, 0x00, 0x00, 0x00 },
  { 0x00, 0x00, 0x04, 0x05, 0x05, 0x04, 0x00, 0x00 },
  { 0x00, 0x10, 0x14, 0x15, 0x15, 0x14, 0x10, 0x00 },
  { 0x40, 0x50, 0x54, 0x55, 0x55, 0x54, 0x50, 0x40 },
};


void setup()
{
  lc.shutdown(0, false);  //MAX72XX is in power-saving mode at startup
  lc.setIntensity(0, 8);  //Set the brightness to its maximum value
  lc.clearDisplay(0);     //Clear display

  pinMode(TrigPin, OUTPUT);  //Set Trig pin to output
  pinMode(EchoPin, INPUT);   //Set Echo pin to input
  Serial.begin(9600);
}

void loop()
{
  distance = checkdistance();
  Serial.println(distance);
  if (distance < 15)
  {
    temp = 0;
  }
  else if (distance < 30 && distance > 15)
  {
    temp = 1;
  }
  else if (distance < 40 && distance > 30)
  {
    temp = 2;
  }
  else if (distance > 50)
  {
    temp = 3;
  }
  for (int i = 0; i < 8; i++)
  {
    lc.setRow(0, i, data_val[temp][i]);
  }
}
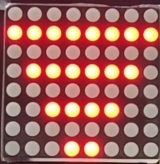
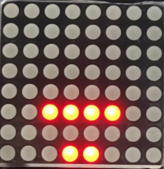
5. Test Result
After connecting the wiring and uploading code, lines will be displayed on the dot matrix. If the detected distance is less than 50cm, there will be fewer lines.