Project 34 Smart Home
1. Description
In this project, we simulate the smart home with the inventor kit.
Notes
You need to prepare your a 2.4GHz frequency WIFI, not 5GHz frequency. It can be a mobile hotspot or a router.
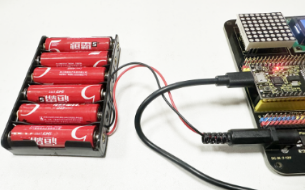
The ESP32 board consumes more power when connected to the network, so you need to connect an external power supply to this kit. We provide you with a 6XAA Battery Holder (battery not included), which you can connect to the DC port of the ESP32 integrated board.

When using other devices to control this kit, the ESP32 board needs to be connected to the same network as your control device.
Remember your wifi network name and password and fill it into the code before uploading it.
const char* ssid = "your_SSID"; // Fill in WiFi name, for example,= "KEYES"
const char* password = "your_password"; // Fill in WiFi password, for example,= "123456"
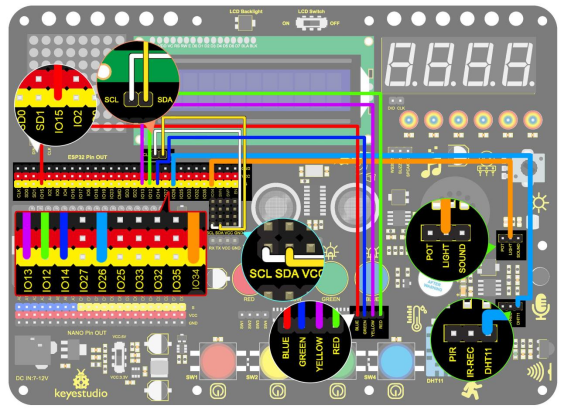
2. Wiring Diagram
3. Upload Code
#include <WiFi.h>
#include <ESPAsyncWebServer.h>
#include <xht11.h>
#include <LiquidCrystal_I2C.h>
LiquidCrystal_I2C lcd(0x27, 16, 2);
// WiFi configuration
const char* ssid = "your-SSID"; // your WiFi name
const char* password = "your-PASSWORD"; // your WiFi password
// DHT11 configuration
xht11 xht(26); //set DHT11 sensor pin to IO26
unsigned char dat[] = { 0, 0, 0, 0 }; //Define an array to store temperature and humidity values
int i = 0;
// photoresistor analog pin
#define LDR_PIN 34 // connect the photoresistor to GPIO 34
// LED pins
#define redLED_PIN 12
#define yellowLED_PIN 13
#define greenLED_PIN 14
#define blueLED_PIN 15
// LED state
bool redLEDState = false;
bool yellowLEDState = false;
bool greenLEDState = false;
bool blueLEDState = false;
// Web server
AsyncWebServer server(80);
String generateHTML() {
String html = "<html><head><style>";
// basic format
html += "body { font-family: Arial, sans-serif; background-color: #f4f4f4; }";
html += "h2 { color: #333; }";
html += "div.sensor { background-color: #fff; padding: 20px; margin: 15px; border-radius: 10px; box-shadow: 0px 4px 6px rgba(0, 0, 0, 0.1); }";
html += "div.sensor h3 { margin: 0; }";
html += "div.sensor p { font-size: 20px; color: #555; }";
// button format
html += "button { font-size: 30px; padding: 15px; margin: 10px; border: none; cursor: pointer; width: 200px; height: 100px; }";
html += "button.on { background-color: #4CAF50; color: white; }"; // color of LED on
html += "button.off { background-color: #f44336; color: white; }"; // color of LED off
html += "</style>";
html += "<meta http-equiv='refresh' content='5'>"; // Automatically refresh every 5 seconds
html += "</head><body>";
// temperature
html += "<h2>Sensor Data</h2>";
html += "<div class='sensor'>";
html += "<h3>Temperature</h3>";
html += "<p>" + String(dat[2]) + " °C</p>";
html += "</div>";
// humidity
html += "<div class='sensor'>";
html += "<h3>Humidity</h3>";
html += "<p>" + String(dat[0]) + " %</p>";
html += "</div>";
// diaplay photoresistor resistance value
int lightValue = analogRead(LDR_PIN); // photoresistor value
html += "<div class='sensor'>";
html += "<h3>Luminance</h3>";
html += "<p>" + String(lightValue) + "</p>";
html += "</div>";
// LED control button
html += "<h2>Control LEDs</h2>";
html += "<button id='btn0' class='" + String(redLEDState ? "on" : "off") + "' onclick='toggleLed(0)'>Red LED</button>";
html += "<button id='btn1' class='" + String(yellowLEDState ? "on" : "off") + "' onclick='toggleLed(1)'>Yellow LED</button>";
html += "<button id='btn2' class='" + String(greenLEDState ? "on" : "off") + "' onclick='toggleLed(2)'>Green LED</button>";
html += "<button id='btn3' class='" + String(blueLEDState ? "on" : "off") + "' onclick='toggleLed(3)'>Blue LED</button>";
// JavaScript control LED On/Off
html += "<script>";
html += "function toggleLed(led) {";
html += " var xhr = new XMLHttpRequest();";
html += " xhr.open('GET', '/toggle?led=' + led, true);";
html += " xhr.send();";
html += " var button = document.getElementById('btn' + led);";
html += " if (button.classList.contains('off')) {";
html += " button.classList.remove('off');";
html += " button.classList.add('on');";
html += " } else {";
html += " button.classList.remove('on');";
html += " button.classList.add('off');";
html += " }";
html += "}";
html += "</script>";
html += "</body></html>";
return html;
}
void setup()
{
// Initialize serial port
Serial.begin(115200);
lcd.init(); // initialize the lcd
lcd.backlight();
lcd.setCursor(0, 0);
lcd.print("IP:");
// WiFi connection
WiFi.begin(ssid, password);
while (WiFi.status() != WL_CONNECTED) {
lcd.setCursor(i, 1);
lcd.print(".");
delay(500);
i++;
if (i > 15) {
i = 0;
lcd.setCursor(0, 1);
lcd.print(" ");
}
}
lcd.setCursor(0, 1);
lcd.print(" ");
lcd.setCursor(0, 1);
lcd.print(WiFi.localIP());
// Set LED pins to output
pinMode(redLED_PIN, OUTPUT);
pinMode(yellowLED_PIN, OUTPUT);
pinMode(greenLED_PIN, OUTPUT);
pinMode(blueLED_PIN, OUTPUT);
// Process Web requests
server.on("/", HTTP_GET, [](AsyncWebServerRequest* request) {
if (!xht.receive(dat)) {
Serial.println("sensor error");
}
String html = generateHTML();
request->send(200, "text/html", html);
});
// Control the end of the LED
server.on("/toggle", HTTP_GET, [](AsyncWebServerRequest* request) {
String led = request->getParam("led")->value();
int ledNum = led.toInt();
if (ledNum == 0) {
redLEDState = !redLEDState;
digitalWrite(redLED_PIN, redLEDState ? HIGH : LOW); // LED 1
} else if (ledNum == 1) {
yellowLEDState = !yellowLEDState;
digitalWrite(yellowLED_PIN, yellowLEDState ? HIGH : LOW); // LED 2
} else if (ledNum == 2) {
greenLEDState = !greenLEDState;
digitalWrite(greenLED_PIN, greenLEDState ? HIGH : LOW); // LED 3
} else if (ledNum == 3) {
blueLEDState = !blueLEDState;
digitalWrite(blueLED_PIN, blueLEDState ? HIGH : LOW); // LED 4
}
request->redirect("/"); // Go back to home page
});
// Start the Web server
server.begin();
}
void loop()
{
// Read the temperature and humidity values and update the web page
if (!xht.receive(dat))
{
Serial.println("sensor error");
}
delay(2000); // Refresh the page every 2 seconds
}
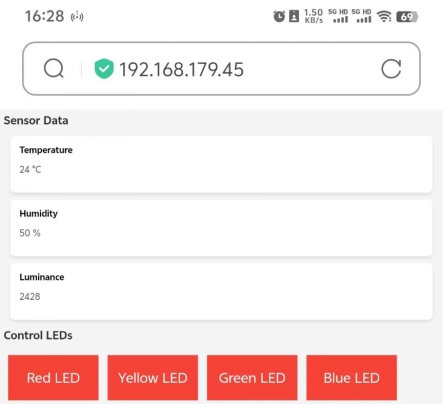
4. Test Result
After uploading the code, LCD1602 shows the IP address. Open the browser, enter the IP address and you will see the control page.
At this time, you can use the control device to read the value read by the sensor, and you can also control the on and off of the LED.