Project 30 Smart Home
1. Description
In this technology era, we are all familiar with smart home. It is a system that can control electric appliance via buttons.
In this project, we seek to stimulate a smart home via an IR remote control. With Arduino MCU as its core, it can be used to control light, air conditioners, TV and security monitors.
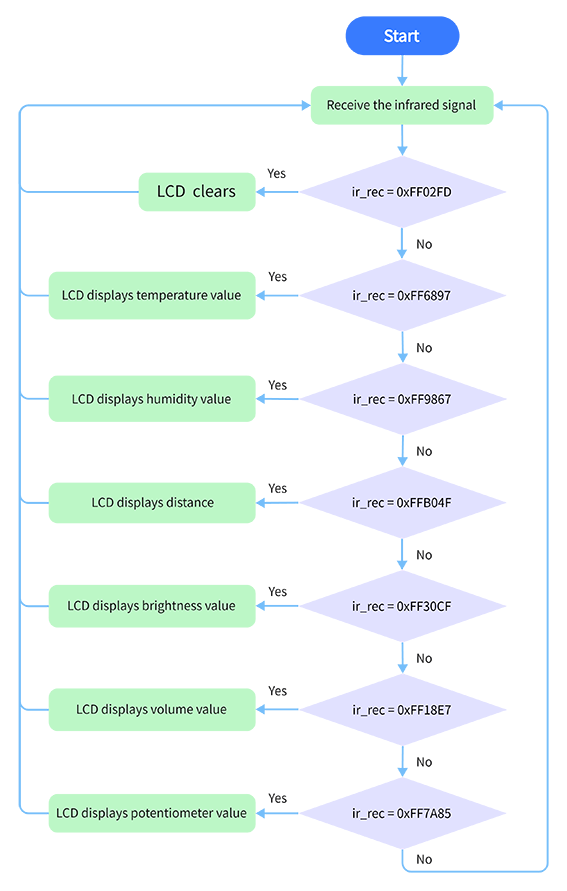
2. Flow Chart
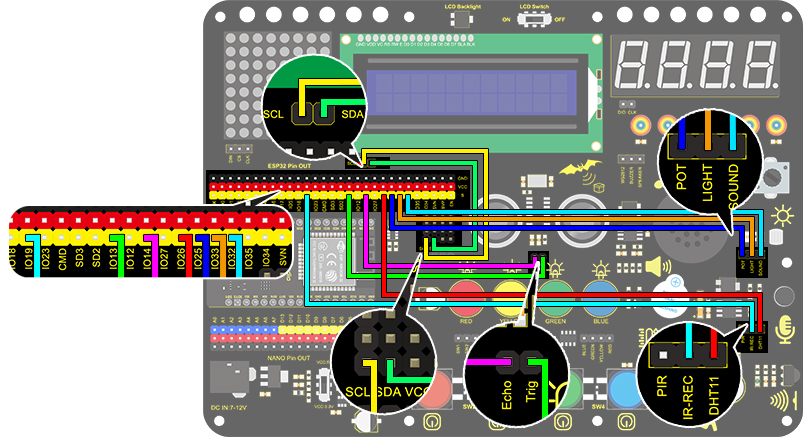
3. Wiring Diagram
4. Test Code
/*
  keyestudio ESP32 Inventor Learning Kit
  Project 30 Smart Home
  http://www.keyestudio.com
*/
#include <LiquidCrystal_I2C.h>
#include <IRremoteESP8266.h>
#include <IRrecv.h>
#include <IRutils.h>
#include <xht11.h>

LiquidCrystal_I2C lcd(0x27, 16, 2);  // set the LCD address to 0x27 for a 16 chars and 2 line display

const uint16_t recvPin = 19;  // Infrared receiving pin
IRrecv irrecv(recvPin);       // Create a class object used to receive class
decode_results results;       // Create a decoding results class object
long ir_rec;

xht11 xht(26);                         //The DHT11 connects to IO26
unsigned char dat[] = { 0, 0, 0, 0 };  //Define an array to store temperature and humidity data

int distance = 0;  //Define a variable to receive the distance
int EchoPin = 14;  //Connect Echo pin to IO14
int TrigPin = 13;  //Connect Trig pin to IO13

int ligth_sensor = 33;      //Define the photoresistor pin
int sound_sensor = 32;      //efine the sound sensor pin
int pot_sensor = 25;        //Define the potentiometer pin

void setup() {
  //LCD 1602
  lcd.init();  // initialize the lcd
  lcd.backlight();  //Turn on the LCD backlight
  lcd.setCursor(3, 0);
  lcd.print("keyestudio");  //LCD displays "keyestudio"
  //IR receiver
  irrecv.enableIRIn();  // start receiving signals
  //Ultrasonic
  pinMode(TrigPin, OUTPUT);  //Set Trig pin to output
  pinMode(EchoPin, INPUT);   //Set Echo pin to input
}
void loop() {
  if (irrecv.decode(&results)) {

    if (results.value != 0) {  //Prevent the button from being pressed repeatedly
      ir_rec = results.value;  //The signal is assigned to the variable ir_rec
      show_clear();
    }
    irrecv.resume();  //Release the IRremote and receive the next value.
  }
  switch (ir_rec) {
    case 0xFF02FD: show_clear(); break;
    case 0xFF6897: show_temperature(); break;
    case 0xFF9867: show_humidity(); break;
    case 0xFFB04F: show_distance(); break;
    case 0xFF30CF: show_luminance(); break;
    case 0xFF18E7: show_sound(); break;
    case 0xFF7A85: show_pot(); break;
  }
  delay(300);
}

void show_clear() {  //Clear display
  lcd.setCursor(0, 1);
  lcd.print("                ");
}

void show_temperature() {  //Display temperature
  if (xht.receive(dat)) {  //Check correct return to true
    lcd.setCursor(0, 1);
    lcd.print("Temperature:");
    lcd.setCursor(13, 1);
    lcd.print(dat[2]);
    if (dat[2] < 100) {
      lcd.setCursor(15, 1);
      lcd.print(" ");
    }
  }
}

void show_humidity() {     //Display humidity
  if (xht.receive(dat)) {  //Check correct return to true
    lcd.setCursor(0, 1);
    lcd.print("Humidity:");
    lcd.setCursor(10, 1);
    lcd.print(dat[0]);
    Serial.println("2");
    if (dat[0] < 100) {
      lcd.setCursor(12, 1);
      lcd.print(" ");
    }
  }
}

float checkdistance() {  //Acquire distance
  // preserve a short low level to ensure a clear high pulse:
  digitalWrite(TrigPin, LOW);
  delayMicroseconds(2);
  // Trigger the sensor by a high pulse of 10um or longer
  digitalWrite(TrigPin, HIGH);
  delayMicroseconds(10);
  digitalWrite(TrigPin, LOW);
  // Read the signal from the sensor: a high level pulse
  //Duration is detected from the point sending "ping" command to the time receiving echo signal (unit: um).
  float distance = pulseIn(EchoPin, HIGH) / 58.00;  //Convert into distance
  delay(10);
  return distance;
}

void show_distance() {  //Display the distance
  distance = checkdistance();
  // if (distance < 2 || distance >= 400) {  //Disolay "-1" if exceeding the detection range
  //   distance = -1;
  // }
  lcd.setCursor(0, 1);
  lcd.print("distance:");
  lcd.setCursor(9, 1);
  lcd.print(distance);
  if (distance < 100 && distance > 10) {  //Eliminate the third residual digit when the value drops to two digits
    lcd.setCursor(11, 1);
    lcd.print(" ");
  }
  if (distance < 10) {  //Eliminate the second residual digit when the value drops to one digit
    lcd.setCursor(10, 1);
    lcd.print(" ");
  }
}

void show_luminance()  //Read the analog value of photoresistor
{
  int value = analogRead(ligth_sensor);
  lcd.setCursor(0, 1);
  lcd.print("Luminance:");
  lcd.setCursor(11, 1);
  lcd.print(value);
  if (value < 1000)
  {
    lcd.setCursor(14, 1);
    lcd.print(" ");
  }
  if (value < 100)
  {
    lcd.setCursor(13, 1);
    lcd.print(" ");
  }
  if (value < 10)
  {
    lcd.setCursor(12, 1);
    lcd.print(" ");
  }
}

void show_sound() //Read the analog sound value
{
  int value = analogRead(sound_sensor);
  lcd.setCursor(0, 1);
  lcd.print("Sound:");
  lcd.setCursor(7, 1);
  lcd.print(value);
  if (value < 1000)
  {
    lcd.setCursor(10, 1);
    lcd.print(" ");
  }
  if (value < 100)
  {
    lcd.setCursor(9, 1);
    lcd.print(" ");
  }
  if (value < 10)
  {
    lcd.setCursor(8, 1);
    lcd.print(" ");
  }
}

void show_pot()  //Read the analog value of potentiometer
{
  int value = analogRead(pot_sensor);
  lcd.setCursor(0, 1);
  lcd.print("PotAnalog:");
  lcd.setCursor(11, 1);
  lcd.print(value);
  if (value < 1000)
  {
    lcd.setCursor(14, 1);
    lcd.print(" ");
  }
  if (value < 100)
  {
    lcd.setCursor(13, 1);
    lcd.print(" ");
  }
  if (value < 10)
  {
    lcd.setCursor(12, 1);
    lcd.print(" ");
  }
}
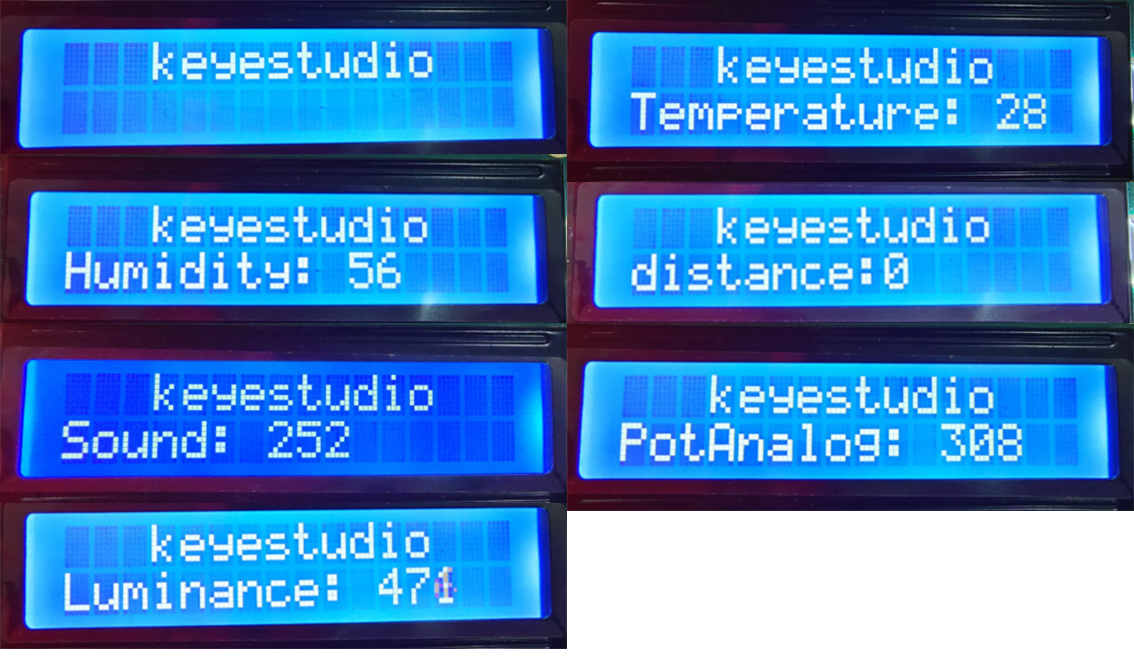
5. Test Result
After connecting the wiring and uploading code, we can see the corresponding contents on LCD by pressing buttons. OK button clears the sensor display.