プロジェクト16 タイムボム
1. 説明
このプロジェクトでは、面白いタイムボムゲームを体験することができます。
このプロジェクトでは、ドットマトリクスがタイムボムを表し、デジタルチューブが残り時間を表示します。ボタンは爆弾の操作だけでなく、時間の設定も可能です。カウントダウンを設定して爆弾を制御し、カウントダウンが終了すると爆発します。それに加えて、ブザーが警報として採用されています。
いずれにせよ、複数のセンサーをプログラミングすることで、論理的思考の総合的な能力を高めることができます。
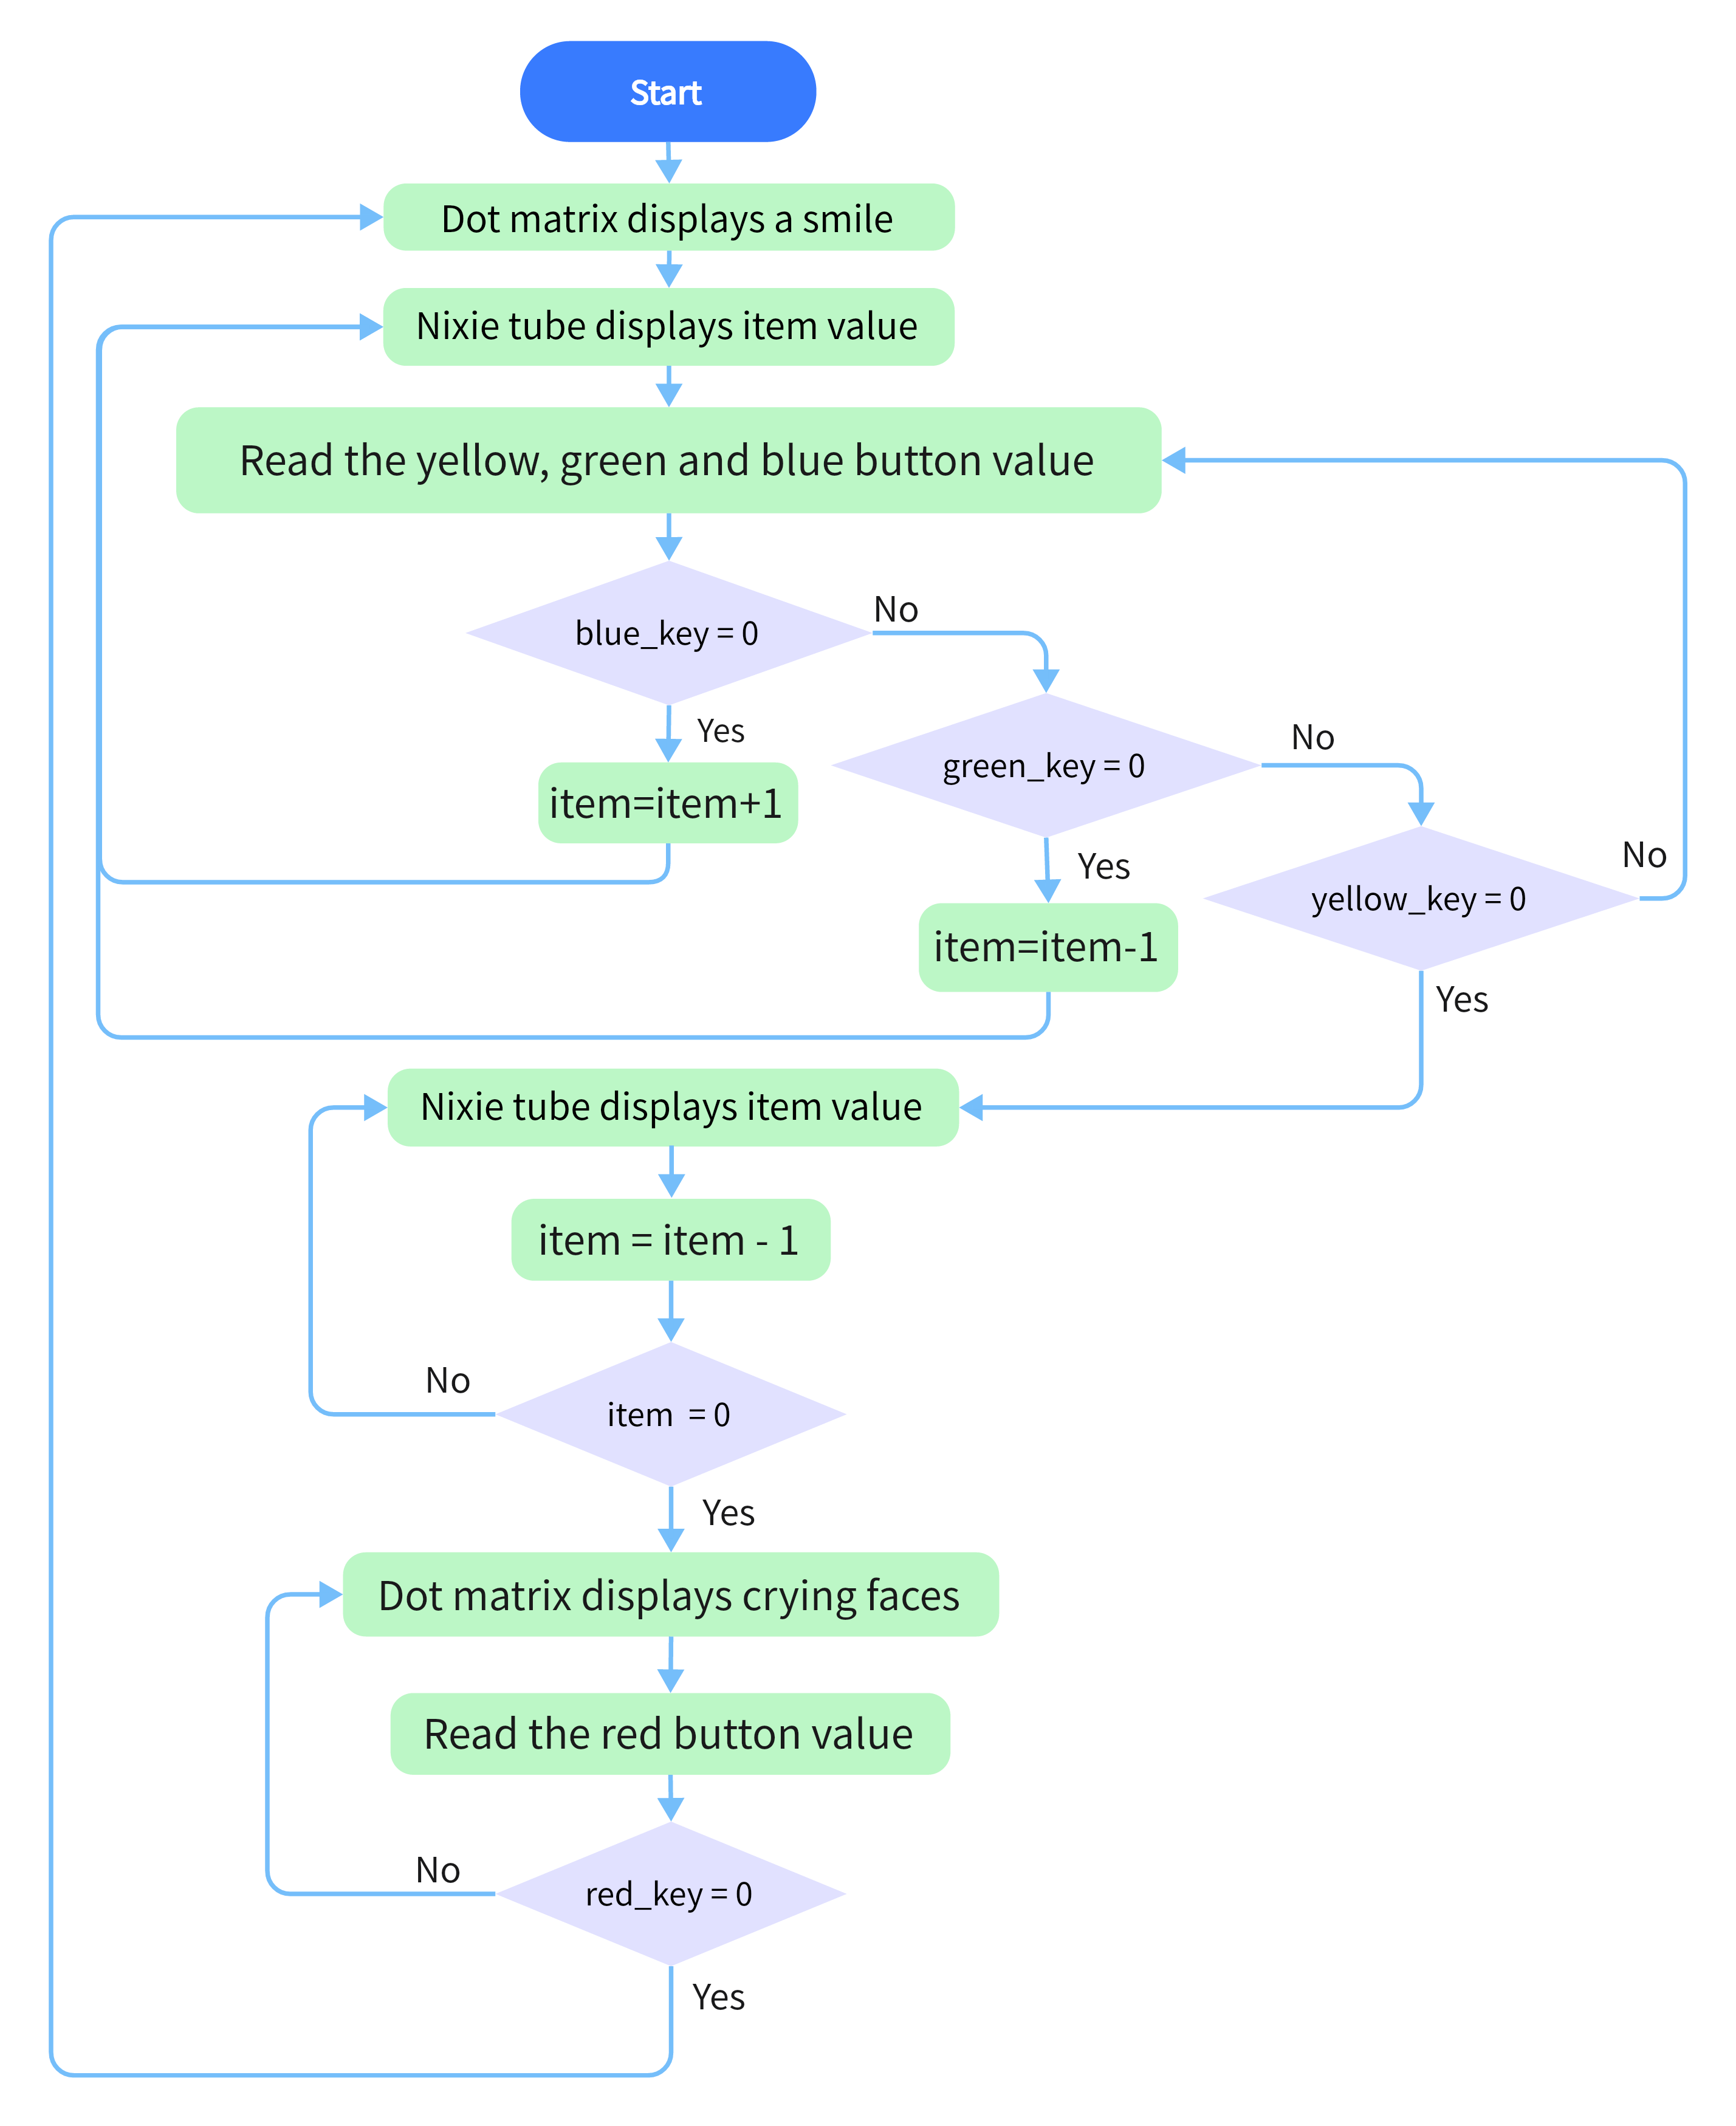
2. フローチャート
3. 配線図

4. テストコード
/*
  keyestudio ESP32 Inventor Learning Kit
  Project 16 Timebomb
  http://www.keyestudio.com
*/
#include "TM1650.h" //Upload TM1650 libraries
#include "LedControl.h"
//Dot matrix
int DIN = 23;
int CLK = 18;
int CS = 15;
LedControl lc=LedControl(DIN,CLK,CS,1);

byte smile[8]=   {0x20,0x44,0x22,0x02,0x02,0x22,0x44,0x20};//Smile face
byte weep[8]= {0x20,0x42,0x24,0x04,0x04,0x24,0x42,0x20};//Crying face

// Button, buzzer and digital tube
int item = 0; //displayed value
TM1650 DigitalTube(22,21);   //Set the SCL pin of the digital tube to 22 and the DIO pin to 21

int addition = 32;		//Set the plus button to IO32
int subtraction = 33;	//Set the minus button to IO33
int start = 34;			//Set the start button to IO34
int reset = 35;			//Set the reset button to IO35
int buzz = 26;			//Set the buzzer to IO26

int buzz_val = 1;		//The variable of buzzer

void printByte(byte character [])  //The dot matrix display function
{
  int i = 0;
  for(i=0;i<8;i++)
  {
    lc.setRow(0,i,character[i]);
  }
}

void setup()
{
  lc.shutdown(0,false);       //MAX72XX is in power saving mode when starting
  lc.setIntensity(0,8);       //Set the brightness to the maximum
  lc.clearDisplay(0);         //Clear the display
 //Set the pin mode
  pinMode(addition,INPUT);
  pinMode(subtraction,INPUT);
  pinMode(start,INPUT);
  pinMode(reset,INPUT);
  pinMode(buzz,OUTPUT);

  for(char b=0;b<4;b++)
  {
    DigitalTube.clearBit(b);      //DigitalTube.clearBit(0 to 3); Clear bit display.
  }
}

void loop()
{
  printByte(smile);		//Dot matrix displays a smile face
  DigitalTube.displayFloatNum(item); //Digital tube displays the item value
  int blue_key = digitalRead(addition);		//Read the button value
  int green_key = digitalRead(subtraction);
  int yellow_key = digitalRead(start);
  if(blue_key == 0)
  {	//Determine whether the button is pressed
    item = item + 1;  	//+1
    delay(200);
  }
  if(green_key == 0 )
  {
    item = item - 1;  //-1
    delay(200);
  }
  if (item > 9999)
  {  //When the value is greater than 9999(exceeding the display range), reset
    item = 0;
  }
  if(yellow_key == 0)
  {
    while(1)
    {					//whlie()loop
      DigitalTube.displayFloatNum(item); //Digital tube displays the item value
      item--;					//item--equals to item = item - 1
      delay(1000);
      buzz_val = !buzz_val;		//“!”takes the inverse runner. invert buzz_val
      digitalWrite(buzz,buzz_val);
      if(item == 0)
      {
        digitalWrite(buzz,LOW);
        break;					//break to exit the loop
      }
    }
    while(item==0)
    {				//when itme=0, enter loop
      DigitalTube.displayFloatNum(item); //Digital tube displays the item value
      printByte(weep);					//Display a crying face
      int red_key = digitalRead(reset);
      if(red_key == 0)
      {
        break;
      }
    }
  }
}
5. テスト結果
配線を接続しコードをアップロードした後、青ボタン(増加)と緑ボタン(減少)で時間を設定でき、黄色ボタンでカウントダウンを開始できます。カウントダウンが終了すると、ドットマトリクスディスプレイのスマイリーフェイスが泣き顔に変わり、爆弾の爆発をシミュレートします。赤ボタンを押すとプログラムをリセットできます。