プロジェクト18 ビートするハート
1. 説明
このプロジェクトでは、Arduinoボード、8X8ドットマトリックスディスプレイ、回路基板およびいくつかの電子部品を使ってビートするハートを表現します。プログラミングにより、ビートの周波数、ハートの大きさ、明るさを制御できます。
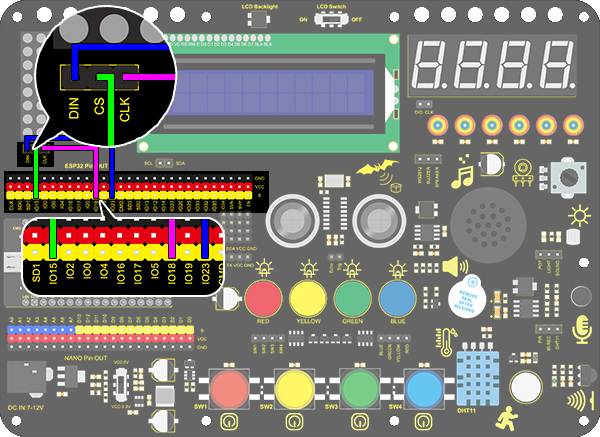
2. 配線図
3. テストコード
/*
  keyestudio ESP32 Inventor Learning Kit
  Project 18 Beating Heart
  http://www.keyestudio.com
*/

#include "LedControl.h"
int DIN = 23;
int CLK = 18;
int CS = 15;
LedControl lc=LedControl(DIN,CLK,CS,1);
const byte IMAGES1[] = {0x30, 0x78, 0x7c, 0x3e, 0x3e, 0x7c, 0x78, 0x30};  // a big heart
const byte IMAGES2[] = {0x00, 0x10, 0x38, 0x1c, 0x1c, 0x38, 0x10, 0x00};  //a small heart

void setup()
{
  lc.shutdown(0,false);
  // Set brightness to a medium value
  lc.setIntensity(0,8);
  // Clear the display
  lc.clearDisplay(0);
}

void loop()
{
  for(int i=0; i < 8; i++)
  {
      lc.setRow(0,i,IMAGES1[i]);
  }
  delay(1000);
  for(int i=0; i < 8; i++)
  {
    lc.setRow(0,i,IMAGES2[i]);
  }
  delay(1000);
}
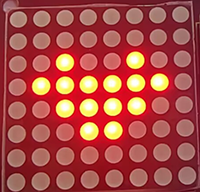
4. テスト結果
配線を接続しコードをアップロードすると、2つのサイズのハートが交互に表示されます。