プロジェクト34 スマートホーム
1. 説明
このプロジェクトでは、インベンターキットを使ってスマートホームをシミュレートします。
注意事項
2.4GHz帯のWIFIを用意してください。5GHz帯は使用できません。モバイルホットスポットやルーターでも構いません。
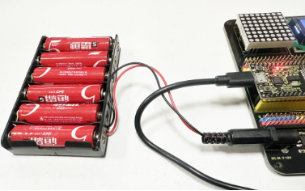
ESP32ボードはネットワーク接続時に消費電力が増えるため、外部電源を接続する必要があります。6本の単三電池用バッテリーホルダー(電池は含まれていません)を用意しており、ESP32統合ボードのDCポートに接続できます。

他のデバイスでこのキットを制御する場合、ESP32ボードは制御デバイスと同じネットワークに接続されている必要があります。
WiFiのネットワーク名とパスワードを覚えておき、コードにアップロード前に入力してください。
const char* ssid = "your_SSID"; // WiFi名を入力、例: "KEYES"
const char* password = "your_password"; // WiFiパスワードを入力、例: "123456"
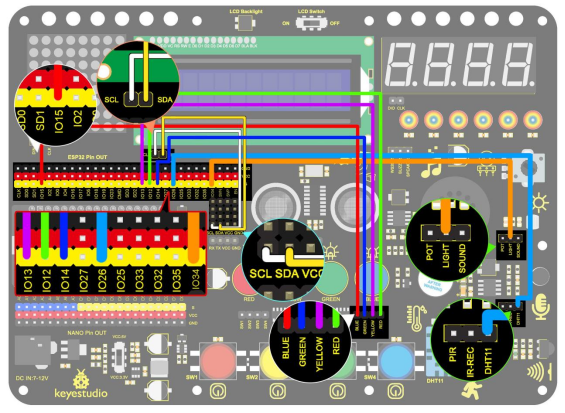
2. 配線図
3. コードのアップロード
#include <WiFi.h>
#include <ESPAsyncWebServer.h>
#include <xht11.h>
#include <LiquidCrystal_I2C.h>
LiquidCrystal_I2C lcd(0x27, 16, 2);
// WiFi設定
const char* ssid = "your-SSID"; // WiFi名
const char* password = "your-PASSWORD"; // WiFiパスワード
// DHT11設定
xht11 xht(26); // DHT11センサーのピンをIO26に設定
unsigned char dat[] = { 0, 0, 0, 0 }; // 温度と湿度の値を格納する配列を定義
int i = 0;
// フォトレジスタのアナログピン
#define LDR_PIN 34 // フォトレジスタをGPIO 34に接続
// LEDピン
#define redLED_PIN 12
#define yellowLED_PIN 13
#define greenLED_PIN 14
#define blueLED_PIN 15
// LED状態
bool redLEDState = false;
bool yellowLEDState = false;
bool greenLEDState = false;
bool blueLEDState = false;
// Webサーバー
AsyncWebServer server(80);
String generateHTML() {
String html = "<html><head><style>";
// 基本フォーマット
html += "body { font-family: Arial, sans-serif; background-color: #f4f4f4; }";
html += "h2 { color: #333; }";
html += "div.sensor { background-color: #fff; padding: 20px; margin: 15px; border-radius: 10px; box-shadow: 0px 4px 6px rgba(0, 0, 0, 0.1); }";
html += "div.sensor h3 { margin: 0; }";
html += "div.sensor p { font-size: 20px; color: #555; }";
// ボタンフォーマット
html += "button { font-size: 30px; padding: 15px; margin: 10px; border: none; cursor: pointer; width: 200px; height: 100px; }";
html += "button.on { background-color: #4CAF50; color: white; }"; // LEDオンの色
html += "button.off { background-color: #f44336; color: white; }"; // LEDオフの色
html += "</style>";
html += "<meta http-equiv='refresh' content='5'>"; // 5秒ごとに自動更新
html += "</head><body>";
// 温度
html += "<h2>センサーデータ</h2>";
html += "<div class='sensor'>";
html += "<h3>温度</h3>";
html += "<p>" + String(dat[2]) + " °C</p>";
html += "</div>";
// 湿度
html += "<div class='sensor'>";
html += "<h3>湿度</h3>";
html += "<p>" + String(dat[0]) + " %</p>";
html += "</div>";
// フォトレジスタの抵抗値表示
int lightValue = analogRead(LDR_PIN); // フォトレジスタの値
html += "<div class='sensor'>";
html += "<h3>照度</h3>";
html += "<p>" + String(lightValue) + "</p>";
html += "</div>";
// LED制御ボタン
html += "<h2>LED制御</h2>";
html += "<button id='btn0' class='" + String(redLEDState ? "on" : "off") + "' onclick='toggleLed(0)'>赤LED</button>";
html += "<button id='btn1' class='" + String(yellowLEDState ? "on" : "off") + "' onclick='toggleLed(1)'>黄LED</button>";
html += "<button id='btn2' class='" + String(greenLEDState ? "on" : "off") + "' onclick='toggleLed(2)'>緑LED</button>";
html += "<button id='btn3' class='" + String(blueLEDState ? "on" : "off") + "' onclick='toggleLed(3)'>青LED</button>";
// JavaScriptでLEDのオン/オフ制御
html += "<script>";
html += "function toggleLed(led) {";
html += " var xhr = new XMLHttpRequest();";
html += " xhr.open('GET', '/toggle?led=' + led, true);";
html += " xhr.send();";
html += " var button = document.getElementById('btn' + led);";
html += " if (button.classList.contains('off')) {";
html += " button.classList.remove('off');";
html += " button.classList.add('on');";
html += " } else {";
html += " button.classList.remove('on');";
html += " button.classList.add('off');";
html += " }";
html += "}";
html += "</script>";
html += "</body></html>";
return html;
}
void setup()
{
// シリアルポート初期化
Serial.begin(115200);
lcd.init(); // LCD初期化
lcd.backlight();
lcd.setCursor(0, 0);
lcd.print("IP:");
// WiFi接続
WiFi.begin(ssid, password);
while (WiFi.status() != WL_CONNECTED) {
lcd.setCursor(i, 1);
lcd.print(".");
delay(500);
i++;
if (i > 15) {
i = 0;
lcd.setCursor(0, 1);
lcd.print(" ");
}
}
lcd.setCursor(0, 1);
lcd.print(" ");
lcd.setCursor(0, 1);
lcd.print(WiFi.localIP());
// LEDピンを出力に設定
pinMode(redLED_PIN, OUTPUT);
pinMode(yellowLED_PIN, OUTPUT);
pinMode(greenLED_PIN, OUTPUT);
pinMode(blueLED_PIN, OUTPUT);
// Webリクエスト処理
server.on("/", HTTP_GET, [](AsyncWebServerRequest* request) {
if (!xht.receive(dat)) {
Serial.println("sensor error");
}
String html = generateHTML();
request->send(200, "text/html", html);
});
// LED制御
server.on("/toggle", HTTP_GET, [](AsyncWebServerRequest* request) {
String led = request->getParam("led")->value();
int ledNum = led.toInt();
if (ledNum == 0) {
redLEDState = !redLEDState;
digitalWrite(redLED_PIN, redLEDState ? HIGH : LOW); // LED 1
} else if (ledNum == 1) {
yellowLEDState = !yellowLEDState;
digitalWrite(yellowLED_PIN, yellowLEDState ? HIGH : LOW); // LED 2
} else if (ledNum == 2) {
greenLEDState = !greenLEDState;
digitalWrite(greenLED_PIN, greenLEDState ? HIGH : LOW); // LED 3
} else if (ledNum == 3) {
blueLEDState = !blueLEDState;
digitalWrite(blueLED_PIN, blueLEDState ? HIGH : LOW); // LED 4
}
request->redirect("/"); // ホームページに戻る
});
// Webサーバー開始
server.begin();
}
void loop()
{
// 温度と湿度の値を読み取り、Webページを更新
if (!xht.receive(dat))
{
Serial.println("sensor error");
}
delay(2000); // 2秒ごとにページを更新
}
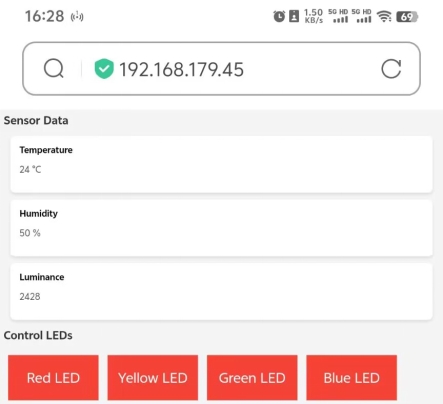
4. テスト結果
コードをアップロードすると、LCD1602にIPアドレスが表示されます。ブラウザを開き、IPアドレスを入力すると制御ページが表示されます。
この時点で、制御デバイスを使ってセンサーの値を読み取ることができ、LEDのオン・オフも制御できます。