Proyecto 16 Bomba de Tiempo
1. Descripción
Este proyecto te dará la oportunidad de experimentar un interesante juego de bomba de tiempo.
En este proyecto, la matriz de puntos representa tu bomba de tiempo, mientras que el tubo digital muestra el tiempo restante. Los botones no solo pueden controlar la bomba, sino también configurar su tiempo. Puedes establecer una cuenta regresiva para controlar esta bomba, y esta explota cuando la cuenta regresiva termina. Además, se utiliza un zumbador para la alarma.
De cualquier manera, al programar con múltiples sensores, tu capacidad integral de pensamiento lógico puede ser mejorada.
2. Diagrama de Flujo

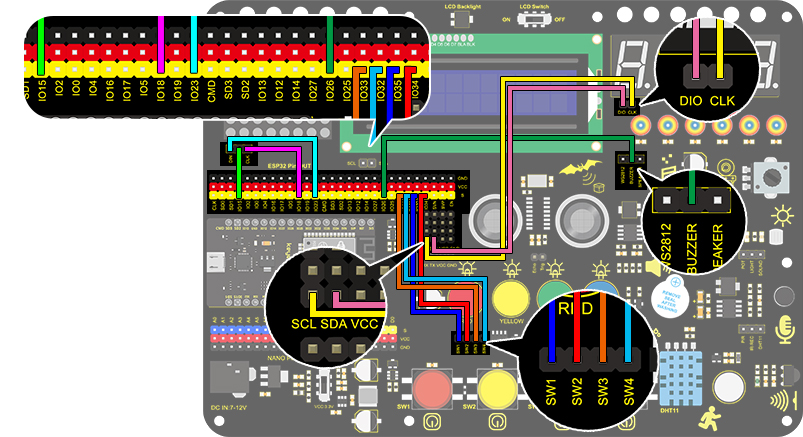
3. Diagrama de Conexiones
4. Código de Prueba
/*
  keyestudio ESP32 Inventor Learning Kit
  Project 16 Timebomb
  http://www.keyestudio.com
*/
#include "TM1650.h" //Upload TM1650 libraries
#include "LedControl.h"
//Dot matrix
int DIN = 23;
int CLK = 18;
int CS = 15;
LedControl lc=LedControl(DIN,CLK,CS,1);

byte smile[8]=   {0x20,0x44,0x22,0x02,0x02,0x22,0x44,0x20};//Smile face
byte weep[8]= {0x20,0x42,0x24,0x04,0x04,0x24,0x42,0x20};//Crying face

// Button, buzzer and digital tube
int item = 0; //displayed value
TM1650 DigitalTube(22,21);   //Set the SCL pin of the digital tube to 22 and the DIO pin to 21

int addition = 32;		//Set the plus button to IO32
int subtraction = 33;	//Set the minus button to IO33
int start = 34;			//Set the start button to IO34
int reset = 35;			//Set the reset button to IO35
int buzz = 26;			//Set the buzzer to IO26

int buzz_val = 1;		//The variable of buzzer

void printByte(byte character [])  //The dot matrix display function
{
  int i = 0;
  for(i=0;i<8;i++)
  {
    lc.setRow(0,i,character[i]);
  }
}

void setup()
{
  lc.shutdown(0,false);       //MAX72XX is in power saving mode when starting
  lc.setIntensity(0,8);       //Set the brightness to the maximum
  lc.clearDisplay(0);         //Clear the display
 //Set the pin mode
  pinMode(addition,INPUT);
  pinMode(subtraction,INPUT);
  pinMode(start,INPUT);
  pinMode(reset,INPUT);
  pinMode(buzz,OUTPUT);

  for(char b=0;b<4;b++)
  {
    DigitalTube.clearBit(b);      //DigitalTube.clearBit(0 to 3); Clear bit display.
  }
}

void loop()
{
  printByte(smile);		//Dot matrix displays a smile face
  DigitalTube.displayFloatNum(item); //Digital tube displays the item value
  int blue_key = digitalRead(addition);		//Read the button value
  int green_key = digitalRead(subtraction);
  int yellow_key = digitalRead(start);
  if(blue_key == 0)
  {	//Determine whether the button is pressed
    item = item + 1;  	//+1
    delay(200);
  }
  if(green_key == 0 )
  {
    item = item - 1;  //-1
    delay(200);
  }
  if (item > 9999)
  {  //When the value is greater than 9999(exceeding the display range), reset
    item = 0;
  }
  if(yellow_key == 0)
  {
    while(1)
    {					//whlie()loop
      DigitalTube.displayFloatNum(item); //Digital tube displays the item value
      item--;					//item--equals to item = item - 1
      delay(1000);
      buzz_val = !buzz_val;		//“!”takes the inverse runner. invert buzz_val
      digitalWrite(buzz,buzz_val);
      if(item == 0)
      {
        digitalWrite(buzz,LOW);
        break;					//break to exit the loop
      }
    }
    while(item==0)
    {				//when itme=0, enter loop
      DigitalTube.displayFloatNum(item); //Digital tube displays the item value
      printByte(weep);					//Display a crying face
      int red_key = digitalRead(reset);
      if(red_key == 0)
      {
        break;
      }
    }
  }
}
5. Resultado de la Prueba
Después de conectar los cables y subir el código, el botón azul (aumentar) y el botón verde (disminuir) pueden usarse para configurar el tiempo, y el botón amarillo puede usarse para iniciar la cuenta regresiva. Cuando la cuenta regresiva termina, la cara sonriente en la Matriz de Puntos se convierte en una cara llorando, simulando la explosión de la bomba. Presionar el botón rojo puede reiniciar el programa.