Proyecto 5 Luz Ambiental Arcoíris
1. Descripción
El LED Arduino 2812RGB es una luz programable, colorida y soñadora, cuyo color, brillo y ritmo son ajustables. Esta luz ambiental arcoíris puede usarse como una decoración dinámica a voluntad. O puede controlarse para “bailar con la música”. Lo importante es que puede mejorarse como una alarma. Su sensor incorporado detecta el entorno ambiental para advertir a los usuarios cambiando su color, brillo y ritmo.
2. Principio de Funcionamiento
El protocolo de datos adopta un modo de comunicación de código de retorno a cero en línea única. Después de que el píxel se reinicia al encenderse, el terminal DIN recibe datos del controlador. Los primeros 24 bits de datos que llegan serán extraídos por el primer píxel y enviados al registro de datos interno.
Los datos restantes serán amplificados por un circuito amplificador y transmitidos a través del puerto DOUT al siguiente píxel en cascada. Al transmitirse a través de los píxeles, la señal disminuye 24 bits cada vez.
Además, el píxel adopta tecnología de conformado y reenvío automático, de modo que el número en cascada de píxeles está limitado solo por la velocidad de transmisión de la señal.
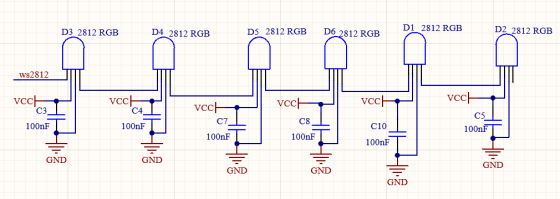
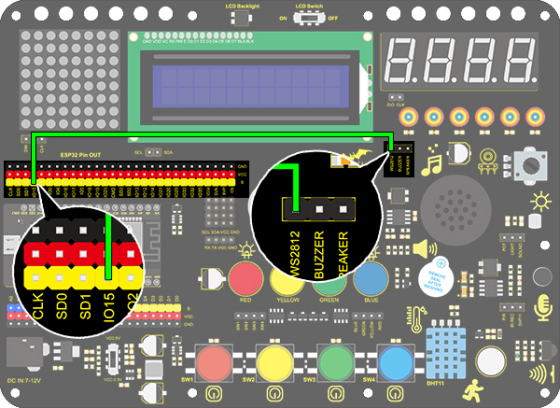
3. Diagrama de Conexiones
4. Código de Prueba
/*
  keyestudio ESP32 Inventor Learning Kit
  Project 5.1  Rainbow Ambient Light
  http://www.keyestudio.com
*/
//Add 2812RGB library file
#include <NeoPixel_ESP32.h>
#define PIN 15

Adafruit_NeoPixel strip = Adafruit_NeoPixel(6, PIN);  //Defines the instance strip and assigns the RGB LED number pins to the library code

void setup()
{
  strip.begin();        //Activate RGB LED
  strip.show(); // Refresh the display
}

void loop()
{
  strip.setPixelColor(0, strip.Color(255, 0, 0));       //The frist RGB LED is red
  strip.setPixelColor(1, strip.Color(0, 255, 0));       //The second RGB LED is green
  strip.setPixelColor(2, strip.Color(0, 0, 255));       //The third RGB LED is blue
  strip.setPixelColor(3, strip.Color(255, 255, 0));     //The fourth RGB LED is yellow
  strip.setPixelColor(4, strip.Color(255, 0, 255));     //The fifth RGB LED is purple
  strip.setPixelColor(5, strip.Color(255, 255, 255));   //The sixth RGB LED is white
  strip.show();       //Refresh the display
  delay(100);         //Give a delay to save the stability of the display
}
5. Resultado de la Prueba
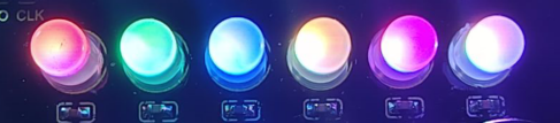
Después de cargar el código y encender, el LED se iluminará en diferentes colores.
De izquierda a derecha:
El primer LED RGB es rojo
El segundo LED RGB es verde
El tercer LED RGB es azul
El cuarto LED RGB es amarillo
El quinto LED RGB es púrpura
El sexto LED RGB es blanco
6. Código Extendido
/*
  keyestudio ESP32 Inventor Learning Kit
  Project 5.2  Rainbow Ambient Light
  http://www.keyestudio.com
*/
//Add 2812RGB library file
#include <NeoPixel_ESP32.h>
#define PIN 15
Adafruit_NeoPixel strip = Adafruit_NeoPixel(6, PIN, NEO_GRB + NEO_KHZ800);

void setup()
{
  strip.begin();
  strip.show(); // Initialize all pixels to 'off'
}

void loop()
{
  // Some example procedures showing how to display to the pixels:
  colorWipe(strip.Color(255, 0, 0), 50); // Red
  colorWipe(strip.Color(0, 255, 0), 50); // Green
  colorWipe(strip.Color(0, 0, 255), 50); // Blue
  // Send a theater pixel chase in...
  theaterChase(strip.Color(127, 127, 127), 50); // White
  theaterChase(strip.Color(127,   0,   0), 50); // Red
  theaterChase(strip.Color(  0,   0, 127), 50); // Blue

  rainbow(20);
  rainbowCycle(20);
  theaterChaseRainbow(50);
}

// Fill the dots one after the other with a color
void colorWipe(uint32_t c, uint8_t wait)
{
  for(uint16_t i=0; i<strip.numPixels(); i++)
  {
      strip.setPixelColor(i, c);
      strip.show();
      delay(wait);
  }
}

void rainbow(uint8_t wait)
{
  uint16_t i, j;

  for(j=0; j<256; j++)
  {
    for(i=0; i<strip.numPixels(); i++)
    {
      strip.setPixelColor(i, Wheel((i+j) & 255));
    }
    strip.show();
    delay(wait);
  }
}

// Slightly different, this makes the rainbow equally distributed throughout
void rainbowCycle(uint8_t wait)
{
  uint16_t i, j;
  for(j=0; j<256*5; j++) // 5 cycles of all colors on wheel
  {
    for(i=0; i< strip.numPixels(); i++)
    {
      strip.setPixelColor(i, Wheel(((i * 256 / strip.numPixels()) + j) & 255));
    }
    strip.show();
    delay(wait);
  }
}

//Theatre-style crawling lights.
void theaterChase(uint32_t c, uint8_t wait)
{
  for (int j=0; j<10; j++) //do 10 cycles of chasing
  {
    for (int q=0; q < 3; q++)
    {
      for (int i=0; i < strip.numPixels(); i=i+3)
      {
        strip.setPixelColor(i+q, c);    //turn every third pixel on
      }
      strip.show();
      delay(wait);
      for (int i=0; i < strip.numPixels(); i=i+3)
      {
        strip.setPixelColor(i+q, 0);        //turn every third pixel off
      }
    }
  }
}

//Theatre-style crawling lights with rainbow effect
void theaterChaseRainbow(uint8_t wait)
{
  for (int j=0; j < 256; j++) // cycle all 256 colors in the wheel
  {
    for (int q=0; q < 3; q++)
    {
        for (int i=0; i < strip.numPixels(); i=i+3)
        {
          strip.setPixelColor(i+q, Wheel( (i+j) % 255));    //turn every third pixel on
        }
        strip.show();
        delay(wait);
        for (int i=0; i < strip.numPixels(); i=i+3)
        {
          strip.setPixelColor(i+q, 0);        //turn every third pixel off
        }
    }
  }
}

// Input a value 0 to 255 to get a color value.
// The colours are a transition r - g - b - back to r.
uint32_t Wheel(byte WheelPos)
{
  if(WheelPos < 85)
  {
  	return strip.Color(WheelPos * 3, 255 - WheelPos * 3, 0);
  }
  else if(WheelPos < 170)
  {
      WheelPos -= 85;
      return strip.Color(255 - WheelPos * 3, 0, WheelPos * 3);
  }
  else
  {
      WheelPos -= 170;
      return strip.Color(0, WheelPos * 3, 255 - WheelPos * 3);
  }
}
7. Resultado de la Prueba
Después de cargar el código y encender, el LED se iluminará en diferentes colores y realizará un espectáculo de luces.