Proyecto 34 Casa Inteligente
1. Descripción
En este proyecto, simulamos la casa inteligente con el kit inventor.
Notas
Necesitas preparar una red WIFI de frecuencia 2.4GHz, no de 5GHz. Puede ser un hotspot móvil o un router.
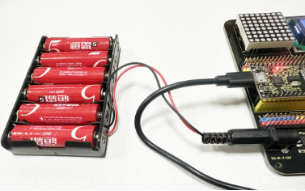
La placa ESP32 consume más energía cuando está conectada a la red, por lo que necesitas conectar una fuente de alimentación externa a este kit. Te proporcionamos un portapilas de 6XAA (pilas no incluidas), que puedes conectar al puerto DC de la placa integrada ESP32.

Al usar otros dispositivos para controlar este kit, la placa ESP32 debe estar conectada a la misma red que tu dispositivo de control.
Recuerda el nombre y la contraseña de tu red wifi y complétalos en el código antes de subirlo.
const char* ssid = "your_SSID"; // Completa con el nombre del WiFi, por ejemplo,= "KEYES"
const char* password = "your_password"; // Completa con la contraseña del WiFi, por ejemplo,= "123456"
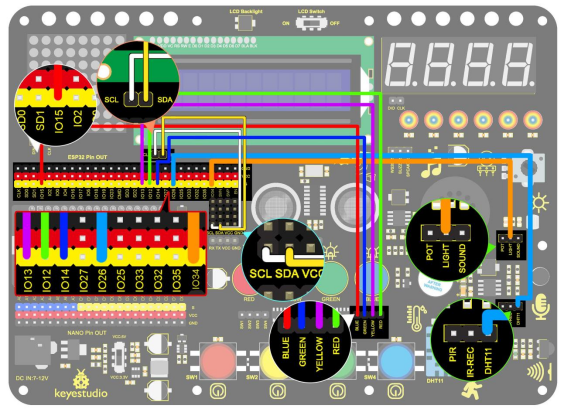
2. Diagrama de Conexiones
3. Subir Código
#include <WiFi.h>
#include <ESPAsyncWebServer.h>
#include <xht11.h>
#include <LiquidCrystal_I2C.h>
LiquidCrystal_I2C lcd(0x27, 16, 2);
// Configuración WiFi
const char* ssid = "your-SSID"; // nombre de tu WiFi
const char* password = "your-PASSWORD"; // contraseña de tu WiFi
// Configuración DHT11
xht11 xht(26); // asignar pin del sensor DHT11 a IO26
unsigned char dat[] = { 0, 0, 0, 0 }; // Definir un arreglo para almacenar valores de temperatura y humedad
int i = 0;
// pin analógico del fotorresistor
#define LDR_PIN 34 // conectar el fotorresistor a GPIO 34
// pines LED
#define redLED_PIN 12
#define yellowLED_PIN 13
#define greenLED_PIN 14
#define blueLED_PIN 15
// estado de los LED
bool redLEDState = false;
bool yellowLEDState = false;
bool greenLEDState = false;
bool blueLEDState = false;
// Servidor web
AsyncWebServer server(80);
String generateHTML() {
String html = "<html><head><style>";
// formato básico
html += "body { font-family: Arial, sans-serif; background-color: #f4f4f4; }";
html += "h2 { color: #333; }";
html += "div.sensor { background-color: #fff; padding: 20px; margin: 15px; border-radius: 10px; box-shadow: 0px 4px 6px rgba(0, 0, 0, 0.1); }";
html += "div.sensor h3 { margin: 0; }";
html += "div.sensor p { font-size: 20px; color: #555; }";
// formato de botones
html += "button { font-size: 30px; padding: 15px; margin: 10px; border: none; cursor: pointer; width: 200px; height: 100px; }";
html += "button.on { background-color: #4CAF50; color: white; }"; // color LED encendido
html += "button.off { background-color: #f44336; color: white; }"; // color LED apagado
html += "</style>";
html += "<meta http-equiv='refresh' content='5'>"; // refrescar automáticamente cada 5 segundos
html += "</head><body>";
// temperatura
html += "<h2>Datos del Sensor</h2>";
html += "<div class='sensor'>";
html += "<h3>Temperatura</h3>";
html += "<p>" + String(dat[2]) + " °C</p>";
html += "</div>";
// humedad
html += "<div class='sensor'>";
html += "<h3>Humedad</h3>";
html += "<p>" + String(dat[0]) + " %</p>";
html += "</div>";
// mostrar valor de resistencia del fotorresistor
int lightValue = analogRead(LDR_PIN); // valor del fotorresistor
html += "<div class='sensor'>";
html += "<h3>Luminancia</h3>";
html += "<p>" + String(lightValue) + "</p>";
html += "</div>";
// botones de control de LED
html += "<h2>Control de LEDs</h2>";
html += "<button id='btn0' class='" + String(redLEDState ? "on" : "off") + "' onclick='toggleLed(0)'>LED Rojo</button>";
html += "<button id='btn1' class='" + String(yellowLEDState ? "on" : "off") + "' onclick='toggleLed(1)'>LED Amarillo</button>";
html += "<button id='btn2' class='" + String(greenLEDState ? "on" : "off") + "' onclick='toggleLed(2)'>LED Verde</button>";
html += "<button id='btn3' class='" + String(blueLEDState ? "on" : "off") + "' onclick='toggleLed(3)'>LED Azul</button>";
// JavaScript para controlar encendido/apagado de LED
html += "<script>";
html += "function toggleLed(led) {";
html += " var xhr = new XMLHttpRequest();";
html += " xhr.open('GET', '/toggle?led=' + led, true);";
html += " xhr.send();";
html += " var button = document.getElementById('btn' + led);";
html += " if (button.classList.contains('off')) {";
html += " button.classList.remove('off');";
html += " button.classList.add('on');";
html += " } else {";
html += " button.classList.remove('on');";
html += " button.classList.add('off');";
html += " }";
html += "}";
html += "</script>";
html += "</body></html>";
return html;
}
void setup()
{
// Inicializar puerto serial
Serial.begin(115200);
lcd.init(); // inicializar el lcd
lcd.backlight();
lcd.setCursor(0, 0);
lcd.print("IP:");
// Conexión WiFi
WiFi.begin(ssid, password);
while (WiFi.status() != WL_CONNECTED) {
lcd.setCursor(i, 1);
lcd.print(".");
delay(500);
i++;
if (i > 15) {
i = 0;
lcd.setCursor(0, 1);
lcd.print(" ");
}
}
lcd.setCursor(0, 1);
lcd.print(" ");
lcd.setCursor(0, 1);
lcd.print(WiFi.localIP());
// Configurar pines LED como salida
pinMode(redLED_PIN, OUTPUT);
pinMode(yellowLED_PIN, OUTPUT);
pinMode(greenLED_PIN, OUTPUT);
pinMode(blueLED_PIN, OUTPUT);
// Procesar solicitudes web
server.on("/", HTTP_GET, [](AsyncWebServerRequest* request) {
if (!xht.receive(dat)) {
Serial.println("sensor error");
}
String html = generateHTML();
request->send(200, "text/html", html);
});
// Controlar el estado de los LED
server.on("/toggle", HTTP_GET, [](AsyncWebServerRequest* request) {
String led = request->getParam("led")->value();
int ledNum = led.toInt();
if (ledNum == 0) {
redLEDState = !redLEDState;
digitalWrite(redLED_PIN, redLEDState ? HIGH : LOW); // LED 1
} else if (ledNum == 1) {
yellowLEDState = !yellowLEDState;
digitalWrite(yellowLED_PIN, yellowLEDState ? HIGH : LOW); // LED 2
} else if (ledNum == 2) {
greenLEDState = !greenLEDState;
digitalWrite(greenLED_PIN, greenLEDState ? HIGH : LOW); // LED 3
} else if (ledNum == 3) {
blueLEDState = !blueLEDState;
digitalWrite(blueLED_PIN, blueLEDState ? HIGH : LOW); // LED 4
}
request->redirect("/"); // Volver a la página principal
});
// Iniciar el servidor web
server.begin();
}
void loop()
{
// Leer los valores de temperatura y humedad y actualizar la página web
if (!xht.receive(dat))
{
Serial.println("sensor error");
}
delay(2000); // Refrescar la página cada 2 segundos
}
4. Resultado de la Prueba
Después de subir el código, el LCD1602 muestra la dirección IP. Abre el navegador, ingresa la dirección IP y verás la página de control.
En este momento, puedes usar el dispositivo de control para leer los valores captados por el sensor, y también puedes controlar el encendido y apagado de los LED.
