Proyecto 27 Estacionamiento Inteligente
1. Descripción
Este sistema de estacionamiento inteligente detecta y optimiza la posición de estacionamiento mediante un sensor ultrasónico. Con este sistema, se evita en gran medida el estacionamiento incorrecto.
Primero, debe instalar el sensor alrededor del estacionamiento. Luego, detectará la distancia entre el coche y sus bordes y enviará la información a la placa de desarrollo para controlar el coche y ajustarlo automáticamente a la posición óptima de estacionamiento.
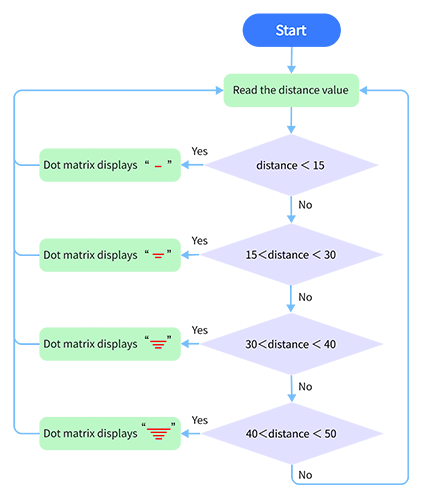
2. Diagrama de Flujo
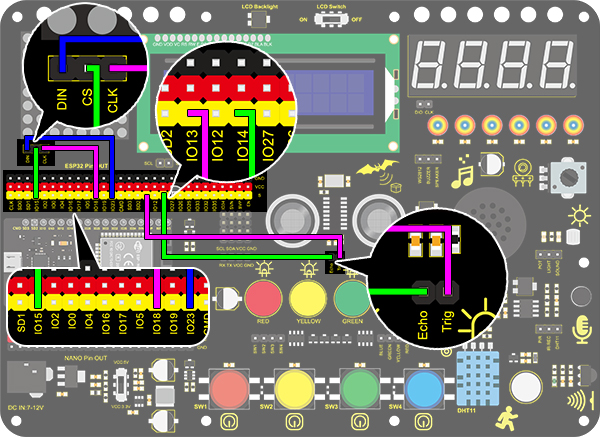
3. Diagrama de Conexiones
4. Código de Prueba
/*
  keyestudio ESP32 Inventor Learning Kit
  Project 27 Intelligent Parking
  http://www.keyestudio.com
*/
#include <LedControl.h>

int DIN = 23;  //Define DIN pin to IO23
int CS = 15;   //Define CS pin to IO15
int CLK = 18;  //Define CLK pin to IO18

int temp = 0;

int distance = 0;  //Define a variable to receive the distance
int EchoPin = 14;  //Connect Echo pin to IO14
int TrigPin = 13;  //Connect Trig pin to IO13

float checkdistance() {  //Acquire distance
  // preserve a short low level to ensure a clear high pulse:
  digitalWrite(TrigPin, LOW);
  delayMicroseconds(2);
  // Trigger the sensor by a high pulse of 10um or longer
  digitalWrite(TrigPin, HIGH);
  delayMicroseconds(10);
  digitalWrite(TrigPin, LOW);
  // Read the signal from the sensor: a high level pulse
  //Duration is detected from the point sending "ping" command to the time receiving echo signal (unit: um).
  float distance = pulseIn(EchoPin, HIGH) / 58.00;  //Convert into distance
  delay(10);
  return distance;
}

LedControl lc = LedControl(DIN, CLK, CS, 4);
byte data_val[4][8] =
{
  { 0x00, 0x00, 0x00, 0x01, 0x01, 0x00, 0x00, 0x00 },
  { 0x00, 0x00, 0x04, 0x05, 0x05, 0x04, 0x00, 0x00 },
  { 0x00, 0x10, 0x14, 0x15, 0x15, 0x14, 0x10, 0x00 },
  { 0x40, 0x50, 0x54, 0x55, 0x55, 0x54, 0x50, 0x40 },
};


void setup()
{
  lc.shutdown(0, false);  //MAX72XX is in power-saving mode at startup
  lc.setIntensity(0, 8);  //Set the brightness to its maximum value
  lc.clearDisplay(0);     //Clear display

  pinMode(TrigPin, OUTPUT);  //Set Trig pin to output
  pinMode(EchoPin, INPUT);   //Set Echo pin to input
  Serial.begin(9600);
}

void loop()
{
  distance = checkdistance();
  Serial.println(distance);
  if (distance < 15)
  {
    temp = 0;
  }
  else if (distance < 30 && distance > 15)
  {
    temp = 1;
  }
  else if (distance < 40 && distance > 30)
  {
    temp = 2;
  }
  else if (distance > 50)
  {
    temp = 3;
  }
  for (int i = 0; i < 8; i++)
  {
    lc.setRow(0, i, data_val[temp][i]);
  }
}
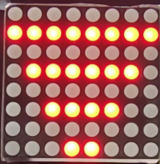
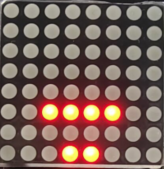
5. Resultado de la Prueba
Después de conectar el cableado y subir el código, se mostrarán líneas en la matriz de puntos. Si la distancia detectada es menor a 50 cm, habrá menos líneas.