Project 10 Make a clock
1.Introduction
Time is of essence in our life. We have all sort of stuff that tells time. In this lesson, we will make a device of our own using the DS3231 clock module. Combine with a buzzer, you can make an alarm or just a time telling device when combined with an LCD.
2.Hardware required
EASY plug controller Board x1
USB cable x1
EASY plug cable x1
EASY plug DS3231 Clock Module x1
Below is a brief introduction of this module.
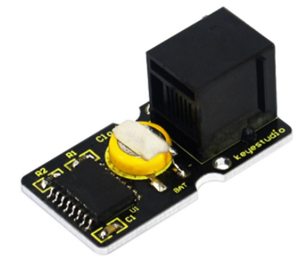
The DS3231 is a low-cost, extremely accurate I2C real-time clock (RTC) with an integrated temperature-compensated crystal oscillator (TCXO) and crystal. The device incorporates a battery input, and maintains accurate timekeeping when main power to the device is interrupted. The integration of the crystal resonator enhances the long-term accuracy of the device as well as reduces the piece-part count in a manufacturing line. The DS3231 is available in commercial and industrial temperature ranges, and is offered in a 16-pin, 300-mil SO package. Below are its specifications:
Temperature range: -40 to +85;
Timing accuracy : ± 5ppm (±0.432 seconds / day)
Device package and function compatible with DS3231
Two calendar clock
Output: 1Hz and 32.768kHz
Reset output and Input Debounce of Pushbutton
High speed (400kHz), I2C serial bus
Supply voltage: +3.3V to +5.5V
Digital temperature sensor with a precision of±3℃
Working temperature: -40 ~ ℃ to +85 ~ ℃
16 pins Small Outline Package (300mil)
Certified by American Association of Underwriters Laboratories (UL)
Size: 38*20mm
Weight: 4g
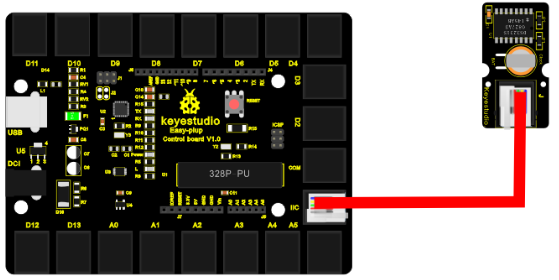
3.Connection Diagram
Now, connect the DS3231 module to the IIC port of the controller board using the EASY plug cable.
4.Sample Code
Connect the board to your PC using the USB cable; copy below code into Arduino IDE, and click upload to upload it to your board.
#include <Wire.h>   // place file “Wire.h” under the directory “libraries” of Arduino
#include "DS3231.h"  // place file “DS3231.h” under the directory “libraries” of Arduino
DS3231 RTC; //Create the DS3231 object
char weekDay[][4] = {"Sun", "Mon", "Tue", "Wed", "Thu", "Fri", "Sat" };
//year, month, date, hour, min, sec and week-day(starts from 0 and goes to 6)
//writing any non-existent time-data may interfere with normal operation of the RTC.
//Take care of week-day also.
DateTime dt(2015, 12, 16, 10,25, 33, 3);//open the series port and you can check time here or make a change to the time as needed.

void setup ()
{   Serial.begin(57600);//set baud rate to 57600
    Wire.begin();
    RTC.begin();
    RTC.adjust(dt); //Adjust date-time as defined 'dt' above
}

void loop ()
{   DateTime now = RTC.now(); //get the current date-time
    Serial.print(now.year(), DEC);
    Serial.print('/');
    Serial.print(now.month(), DEC);
    Serial.print('/');
    Serial.print(now.date(), DEC);
    Serial.print(' ');
    Serial.print(now.hour(), DEC);
    Serial.print(':');
    Serial.print(now.minute(), DEC);
    Serial.print(':');
    Serial.print(now.second(), DEC);
    Serial.println();
    Serial.print(weekDay[now.dayOfWeek()]);
    Serial.println();
    delay(1000);
}
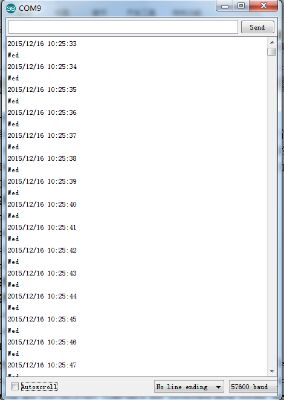
5.Result
Now, open serial monitor, set baud rate to 57600, it will display the date we set in the program. You can change the code for it to display different dates; the module will then begin time counting, as below picture shows.