Project 12 Bluetooth so easy
1.Introduction
Wireless communication is very common in our everyday life. In this lesson, we will use a Bluetooth module and the LCD module to help you better understand how this technology works.
2.Hardware required
EASY plug controller Board x1
USB cable x1
EASY plug cable x2
EASY plug 1602 I2C Module x1
EASY plug Bluetooth Module x1
First, let’s take a look at this EASY plug Bluetooth Module.
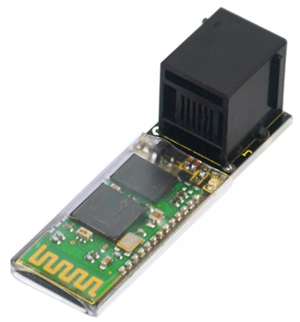
This Bluetooth module can easily achieve serial wireless data transmission. Its operating frequency is among the most popular 2.4GHz ISM frequency band (i.e. Industrial, scientific and medical). It adopts Bluetooth 2.1+EDR standard. In Bluetooth 2.1, signal transmit time of different devices stands at a 0.5 seconds interval so that the workload of bluetooth chip can be reduced substantially and more sleeping time can be saved for bluetooth. Below are its specifications:
Bluetooth protocol: Bluetooth 2.1+ EDR standard
USB protocol: USB v1.1/2.0
Operating frequency: 2.4GHz ISM frequency band
Modulation mode: Gauss frequency Shift Keying
Transmit power: ≤ 4dBm, second stage
Sensitivity: ≤-84dBm at 0.1% Bit Error Rate
Transmission speed: 2.1Mbps(Max)/160 kbps(Asynchronous); 1Mbps/1Mbps(Synchronous)
Safety feature: Authentication and encryption
Supported configuration: Bluetooth serial port (major and minor)
Supply Voltage: +3.3 VDC 50mA
Operating temperature: -20 to 55℃
Size: 49*15.4mm
Weight: 4g
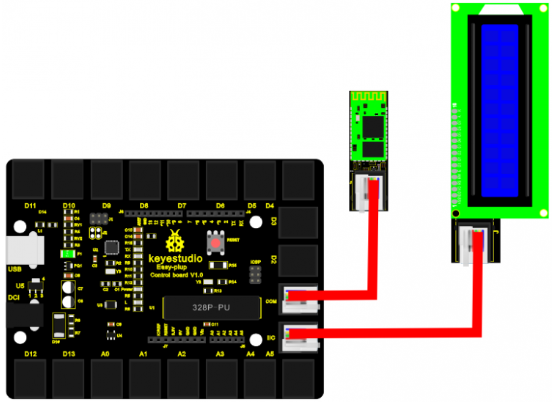
3.Connection Diagram
Now, connect the Bluetooth module to the COM port of the controller board, and LCD module to IIC port using the EASY plug cables.
4.Sample Code
Connect the board to your PC using the USB cable; copy below code into Arduino IDE, and click upload to upload it to your board.
#include <Wire.h>  // place file “Wire.h” under the “library” directory of Arduino
#include <LiquidCrystal_I2C.h>  // place file “LiquidCrystal_I2C.h” under the “library” directory of Arduino
#define ledpin 13
LiquidCrystal_I2C lcd(0x27,16,2);  // set the LCD address to 0x27 for a 16 chars and 2 line display

void setup()
{
  Serial.begin(9600);
  pinMode(ledpin,OUTPUT);
  lcd.init();                      // initialize the lcd
  lcd.init();
  // Print a message to the LCD.
  lcd.backlight();
}

void loop()
{
    int val=Serial.read();
    if(val=='a')
    {
      lcd.setCursor(3,0);
      lcd.print("welcome to");
      lcd.setCursor(3,1);
      lcd.print("keyes");
      delay(1000);
      digitalWrite(ledpin,HIGH);
      delay(200);
      digitalWrite(ledpin,LOW);
      delay(200);
    }
    else
       lcd.clear();
}
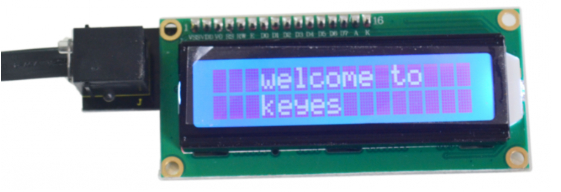
5.Result
In this experiment, you need to download an App called “BTClient” to your phone. After power is on, the LED on the Bluetooth module begins to blink; open Bluetooth on your phone, pair up the device, enter PIN number “1234”; device is paired. Now, open BTClient, search and pair up the device. The LED on the Bluetooth module stops blinking and becomes stable. Enter “a” on BTClient page, you can see the LCD displays “welcome to keyes” for 1 second. When you input “a” again, the LCD will display the information again.