Project 7 Is there something upfront
1.Introduction
If you are interested in smart cars, you might be intrigued in how they avoid obstacles. It’s not like the smart cars have eyes, right? In this lesson, we will learn how to use a infrared obstacle avoidance sensor. This sensor is widely applied in obstacle avoidance, fall prevention of smart cars, product counting etc. After this lesson, you will know how obstacle avoidance function of smart cars can be achieved.
2.Hardware required
EASY plug controller Board x1
USB cable x1
EASY plug cable x2
EASY plug Piranha LED Module x1
EASY plug Infrared obstacle avoidance sensor x1
Below is a brief introduction of this infrared obstacle avoidance sensor.
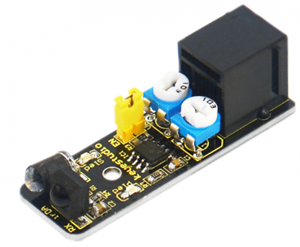
Infrared obstacle avoidance sensor is equipped with distance adjustment function and is especially designed for wheeled robots. This sensor has strong adaptability to ambient light and is of high precision. It has a pair of infrared transmitting and receiving tube. When infrared ray launched by the transmitting tube encounters an obstacle (its reflector), the infrared ray is reflected to the receiving tube, and the indicator will light up. A robot mounted with the sensor can sense changes in the environment. Below are its specifications:
Working voltage: DC 3.3V-5V
Working current: ≥20mA
Working temperature: -10℃—+50℃
Detection distance: 2-1000px
IO Interface: 4 wire interface (-/+/S/EN)
Output signal: TTL voltage
Accommodation mode: Multi-circle resistance regulation
Effective Angle: 35°
Size: 51*16.5mm
Weight: 5g
3.Connection Diagram
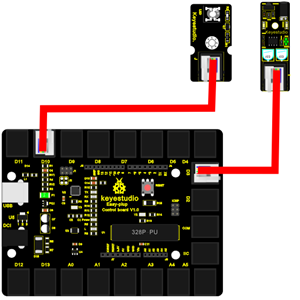
Now, connect the LED module to the D10 port of the controller board and obstacle avoidance sensor to D3 port using the EASY plug cables.
4.Sample Code
Connect the board to your PC using the USB cable; copy below code into Arduino IDE, and click upload to upload it to your board.
const int sensorPin = 3;     // the number of the sensor pin
const int ledPin =  10;      // the number of the LED pin
int sensorState = 0;         // variable for reading the sensor status

void setup()
{
  pinMode(ledPin, OUTPUT);
  pinMode(sensorPin, INPUT);
}

void loop()
{
  // read the state of the sensor value:
  sensorState = digitalRead(sensorPin);
  // if it is, the sensorState is HIGH:
  if (sensorState == HIGH)
  {
     digitalWrite(ledPin, HIGH);
  }
  else
  {
       digitalWrite(ledPin, LOW);
  }
}
5.Result
When power is on, use a screw driver to adjust the two knobs on the module. P LED is always on and S LED is out. At this time, the piranha LED is on. Now, put your hand in front of the sensor, you can see the S LED front of the sensor turns on and the piranha LED is out. If you open the serial monitor, you can see when it detects an object, the output is “0”; no object, output is “1”. These different outputs can be used as a switch signal to control smart car actions and that’s how smart cars realize obstacle avoidance function.