Project 19 What’s the temperature
1.Introduction
In this lesson, we will combine DS18B20 Temperature Sensor and 1602 I2C Module to make a temperature measuring device. You can also apply the experiment principle to make a temperature alarm.
2.Hardware required
EASY plug controller Board x1
USB cable x1
EASY plug cable x2
EASY plug 1602 I2C Module x1
EASY plug DS18B20 Temperature Sensor x1
Before we get to the test, let’s take a look at this DS18B20 Temperature Sensor.
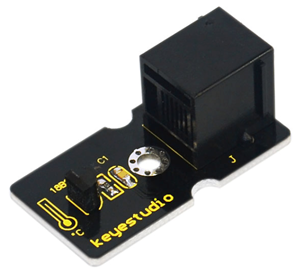
This DS18B20 Temperature Sensor Module is not like traditional analog temperature sensors that need additional A/D and D/A conversion chip, placing a challenge on limited port resources of Arduino, this newly developped DS18B20 Temperature Sensor can be easily connected to an Arduino digital input. The sensor communicates over a one-wire bus and requires little in the way of additional components so users can easily create a sensor network. Below are its specifications:
Supply Voltage: 3.3V to 5V
Temperature range: -55 °C ~ +125 °C
Interface: Digital
Size: 40*20mm
Weight: 3g
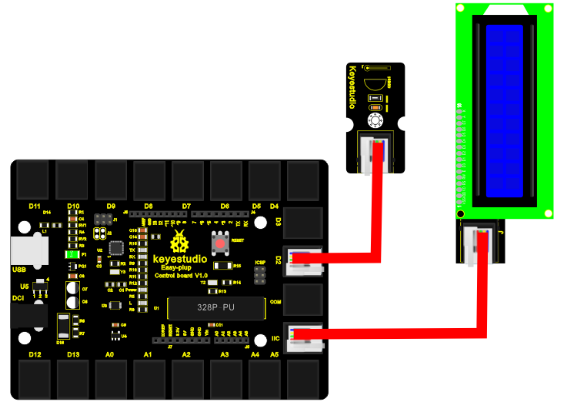
3.Connection Diagram
Now, connect the DS18B20 module to the D2 port of the controller board, and LCD module to IIC using the EASY plug cables.
4.Sample Code
Connect the board to your PC using the USB cable; copy below code into Arduino IDE, and click upload to upload it to your board.
#include <OneWire.h>   // Place file “OneWire.h” under the directory “library” of Arduino
#include <Wire.h>    // Place file “OneWire.h” under the directory “library” of Arduino
#include <LiquidCrystal_I2C.h>   // Place file “LiquidCrystal_I2C.h” under the directory library of Arduino
 int DS18S20_Pin = 2; //DS18S20 Signal pin on digital 2
 //Temperature chip i/o
OneWire ds(DS18S20_Pin);  // on digital pin 2
LiquidCrystal_I2C lcd(0x27,16,2);  // set the LCD address to 0x27 for a 16 chars and 2 line display
 void setup(void) {
  Serial.begin(9600);
  lcd.init();                      // initialize the lcd
  lcd.init();
  // Print a message to the LCD.
  lcd.backlight();
}
 void loop(void) {
  float temperature = getTemp();
{
  lcd.setCursor(1,0);
  lcd.print("temperature is");
  lcd.setCursor(3,1);
  lcd.print(temperature);
}
delay(2000);
}
float getTemp(){
  //returns the temperature from one DS18S20 in DEG Celsius
  byte data[12];
  byte addr[8];
  if ( !ds.search(addr)) {
      //no more sensors on chain, reset search
      ds.reset_search();
      return -1000;
  }
  if ( OneWire::crc8( addr, 7) != addr[7]) {
   {
   lcd.setCursor(3,0);
   lcd.print("CRC is ");
   lcd.setCursor(3,1);
   lcd.print(" not valid!");
   }
      return -1000;
  }
  if ( addr[0] != 0x10 && addr[0] != 0x28) {
  {
  lcd.setCursor(3,0);
  lcd.print("Device is ");
  lcd.setCursor(3,1);
  lcd.print("not recognized");
  }
      return -1000;
  }
  ds.reset();
  ds.select(addr);
  ds.write(0x44,1); // start conversion, with parasite power on at the end
  byte present = ds.reset();
  ds.select(addr);
  ds.write(0xBE); // Read Scratchpad
  for (int i = 0; i < 9; i++) { // we need 9 bytes
    data[i] = ds.read();
  }
  ds.reset_search();
  byte MSB = data[1];
  byte LSB = data[0];
  float tempRead = ((MSB << 8) | LSB); //using two's compliment
  float TemperatureSum = tempRead / 16;
  return TemperatureSum;
}
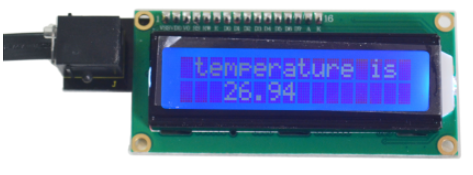
5.Result
After power is on, LCD first line displays “temperature is”, second line displays the current temperature. Temperature is updated in 3 seconds interval.