Project 4 Running light
1.Introduction
Walking down a business street a night, you must be amazed by all the beautiful lights around you. In this lesson, we will make one of our own and learn how those beautiful lights are achieved.
2.Hardware required
EASY plug controller Board x1
USB cable x1
EASY plug cable x1
EASY plug I2C 8x8 LED Matrix x1
Let’s first meet this EASY plug I2C 8x8 LED Matrix.
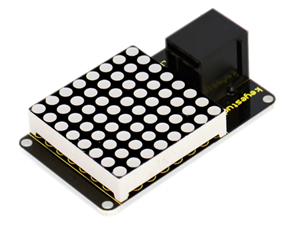
What’s better than a single LED? Lots of LEDs! A fun way to make a small display is to use an 8x8 matrix. This matrix uses a driver chip that does all the heavy lifting for you: They have a built in clock so they multiplex the display. They use constant-current drivers for ultra-bright, consistent color, 1/16 step display dimming, all via a simple I2C interface. Below are its specifications:
Supply voltage: 4.5V-5.5V
Maximum display: 16*8
Size: 53*32mm
Weight: 4g
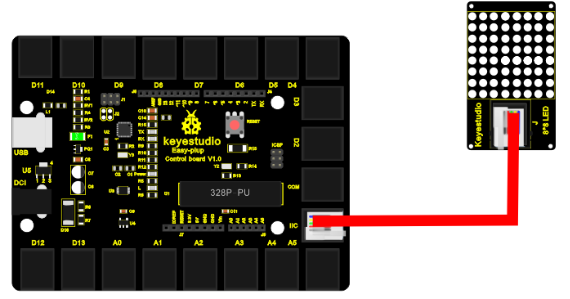
3.Connection Diagram
Now, connect the module to the IIC port of the controller board using the EASY plug cable.
4.Sample Code
Connect the board to your PC using the USB cable; copy below code into Arduino IDE, and click upload to upload it to your board.
#include <Wire.h>  // Place file “Wire.h” under the directory “library” of Arduino
#include "Adafruit_LEDBackpack.h" // Place file “Adafruit_LEDBackpack.h” under the directory “library” of Arduino
#include "Adafruit_GFX.h"  // Place file “Adafruit_GFX.h” under the directory “library” of Arduino
#define _BV(bit) (1<<(bit))
#endif
Adafruit_LEDBackpack matrix = Adafruit_LEDBackpack();
uint8_t counter = 0;

void setup()
{
  Serial.begin(9600);
  Serial.println("HT16K33 test");
  matrix.begin(0x70);  // pass in the address
}

void loop()
{
  // paint one LED per row. The HT16K33 internal memory looks like
  // a 8x16 bit matrix (8 rows, 16 columns)
  for (uint8_t i=0; i<8; i++)
  {
    // draw a diagonal row of pixels
    matrix.displaybuffer[i] = _BV((counter+i) % 16) | _BV((counter+i+8) % 16)  ;
  }
  // write the changes we just made to the display
  matrix.writeDisplay();
  delay(100);
  counter++;
  if (counter >= 16) counter = 0;
}
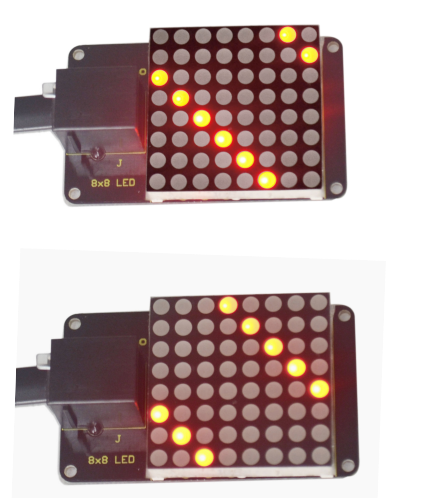
5.Result
After all the above are done (circuit connection, program uploading), press the “reset” button on the main board. The LED matrix begins to display a beautiful light pattern, as pictures show below.