Project 15 How’s the air quality
1.Introduction
We always say man cannot live without water and air. So we know how important air is to us. In this lesson, we will introduce you an air quality sensor for you to detect the quality of the air. The experiment principle can be directly applied to factories in detecting harmful gases.
2.Hardware required
EASY plug controller Board x1
USB cable x1
EASY plug cable x2
Lighter x1 (not included)
EASY plug Piranha LED Module x1
EASY plug MQ135 Air Quality Sensor x1
In this lesson, one critical component is MQ135 Air Quality Sensor. Below is its brief introduction.

MQ135 adopts SnO2 as its gas sensitive material because SnO2 has low electrical conductivity in the clean air. So when surrounded by polluted air, the electrical conductivity of MQ135 will increase with the increase of pollutants, and the change in electrical conductivity can be converted to corresponding output signal. MQ135 has a high sensitivity to Ammonia, sulfide, benzene vapor, smoke and other harmful gases. It can detect various harmful gases, making it a cost-effective choice suitable for multiple applications. Below are its specifications:
Product model: MQ135
Product type: Semiconductor gas sensor
Target gas: Ammonia; methylbenzene; hydrogen
Standard circuit: Loop voltage Vc ≤24V DC
Heater voltage: VH 5.0V±0.2V AC or DC
Load resistance: Adjustable RL
Size: 56*20mm
Weight: 6g
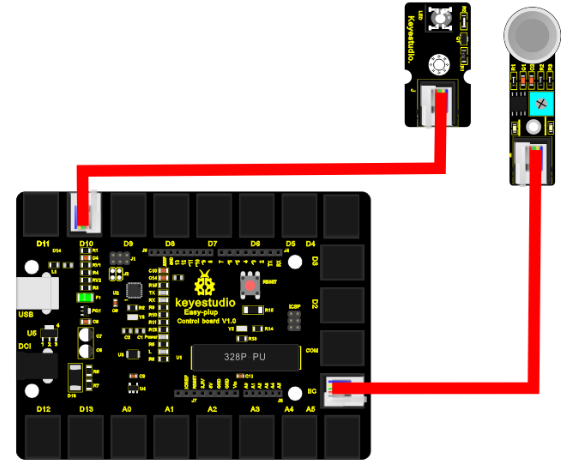
3.Connection Diagram
Now, connect the LED module to the D10 port of the controller board, and MQ-135 module to IIC port using the EASY plug cables.
4.Sample Code
Connect the board to your PC using the USB cable; copy below code into Arduino IDE, and click upload to upload it to your board.
int gas_din=18;
int gas_ain=A5;
int led=10;
int ad_value;

void setup()
{
  pinMode(led,OUTPUT);
  pinMode(gas_din,INPUT);
  pinMode(gas_ain,INPUT);
  Serial.begin(9600);
}
void loop()
{
  ad_value=analogRead(gas_ain);
  if(digitalRead(gas_din)==LOW)
  {
    digitalWrite(led,HIGH);
    Serial.println("Gas leakage");
    Serial.println(ad_value);
  }
  else
  {
    digitalWrite(led,LOW);
    Serial.println("Gas not leak");
  }
  delay(500);
}
5.Result
After all the above are done, you can see the power LED1 on the module is on, for LED2 on the module, you need to use a screw driver to adjust the knob for LED2 to be in a “off” state when it’s about to be turned on. Now, the piranha LED is off and open serial monitor, you can see it displays “Gas not leak”; then, turn on the lighter and turn off after a little while, place the lighter mouth into the sensor sensing area, you can see LED2 on the module and piranha LED are both on, and serial monitor displays “Gas leakage”.